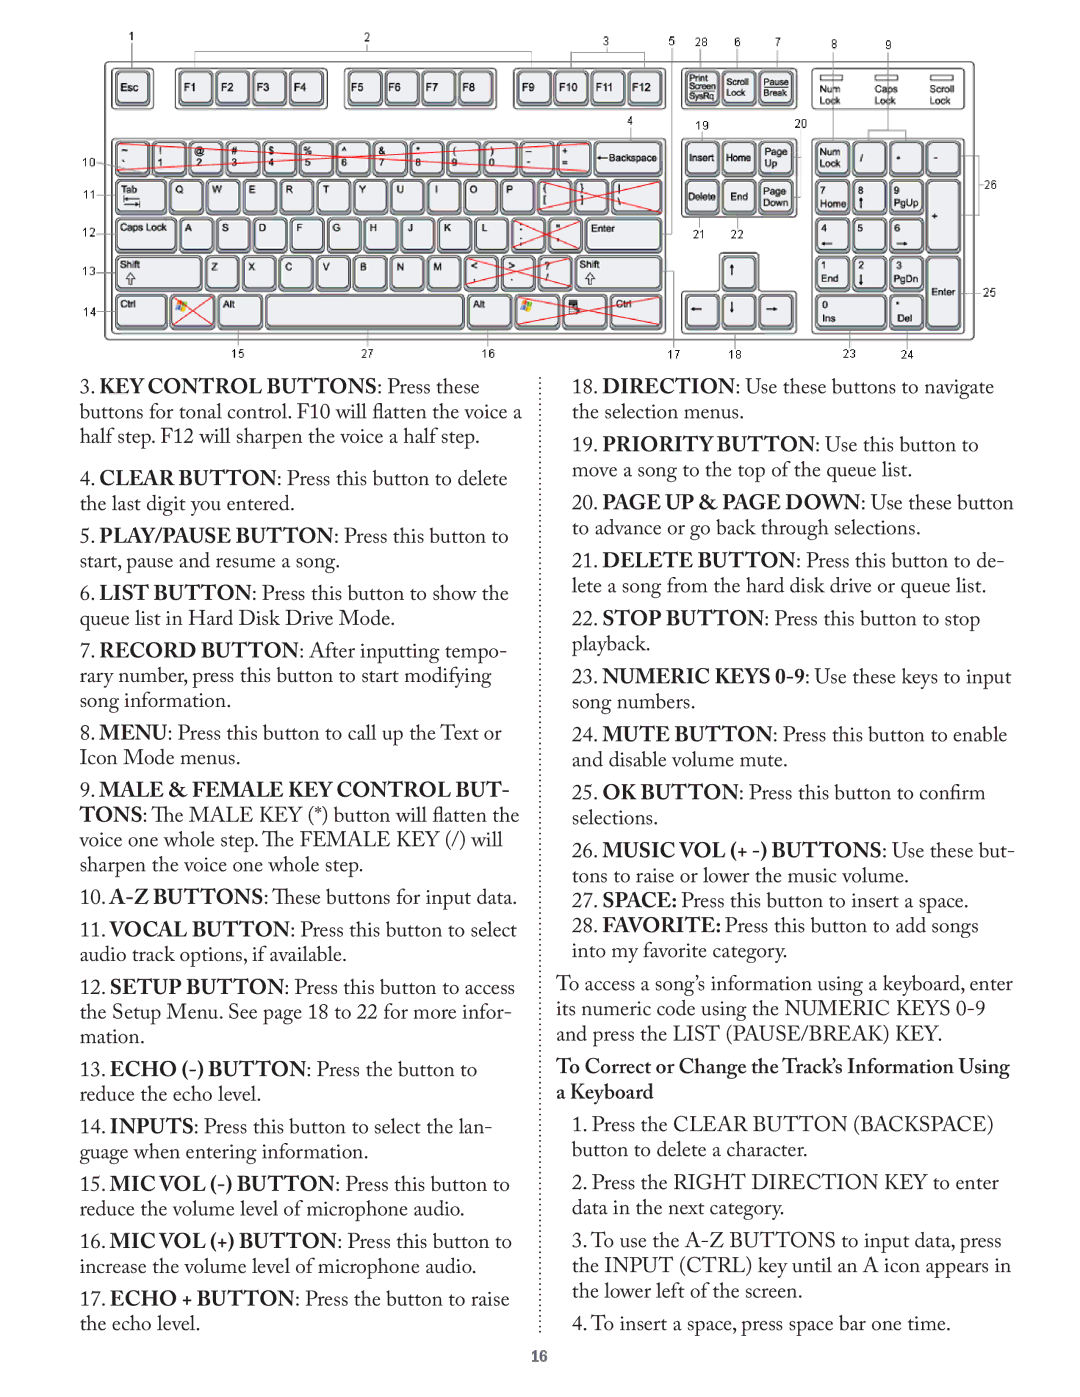
3.KEY CONTROL BUTTONS: Press these buttons for tonal control. F10 will flatten the voice a half step. F12 will sharpen the voice a half step.
4.CLEAR BUTTON: Press this button to delete the last digit you entered.
5.PLAY/PAUSE BUTTON: Press this button to start, pause and resume a song.
6.LIST BUTTON: Press this button to show the queue list in Hard Disk Drive Mode.
7.RECORD BUTTON: After inputting tempo- rary number, press this button to start modifying song information.
8.MENU: Press this button to call up the Text or Icon Mode menus.
9.MALE & FEMALE KEY CONTROL BUT-
TONS: The MALE KEY (*) button will flatten the voice one whole step. The FEMALE KEY (/) will sharpen the voice one whole step.
10.
11.VOCAL BUTTON: Press this button to select audio track options, if available.
12.SETUP BUTTON: Press this button to access the Setup Menu. See page 18 to 22 for more infor- mation.
13.ECHO
14.INPUTS: Press this button to select the lan- guage when entering information.
15.MIC VOL
16.MIC VOL (+) BUTTON: Press this button to increase the volume level of microphone audio.
17.ECHO + BUTTON: Press the button to raise the echo level.
18.DIRECTION: Use these buttons to navigate the selection menus.
19.PRIORITY BUTTON: Use this button to move a song to the top of the queue list.
20.PAGE UP & PAGE DOWN: Use these button to advance or go back through selections.
21.DELETE BUTTON: Press this button to de- lete a song from the hard disk drive or queue list.
22.STOP BUTTON: Press this button to stop playback.
23.NUMERIC KEYS
24.MUTE BUTTON: Press this button to enable and disable volume mute.
25.OK BUTTON: Press this button to confirm selections.
26.MUSIC VOL (+
27.SPACE: Press this button to insert a space.
28.FAVORITE: Press this button to add songs into my favorite category.
To access a song’s information using a keyboard, enter its numeric code using the NUMERIC KEYS
To Correct or Change the Track’s Information Using
aKeyboard
1.Press the CLEAR BUTTON (BACKSPACE) button to delete a character.
2.Press the RIGHT DIRECTION KEY to enter data in the next category.
3.To use the
4.To insert a space, press space bar one time.
16