4
Quick Setup Guide:
1.Install (2) “AA” batteries into the main unit first; then install (2) “AAA” batteries into the remote sensor. Before closing the remote sensor battery compartment, press the “TX” button on the remote sensor. The main unit will automatically begin to acquire the signal from the remote sensor. To select between Fahrenheit or Celsius temperature display on the remote sensor display, push the “C/F” button located above the battery compartment. At this point, you may close the case of the remote sensor.
2.After the remote sensor has registered on the main unit, the atomic clock feature will automatically begin to search for the time and date signal.
3.Once the atomic clock signal has registered, the “OK” icon will appear next to the tower icon on the main display (this may take up to 24 hrs).
4.Press the “ZONE” key to enter your existing time zone to set the correct hour. The time zone icon is located to the right of the tower icon on the main display.
P = PACIFIC STANDARD TIME M = MOUNTAIN STANDARD TIME
C = CENTRAL STANDARD TIME E = EASTERN STANDARD TIME
5.Use a pen to push the “C/F” button To select between Fahrenheit or Celsius temperature display on the main unit. The “C/F” button is located on the lower right corner on the back of the main unit.
NOTE: The main unit will reject any manual settings when it is automatically searching for the temperature and time settings.
About The Wireless Thermometer
Min/Max Temperature Memory:
Press the “MIN/MAX” button to view the maximum values for 5 seconds, press again to view minimum memory values. This unit has a time stamp memory. When the “MIN/MAX” button is pressed, the time that the minimum and maximum temperatures were recorded within a 24-hour time period will display. The memory automatically clears every night at midnight.
Temperature Trend Indicator: 


The 3 arrow icons will indicate Rising, Steady, or Falling if the temperature change is more than 1 degree an hour. A snowflake icon will appear on the main display if the temperature reaches 32ºF / 0ºC or below. The Trend icons will appear to the right of the remote sensor temperature readout on the main display.
Battery Replacement: 
A low battery icon will appear when the main unit or the sensor needs new batteries. For the main unit, the icon will appear next to the indoor temperature readout on the main display. For the remote sensor unit, the icon will appear next to the remote temperature readout on the main display.
NOTE: When replacing batteries in the main unit, the batteries in all remote sensors must be removed and re-installed according to the initial set-up process. When replacing the batteries in the remote sensor only, the channel on the main unit must be cleared. This can be achieved by selecting the appropriate channel and pressing the “CHANNEL” button for 3-5 seconds.
Place new batteries in the remote sensor and then follow the quick setup guide above.
TROUBLESHOOTING:
The main unit may display “---” if the signal is being interrupted by outside interference. In most cases, the unit will re-sync with the remote sensor on it’s own. It may also help to bring the remote sensor closer to the main unit to re-sync the main unit and the remote sensor. However, should this condition continue to occur, be sure to check the following:
A. The batteries may be low, replace and repeat setup procedure.
B. The sensor may be placed outside of the effective transmission range (100 feet). C. The sensor may have outside interference that is preventing transmission.
(metal surfaces, other electronic devices, etc.). The sensor may need to be moved to another location if interference continues.
2
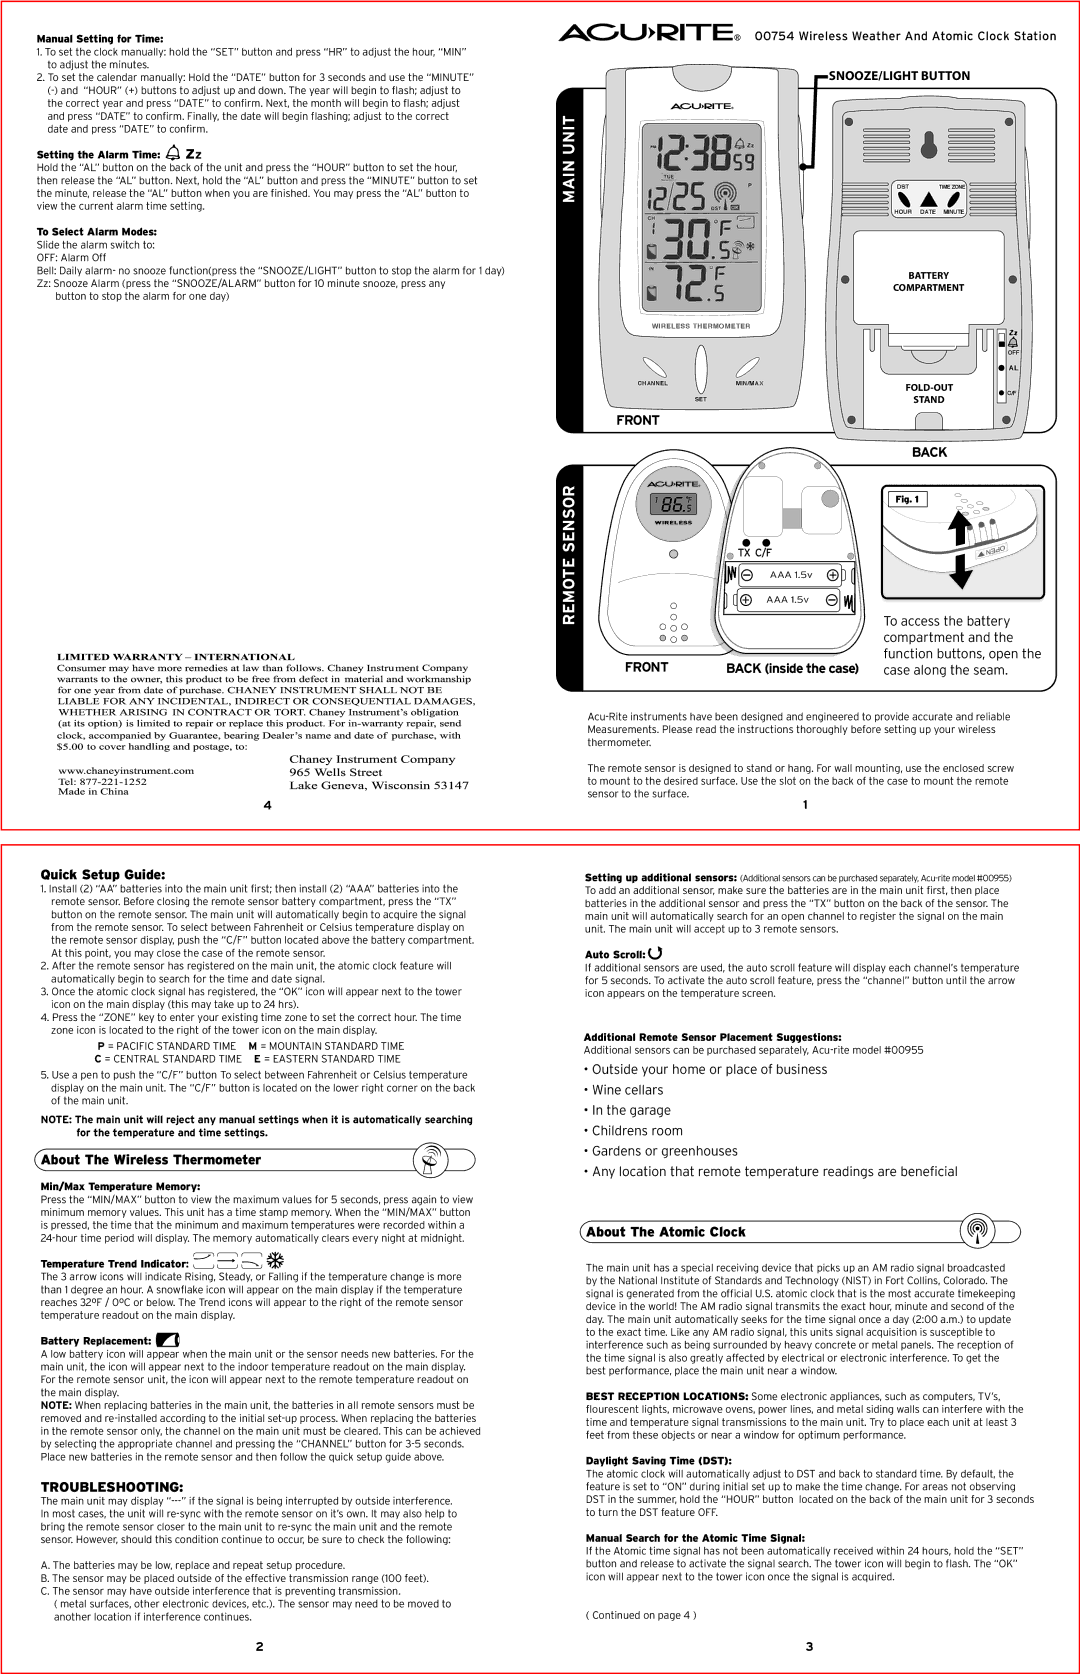
Acu-Rite instruments have been designed and engineered to provide accurate and reliable Measurements. Please read the instructions thoroughly before setting up your wireless thermometer.
The remote sensor is designed to stand or hang. For wall mounting, use the enclosed screw to mount to the desired surface. Use the slot on the back of the case to mount the remote sensor to the surface.
1
Setting up additional sensors: (Additional sensors can be purchased separately, Acu-rite model #00955) To add an additional sensor, make sure the batteries are in the main unit first, then place batteries in the additional sensor and press the “TX” button on the back of the sensor. The main unit will automatically search for an open channel to register the signal on the main unit. The main unit will accept up to 3 remote sensors.
Auto Scroll: 
If additional sensors are used, the auto scroll feature will display each channel’s temperature for 5 seconds. To activate the auto scroll feature, press the “channel” button until the arrow icon appears on the temperature screen.
Additional Remote Sensor Placement Suggestions:
Additional sensors can be purchased separately, Acu-rite model #00955
•Outside your home or place of business
•Wine cellars
•In the garage
•Childrens room
•Gardens or greenhouses
•Any location that remote temperature readings are beneficial
About The Atomic Clock
The main unit has a special receiving device that picks up an AM radio signal broadcasted by the National Institute of Standards and Technology (NIST) in Fort Collins, Colorado. The signal is generated from the official U.S. atomic clock that is the most accurate timekeeping device in the world! The AM radio signal transmits the exact hour, minute and second of the day. The main unit automatically seeks for the time signal once a day (2:00 a.m.) to update to the exact time. Like any AM radio signal, this units signal acquisition is susceptible to interference such as being surrounded by heavy concrete or metal panels. The reception of the time signal is also greatly affected by electrical or electronic interference. To get the best performance, place the main unit near a window.
BEST RECEPTION LOCATIONS: Some electronic appliances, such as computers, TV’s, flourescent lights, microwave ovens, power lines, and metal siding walls can interfere with the time and temperature signal transmissions to the main unit. Try to place each unit at least 3 feet from these objects or near a window for optimum performance.
Daylight Saving Time (DST):
The atomic clock will automatically adjust to DST and back to standard time. By default, the feature is set to “ON” during initial set up to make the time change. For areas not observing DST in the summer, hold the “HOUR” button located on the back of the main unit for 3 seconds to turn the DST feature OFF.
Manual Search for the Atomic Time Signal:
If the Atomic time signal has not been automatically received within 24 hours, hold the “SET” button and release to activate the signal search. The tower icon will begin to flash. The “OK” icon will appear next to the tower icon once the signal is acquired.
( Continued on page 4 )
3