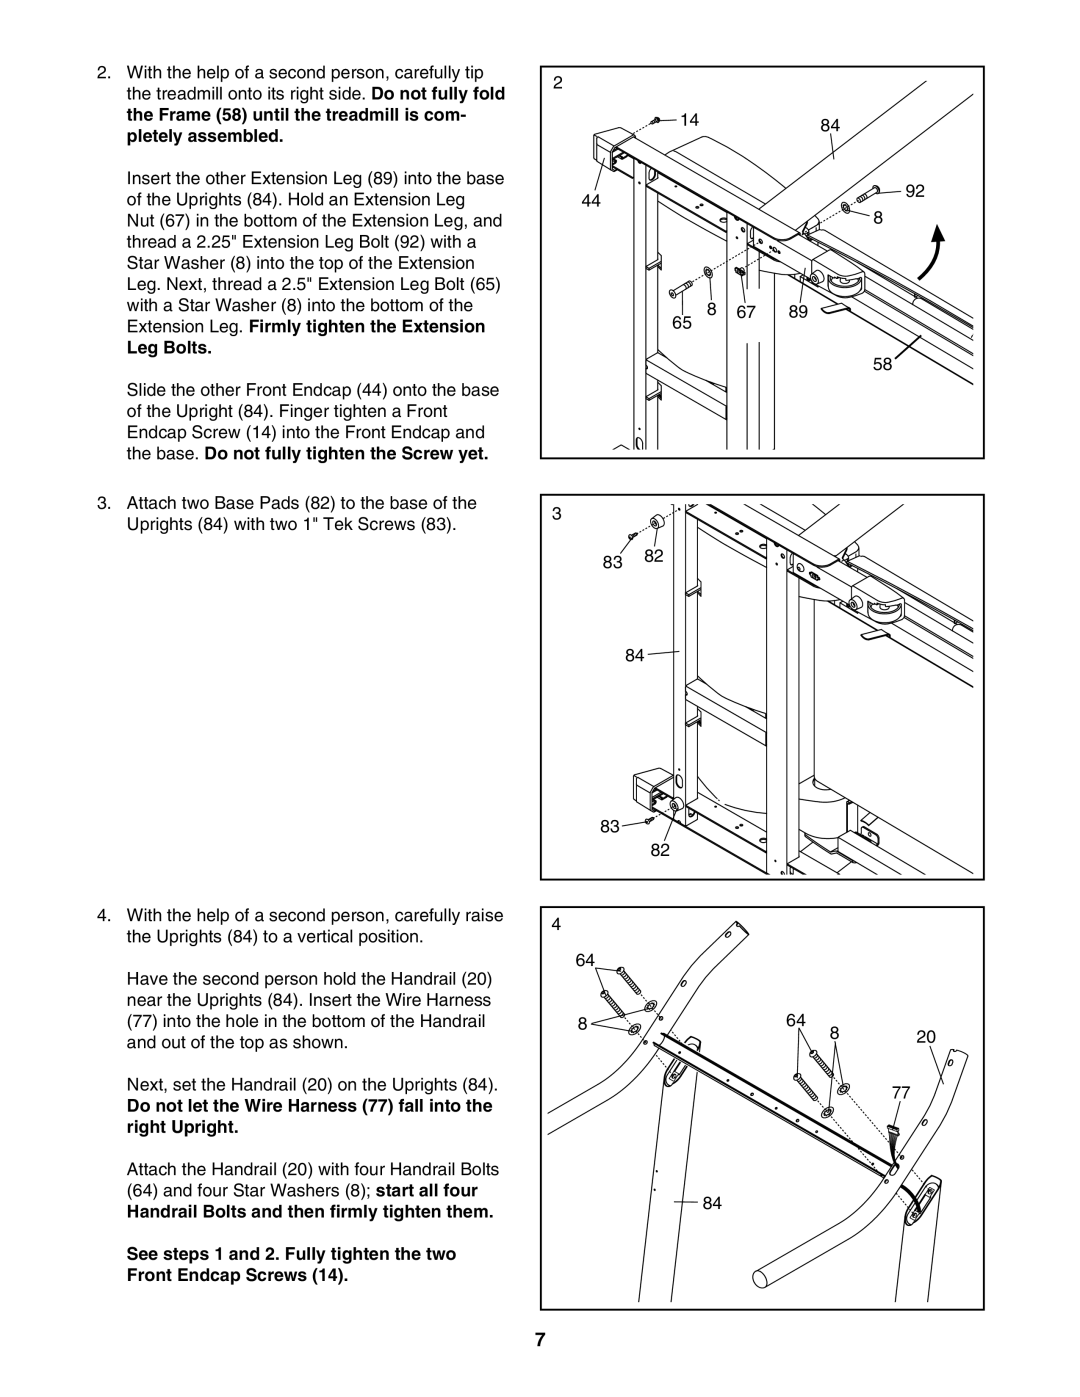
2. With the help of a second person, carefully tip | 2 |
|
|
|
|
the treadmill onto its right side. Do not fully fold |
|
|
|
| |
|
|
|
|
| |
the Frame (58) until the treadmill is com- |
| 14 |
| 84 |
|
pletely assembled. |
|
|
| ||
|
|
|
| ||
|
|
|
|
| |
Insert the other Extension Leg (89) into the base |
|
|
|
| 92 |
of the Uprights (84). Hold an Extension Leg | 44 |
|
|
| |
|
|
| 8 | ||
Nut (67) in the bottom of the Extension Leg, and |
|
|
|
| |
thread a 2.25" Extension Leg Bolt (92) with a |
|
|
|
|
|
Star Washer (8) into the top of the Extension |
|
|
|
|
|
Leg. Next, thread a 2.5" Extension Leg Bolt (65) |
|
|
|
|
|
with a Star Washer (8) into the bottom of the |
| 8 | 67 | 89 |
|
Extension Leg. Firmly tighten the Extension |
| 65 |
|
|
|
Leg Bolts. |
|
|
|
| 58 |
|
|
|
|
| |
Slide the other Front Endcap (44) onto the base |
|
|
|
|
|
of the Upright (84). Finger tighten a Front |
|
|
|
|
|
Endcap Screw (14) into the Front Endcap and |
|
|
|
|
|
the base. Do not fully tighten the Screw yet. |
|
|
|
|
|
3. Attach two Base Pads (82) to the base of the | 3 |
|
|
|
|
Uprights (84) with two 1" Tek Screws (83). |
|
|
|
| |
|
|
|
|
| |
| 83 | 82 |
|
|
|
|
|
|
|
| |
|
| 84 |
|
|
|
| 83 |
|
|
|
|
|
| 82 |
|
|
|
4. With the help of a second person, carefully raise | 4 |
|
|
|
|
the Uprights (84) to a vertical position. |
|
|
|
| |
|
|
|
|
| |
Have the second person hold the Handrail (20) | 64 |
|
|
|
|
|
|
|
|
| |
near the Uprights (84). Insert the Wire Harness |
|
|
| 64 |
|
(77) into the hole in the bottom of the Handrail | 8 |
|
| 20 | |
and out of the top as shown. |
|
|
| 8 | |
|
|
|
|
| |
Next, set the Handrail (20) on the Uprights (84). |
|
|
|
| 77 |
Do not let the Wire Harness (77) fall into the |
|
|
|
| |
|
|
|
|
| |
right Upright. |
|
|
|
|
|
Attach the Handrail (20) with four Handrail Bolts |
|
|
|
|
|
(64) and four Star Washers (8); start all four |
| 84 |
|
|
|
Handrail Bolts and then firmly tighten them. |
|
|
|
| |
|
|
|
|
| |
See steps 1 and 2. Fully tighten the two |
|
|
|
|
|
Front Endcap Screws (14). |
|
|
|
|
|
| 7 |
|
|
|
|
