Tap Master Owners Manual
for the drain saddle clamp. Place ¼” drill bit inside template hole, and drill a hole into the drainpipe. DO NOT drill the hole clean through both sides of the drainpipe. This will result in a leak, and require a replacement piece of drainpipe. Drill through one side only. Mount the drain saddle clamp on top of the template with the holes aligned. Fit drain saddle clamp back-plate and screws. Alternate tightening screws on each side of the drain saddle clamp to ensure an even, snug fit. See Fig. 10. Screw plastic female fitting onto the drain saddle male fitting until it is snug, and wrap excess tubing around the drainpipe.
5.Install water out line to RO sink spigot – Screw Speedfit® spigot adapter onto the bottom of the RO sink spigot located under the sink until it is snug. See Fig. 15. Over tightening may cause damage. Insert tubing labeled “to RO spigot” into Speedfit® spigot adapter. Push tubing all the way in, then pull back gently to check fit. Most push-pull fittings take about a ¼” of tubing inserted into them.
6.Install reserve tank and connect reserve line – Apply Teflon tape to the male fitting on top of the reserve tank. Screw on the reserve tank shut off valve until it is snug. (Fig. 11) Over tightening may cause damage. Insert line marked “to reserve tank” from the Tap Master™ RO into the reserve tank shut off valve. Push tubing all the way in, then pull back gently, to check fit. Most push-pull fittings take about a ½” of tubing inserted into them. Make sure reserve tank shut off valve is in the OFF position, where the blue handle will be perpendicular to the body. Shown in the ON position in Fig. 11.
7.Pressurize the Tap Master™ RO - For Tap Master UV & ULTRA first connect power adapter to UV filter so the filter glows blue at the bottom. Power supply should make noise when connected to wall outlet and not connected to UV filter, or if connected and the UV filter does not function.
Double check to make sure all valves are in the OFF position, except for the main angle- stop valve or piercing valve, which should be ON. Make sure unit is dry. Water should flow normally from your sink’s cold and hot faucets. Turn the easy adapter ball valve, or the shut off valve from the piercing valve to the ON position. You should hear water rushing through the system. Check for leaks at all fittings. Allow 5-15 minutes for system pressure to build. Turn valve on RO sink spigot to ON position by depressing and holding the lever down, or by flipping the lever up, where it should stay open. A steady trickle of water should be present after between 1-20 minutes. Some blackening of the water may present due to loose carbon being flushed out. Close the lever on the RO sink spigot, and open the reserve tank valve. Allow reserve tank to fill for 3.5 hours, and then drain completely. Repeat. System must be flushed prior to use. Plug in refrigerator electric plug; turn ON refrigerator line shut off valve so that the blue handle is parallel with the white body. Make sure refrigerator icemaker and water center are turned ON. Check for leaks. Check for pressure at the refrigerator’s water center if applicable. Dispose of the first two batches of ice after installing the Tap Master™ RO. Use caution when rolling refrigerator back into place. DO NOT crimp or crush water line, as a leak will likely develop. IMPORTANT –
After reserve tank has filled (3.5 hours), Drain entire reserve tank completely, until the flow from the RO sink spigot falls to a thin light stream. Repeat. Reserve
Page 8
Customer Service Hotline 1-800-453-4206
Tap Master Owners Manual
tank is full when the hissing noise stops. Discoloration of water may be present. System must be flushed twice prior to use. Allow another 3 hours for the reserve tank to refill. Enjoy!
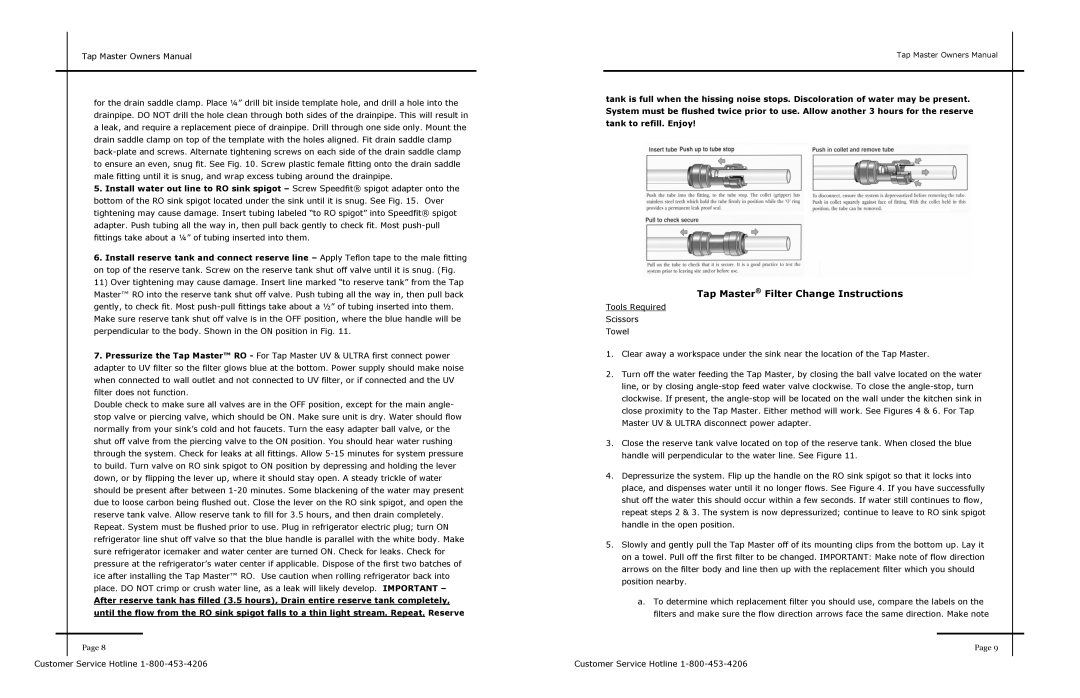
Tap Master® Filter Change Instructions
Tools Required
Scissors
Towel
1.Clear away a workspace under the sink near the location of the Tap Master.
2.Turn off the water feeding the Tap Master, by closing the ball valve located on the water line, or by closing angle-stop feed water valve clockwise. To close the angle-stop, turn clockwise. If present, the angle-stop will be located on the wall under the kitchen sink in close proximity to the Tap Master. Either method will work. See Figures 4 & 6. For Tap Master UV & ULTRA disconnect power adapter.
3.Close the reserve tank valve located on top of the reserve tank. When closed the blue handle will perpendicular to the water line. See Figure 11.
4.Depressurize the system. Flip up the handle on the RO sink spigot so that it locks into place, and dispenses water until it no longer flows. See Figure 4. If you have successfully shut off the water this should occur within a few seconds. If water still continues to flow, repeat steps 2 & 3. The system is now depressurized; continue to leave to RO sink spigot handle in the open position.
5.Slowly and gently pull the Tap Master off of its mounting clips from the bottom up. Lay it on a towel. Pull off the first filter to be changed. IMPORTANT: Make note of flow direction arrows on the filter body and line then up with the replacement filter which you should position nearby.
a.To determine which replacement filter you should use, compare the labels on the filters and make sure the flow direction arrows face the same direction. Make note
Page 9
Customer Service Hotline 1-800-453-4206