MOUNTING

The fixed base of the reel allows mounting in several different positions including base up, base down, or wall mounted. Here are general mounting requirements:

Main-shaft must be horizontal.

Centerline of the spool assembly must be on line with the cable run.

When mounted overhead in base up position, add a secondary chain, bracket or other safety device to prevent reel from falling in case the mounting bolts are removed or loosened from vibration.

INSTALLING CABLE

1.Select the proper cable size (#1/0 or #2/0 AWG) to fit the application. The cable should have fine stranding for flexibility and a jacket suitable for rough handling.

2.After removing the outer drum half (29) pass the end of the cable through the neoprene cable seal (30).

3.Adjust the neoprene cable seal (30) to fit the cable diameter by cutting away the smaller rings with a

sharp knife. The remaining hole size should be smaller then the cable diameter and must stretch when

inserting the cable.

4.Finish the end of the cable by either stripping and thinning or applying a suitable pin connector.

5.Insert the cable end or pin connector through the diameter hole provided in the terminal on the rotating portion of the slip ring assembly (27).

6.Lock the cable securely in place with the set screw and jam nut provided.

7.Clamp the cable to the inside of the inner drum half (33) using the two hole clamp (23), screws (25), and washers (24). Provide slack between the cable termination on the slip ring assembly (27), and

the

cable clamp (23) to allow free alignment.

8. Reinstall the outer drum half (29) and drum gasket (26) with the four screws.

WARNING: All steps related to termination of the cable must be followed carefully. Failure to properly

terminate the cable may result in property damage, personal injury, or death.

9.The cable can now be wound onto the cable drum.

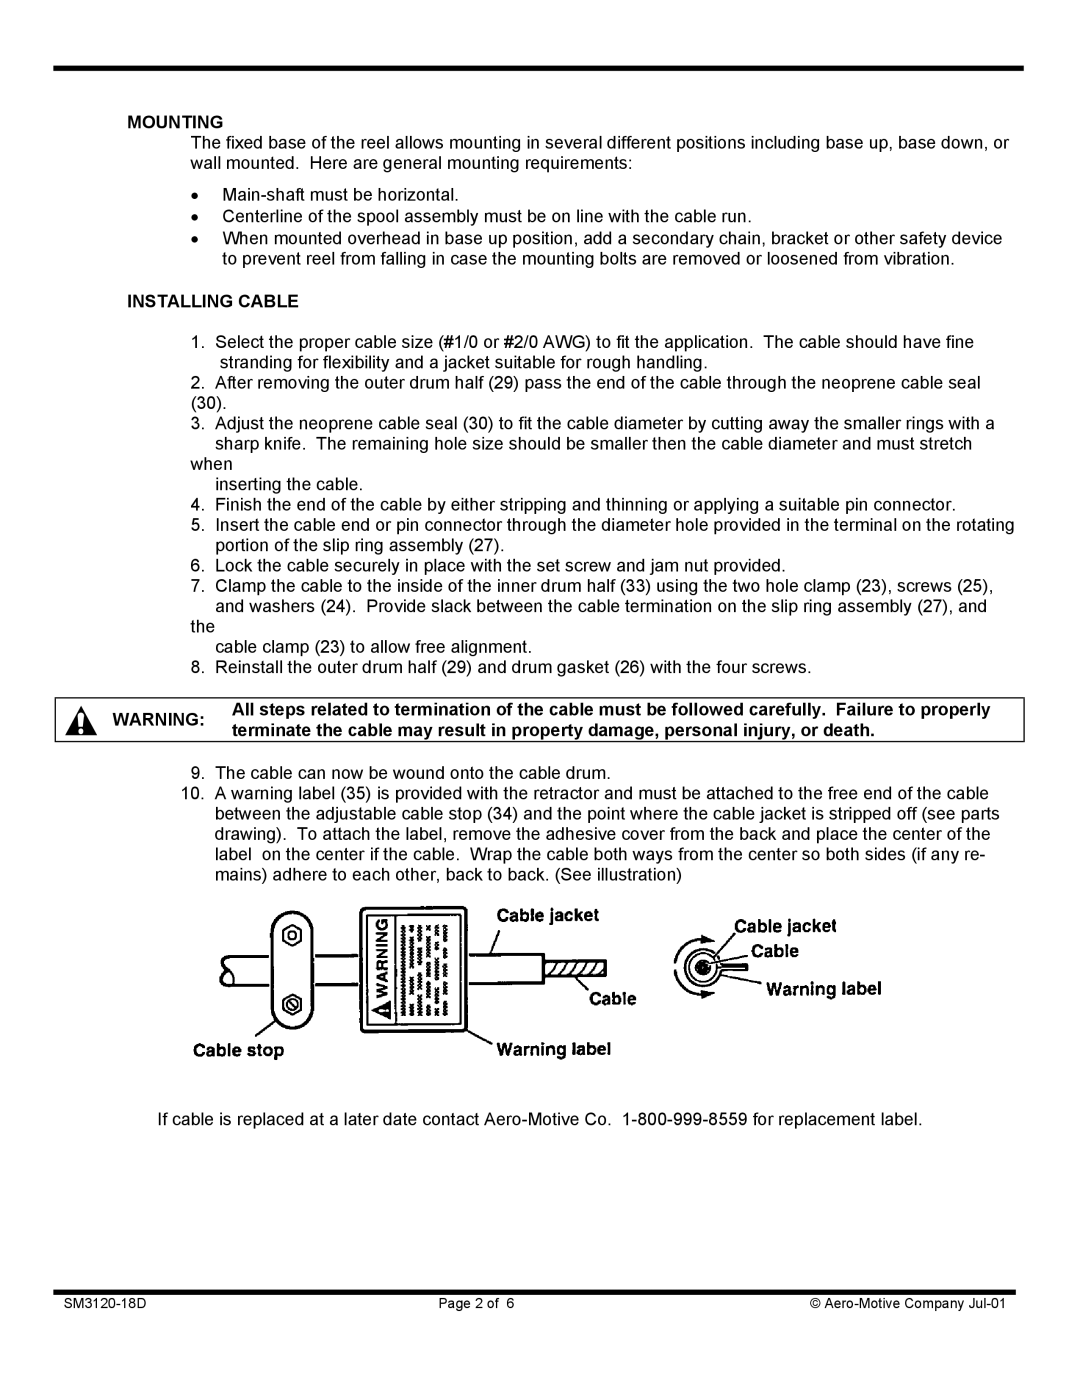
10.A warning label (35) is provided with the retractor and must be attached to the free end of the cable between the adjustable cable stop (34) and the point where the cable jacket is stripped off (see parts drawing). To attach the label, remove the adhesive cover from the back and place the center of the label on the center if the cable. Wrap the cable both ways from the center so both sides (if any re- mains) adhere to each other, back to back. (See illustration)

If cable is replaced at a later date contact Aero-Motive Co. 1-800-999-8559 for replacement label.

SM3120-18D

Page 2 of 6

© Aero-Motive Company Jul-01

Page 2
Image 2
Aero Housewares GR900 Series manual Mounting, Installing Cable

GR900 Series specifications

The Aero Housewares GR900 Series sets a new standard in kitchen appliance design and performance, catering to both amateur cooks and professional chefs alike. This innovative product line is engineered to offer advanced features and cutting-edge technologies that enhance the cooking process while ensuring optimal results.

One of the standout features of the GR900 Series is its state-of-the-art induction heating technology. This ensures that heat is generated directly within the cooking vessel, offering precise temperature control and reducing cooking times significantly. With this technology, users can enjoy faster boil times without sacrificing energy efficiency.

The GR900 Series includes a variety of cooking appliances, including multi-cookers, pressure cookers, and slow cookers, each designed with versatility in mind. The multi-cooker, for example, can perform a range of functions such as steaming, sautéing, slow cooking, and pressure cooking, making it an invaluable tool in the modern kitchen. The user-friendly interface, featuring an intuitive digital display and pre-set cooking programs, allows for hassle-free operation, encouraging culinary exploration.

Durability and safety are paramount in the GR900 Series design. Each appliance is constructed with high-quality materials that withstand the rigors of daily use while ensuring a long lifespan. The inclusion of safety features, such as automatic lid locking mechanisms and pressure release valves, creates a worry-free cooking environment.

Moreover, the GR900 Series boasts energy efficiency, which is increasingly important for eco-conscious consumers. The appliances are designed to reduce energy consumption without compromising on performance, allowing for eco-friendly cooking without added costs.

Ease of cleaning is another significant characteristic of the GR900 Series. Many components are dishwasher-safe or feature non-stick surfaces, which simplifies the post-cooking cleanup process. This practical design philosophy aligns with the modern lifestyle, where convenience is key.

In summary, the Aero Housewares GR900 Series offers a comprehensive suite of kitchen appliances that combine advanced technologies, essential safety features, and user-centric designs. This series not only boosts culinary creativity but also promotes a more efficient and sustainable cooking experience, making it an excellent addition for anyone looking to elevate their kitchen game.