GENERAL SAFETY INFORMATION
When using electrical appliances, basic precautions should always be followed to reduce the
risk of fire, electrical shock and injury to persons, including the following:
 Read all instructions before using this Heater.
1.DO NOT PLUG HEATER INTO ANY OTHER CORD CONNECTED DEVICE, SUCH AS A POWER STRIP, SURGE PROTECTOR, MUL- TIPLE OUTLET ADAPTER, CORD REEL OR
2.AVOID THE USE OF EXTENSION CORDS BECAUSE THE EXTENSION CORD MAY OVERHEAT AND CAUSE A RISK OF FIRE. HOWEVER, IF YOU HAVE TO USE AN EXTENSION CORD, MINIMIZE THE RISK OF OVERHEATING BY USING THE SHORTEST CORD POSSIBLE AND BY ENSURING THAT IT IS UL LISTED. THE CORD SHALL BE A
WARNING: Faulty wall outlet connections may cause the wall outlet to overheat. Be sure that heater plug fits tightly into outlet be- fore each use. During use, check to make certain the Heater plug is not overheating. If necessary have a qualified electrician check and/or replace the wall outlet.
3.Use this Heater only as described in this manual. Any other use not recommended by the manufacturer may cause fire, electrical shock, or injury to persons.
4.Make certain that the room is equipped with a working smoke detector.
5.Make certain that the power source conforms to the electrical requirements of the Heater.
6.Extreme caution is necessary when any Heater is used by or near children or invalids and whenever the Heater is left operating unattended.
7.This appliance has a polarized plug (one blade is wider than the other). To reduce the risk of electric shock, this plug is intended to fit in a polarized outlet only one way. If the plug does not fit fully in the outlet, reverse the plug. If it still does not fit, contact a qualified electrician. Do not attempt to defeat this safety feature.
8.Do not operate any Heater with a damaged cord or plug or after the Heater malfunctions, or has been dropped or damaged in any manner.
9.To disconnect Heater, turn the Heater OFF then remove the plug from the outlet.
DO NOT DEPEND ON THE ON/OFF SWITCH AS THE SOLE MEANS OF DISCONNECTING POWER WHEN SERVICING OR MOVING THE HEATER. ALWAYS UNPLUG THE POWER CORD. ALWAYS TURN OFF AND UNPLUG HEATER BEFORE LEAVING THE AREA. NEVER LEAVE CHILDREN UNATTENDED WHEN THE HEATER IS ON OR PLUGGED IN.
10.Always unplug Heater when not in use. Unplug power cord before servicing or moving the Heater.
11.Do not insert or allow fingers or foreign objects to enter any ventilation or exhaust opening as it may cause an electric shock, fire, or dam- age the Heater. Do not block or tamper with the Heater in any manner while it is in operation.
12.To prevent a possible fire, do not block air intakes or exhaust in any manner. Do not place on soft surfaces, like a bed, where openings may become blocked.
13.Always place the Heater on a stable, flat, level surface when operating, to avoid the chance of the Heater overturning. Locate the Power Cord so the Heater or other objects are not resting on it. DO NOT run Power Cord under carpeting. DO NOT cover Power Cord with throw rugs, runners, or the like. Arrange Power Cord away from room traffic and where it will not be tripped over.
14.This Heater is HOT when in use. To avoid burns, do not let bare skin touch hot surfaces. Always use handle when moving this Heater. Keep combustible materials, such as furniture, pillows, bedding, papers, clothes and curtains at least 3 feet (0.9 m) from the front of the Heater and keep them at least 1 foot (0.3 m) from the sides and rear.
15.A Heater has hot and arcing or sparking parts inside. DO NOT use the Heater in areas where gasoline, paint, or flammable liquids are used or stored. DO NOT use Heater in locations where flammable or explosive chemicals are stored, or in wet atmospheres. This Heater is intended for general use ONLY.
16.This Heater is not intended for use in wet or damp locations. This Heater is not intended for use in bathrooms, laundry areas and similar indoor locations. NEVER locate a Heater where it may fall into a bathtub or other water container.
17.DO NOT use Heater outdoors.
18.This Heater is not suitable for use in agricultural facilities including areas where livestock, poultry or other animals are confined. Please refer to National Electric Code (NEC) Article
19.This Heater is not suitable for use in hazardous locations. Please refer to National Electric Code (NEC) Article 500 or applicable state or local codes or standards relating to electrical requirements for Hazardous locations. THIS HEATER DOES NOT MEET THE
REQUIREMENTS OF NEC ARTICLE 500 (2002).
WARNING: REDUCE THE RISK OF FIRE OR ELECTRIC SHOCK – DO NOT USE THIS HEATER WITH ANY SOLID STATE SPEED CONTROL DEVICES.
SAVE THESE INSTRUCTIONS
New 4/07 | 2 | 8900ESF |
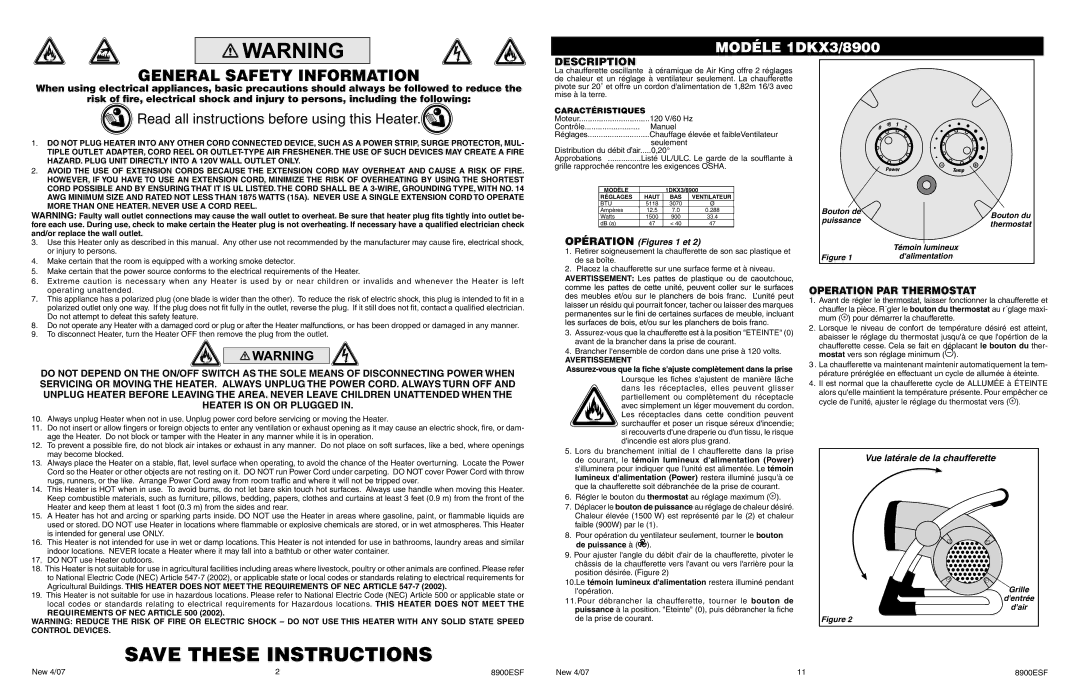
MODÉLE 1DKX3/8900
DESCRIPTION
La chaufferette oscillante à céramique de Air King offre 2 réglages de chaleur et un réglage à ventilateur seulement. La chaufferette pivote sur 20˚ et offre un cordon d'alimentation de 1,82m 16/3 avec mise à la terre.
CARACTÉRISTIQUES |
|
|
|
| ||
Moteur | 120 V/60 Hz |
|
| |||
Contrôle | Manuel |
|
|
| ||
Réglages | Chauffage élevée et faibleVentilateur |
|
| |||
| seulement |
|
|
| ||
Distribution du débit d’air | 0,20° |
|
|
| ||
Approbations | Listé UL/ULC. Le garde de la soufflante à |
|
| |||
grille rapprochée rencontre les exigences OSHA. |
|
| ||||
MODÈLE |
| 1DKX3/8900 |
|
| ||
RÉGLAGES | HAUT | BAS | VENTILATEUR |
|
| |
BTU | 5118 | 3070 | Ø | Bouton de |
| |
Ampères | 12.5 | 7.0 | 0.288 | Bouton du | ||
Watts | 1500 | 900 | 33.4 | puissance | ||
dB (a) | 47 | < 40 | 47 | thermostat | ||
| ||||||
OPÉRATION (Figures 1 et 2) |
| Témoin lumineux | ||||
1. Retirer soigneusement la chaufferette de son sac plastique et |
| |||||
Figure 1 | d'alimentation | |||||
de sa boîte. |
|
|
| |||
|
|
|
|
| ||
2.Placez la chaufferette sur une surface ferme et à niveau. AVERTISSEMENT: Les pattes de plastique ou de caoutchouc,
comme les pattes de cette unité, peuvent coller sur le surfaces | OPERATION PAR THERMOSTAT | |||||||||||
des meubles et/ou sur le planchers de bois franc. L’unité peut | ||||||||||||
1. Avant de régler le thermostat, laisser fonctionner la chaufferette et | ||||||||||||
laisser un résidu qui pourrait foncer, tacher ou laisser des marques | ||||||||||||
chauffer la pièce. R´gler le bouton du thermostat au r´glage maxi- | ||||||||||||
permanentes sur le fini de certaines surfaces de meuble, incluant | ||||||||||||
mum ( |
| ) pour démarrer la chaufferette. | ||||||||||
les surfaces de bois, et/ou sur les planchers de bois franc. |
| |||||||||||
2. Lorsque le niveau de confort de température désiré est atteint, | ||||||||||||
3. | ||||||||||||
abaisser le réglage du thermostat jusqu'à ce que l'opértion de la | ||||||||||||
avant de la brancher dans la prise de courant. | ||||||||||||
chaufferette cesse. Cela se fait en déplacant le bouton du ther- | ||||||||||||
4. Brancher l'ensemble de cordon dans une prise à 120 volts. | ||||||||||||
|
|
|
|
|
|
|
|
| ||||
mostat vers son réglage minimum ( ). | ||||||||||||
AVERTISSEMENT | ||||||||||||
3. La chaufferette va maintenant maintenir automatiquement la tem- | ||||||||||||
pérature préréglée en effectuant un cycle de allumée à éteinte. | ||||||||||||
|
| Loursque les fiches s'ajustent de manière lâche | ||||||||||
|
| 4. Il est normal que la chaufferette cycle de ALLUMÉE à ÉTEINTE | ||||||||||
|
| dans les réceptacles, elles peuvent glisser | ||||||||||
|
| alors qu'elle maintient la température présente. Pour empêcher ce | ||||||||||
|
| partiellement ou complètement du réceptacle | ||||||||||
|
| cycle de l'unité, ajuster le réglage du thermostat vers ( |
| ). |
| |||||||
|
| avec simplement un léger mouvement du cordon. |
|
| ||||||||
|
|
|
|
|
|
|
|
|
|
| ||
|
| Les réceptacles dans cette condition peuvent |
|
|
|
|
|
|
|
|
| |
|
| surchauffer et poser un risque séreux d'incendie; |
|
|
|
|
|
|
|
|
| |
|
|
|
|
|
|
|
|
|
|
| ||
|
| si recouverts d'une draperie ou d'un tissu, le risque |
|
|
|
|
|
|
|
|
| |
|
| d'incendie est alors plus grand. |
|
|
|
|
|
|
|
|
| |
5. Lors du branchement initial de l chaufferette dans la prise |
|
|
|
|
|
|
|
|
| |||
|
|
| Vue latérale de la chaufferette | |||||||||
de courant, le témoin lumineux d'alimentation (Power) |
|
|
| |||||||||
s'illuminera pour indiquer que l'unité est alimentée. Le témoin |
|
|
|
|
|
|
|
|
| |||
lumineux d'alimentation (Power) restera illuminé jusqu'à ce |
|
|
|
|
|
|
|
|
| |||
que la chaufferette soit débranchée de la prise de courant. |
|
|
|
|
|
|
|
|
| |||
6.Régler le bouton du thermostat au réglage maximum (![]() ).
).
7.Déplacer le bouton de puissance au réglage de chaleur désiré. Chaleur élevée (1500 W) est représenté par le (2) et chaleur faible (900W) par le (1).
8. Pour opération du ventilateur seulement, tourner le bouton
de puissance à ( ).
).
9. Pour ajuster l'angle du débit d'air de la chaufferette, pivoter le châssis de la chaufferette vers l'avant ou vers l'arrière pour la position désirée. (Figure 2)
10.Le témoin lumineux d'alimentation restera illuminé pendant | Grille | |
l'opération. | ||
11.Pour débrancher la chaufferette, tourner le bouton de | d'entrée | |
d'air | ||
puissance à la position. "Eteinte" (0), puis débrancher la fiche | ||
de la prise de courant. | Figure 2 |
New 4/07 | 11 | 8900ESF |