TO MEMORIZE CHANNELS

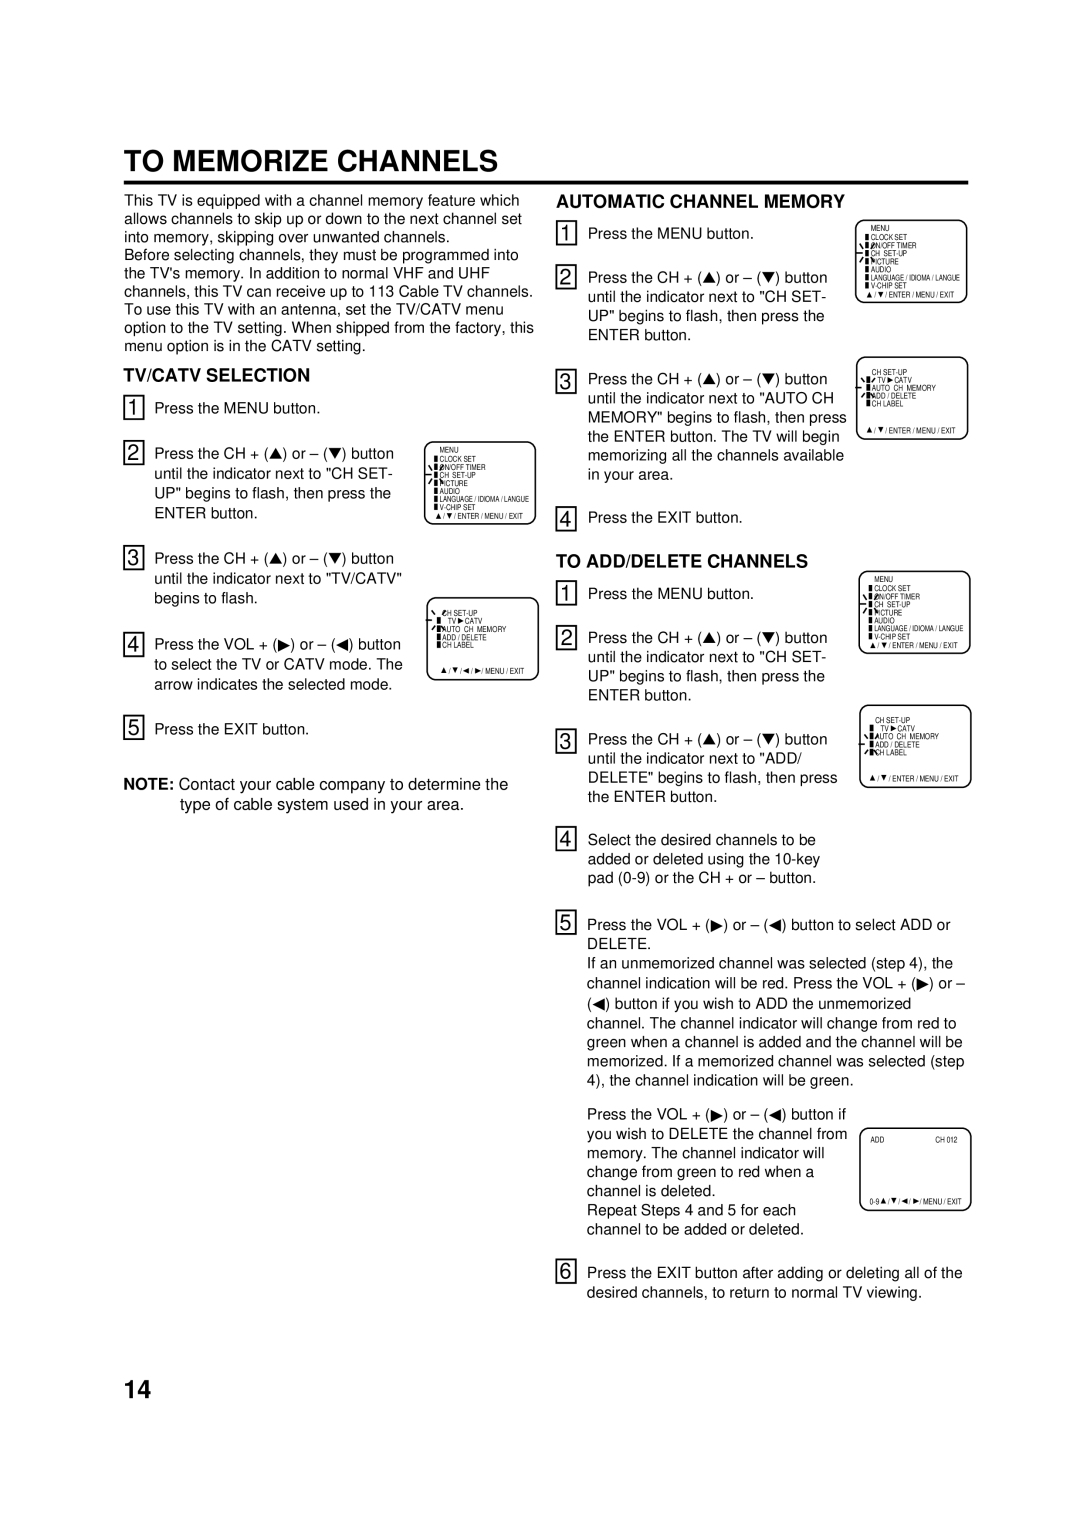
This TV is equipped with a channel memory feature which allows channels to skip up or down to the next channel set into memory, skipping over unwanted channels.

Before selecting channels, they must be programmed into the TV's memory. In addition to normal VHF and UHF channels, this TV can receive up to 113 Cable TV channels. To use this TV with an antenna, set the TV/CATV menu option to the TV setting. When shipped from the factory, this menu option is in the CATV setting.

AUTOMATIC CHANNEL MEMORY

1

Press the MENU button.

2

Press the CH + () or – () button


until the indicator next to "CH SET-

UP" begins to flash, then press the ENTER button.

MENU

CLOCK SET

ON/OFF TIMER

CH SET-UP

PICTURE

AUDIO

LANGUAGE / IDIOMA / LANGUE V-CHIP SET

/ / ENTER / MENU / EXIT

TV/CATV SELECTION

3

Press the CH + () or – () button

CH SET-UP

TV CATV

AUTO CH MEMORY


until the indicator next to "AUTO CH

ADD / DELETE

1 Press the MENU button.

2 Press the CH + () or – () button until the indicator next to "CH SET- UP" begins to flash, then press the

MENU

CLOCK SET

ON/OFF TIMER

CH SET-UP

PICTURE

AUDIO

LANGUAGE / IDIOMA / LANGUE V-CHIP SET


CH LABEL

MEMORY" begins to flash, then press

/ / ENTER / MENU / EXIT

the ENTER button. The TV will begin


memorizing all the channels available


in your area.


ENTER button.

3 Press the CH + () or – () button until the indicator next to "TV/CATV" begins to flash.

4 Press the VOL + ( ) or – ( ) button to select the TV or CATV mode. The arrow indicates the selected mode.

5 Press the EXIT button.

/ / ENTER / MENU / EXIT

CH SET-UP

TV CATV AUTO CH MEMORY

ADD / DELETE

CH LABEL

/ / / / MENU / EXIT

4

Press the EXIT button.

TO ADD/DELETE CHANNELS

1

Press the MENU button.

2

Press the CH + () or – () button


until the indicator next to "CH SET-


UP" begins to flash, then press the


ENTER button.

3

Press the CH + () or – () button


until the indicator next to "ADD/

MENU

CLOCK SET

ON/OFF TIMER

CH SET-UP

PICTURE

AUDIO

LANGUAGE / IDIOMA / LANGUE V-CHIP SET

/ / ENTER / MENU / EXIT

CH SET-UP

TVCATV

AUTO CH MEMORY

ADD / DELETE

CH LABEL

NOTE: Contact your cable company to determine the type of cable system used in your area.

DELETE" begins to flash, then press

the ENTER button.

4 Select the desired channels to be

added or deleted using the 10-key

pad (0-9) or the CH + or – button.

/ / ENTER / MENU / EXIT

5 Press the VOL + () or – () button to select ADD or

DELETE.

If an unmemorized channel was selected (step 4), the channel indication will be red. Press the VOL + () or – () button if you wish to ADD the unmemorized channel. The channel indicator will change from red to green when a channel is added and the channel will be memorized. If a memorized channel was selected (step 4), the channel indication will be green.

Press the VOL + () or – () button if you wish to DELETE the channel from memory. The channel indicator will change from green to red when a channel is deleted.

Repeat Steps 4 and 5 for each channel to be added or deleted.

ADD

CH 012

0-9 / // / MENU / EXIT

6 Press the EXIT button after adding or deleting all of the desired channels, to return to normal TV viewing.

14

Page 14
Image 14
Aiwa AV-14F703 manual To Memorize Channels, Automatic Channel Memory, TV/CATV Selection, To ADD/DELETE Channels, Delete

AV-14F703 specifications

The Aiwa AV-14F703 is a remarkable addition to the realm of audio and visual technology, showcasing a blend of advanced features and user-friendly design. Known for its impressive sound quality and innovative attributes, the AV-14F703 has garnered attention from both audiophiles and casual listeners alike.

One of the standout features of the Aiwa AV-14F703 is its powerful audio performance, characterized by a robust output that delivers crystal-clear sound across various genres. The device comes equipped with advanced sound processing technology, enabling it to handle complex audio signals with ease. Whether you’re listening to music, watching movies, or playing video games, the sound remains balanced and immersive.

To enhance user experience, the AV-14F703 boasts a sleek and modern design, allowing it to seamlessly integrate into any home entertainment setup. The intuitive interface makes navigating through menus and settings simple, ensuring that users of all technical abilities can operate the system without hassle. The remote control further adds to the convenience, providing easy access to functions from a distance.

Connectivity options on the Aiwa AV-14F703 are extensive. With multiple input and output ports, it supports a wide range of devices, including DVDs, gaming consoles, and streaming boxes. Bluetooth connectivity is another impressive feature, allowing users to stream music wirelessly from their smartphones or tablets. This versatility makes the AV-14F703 an outstanding choice for those who enjoy a variety of media sources.

Additionally, the AV-14F703 is designed with energy efficiency in mind. It utilizes cutting-edge technology to minimize power consumption without compromising performance. This feature not only benefits the environment but also helps users save on electricity bills, making it a smart choice for budget-conscious consumers.

In terms of durability, Aiwa has constructed the AV-14F703 using high-quality materials, ensuring that it can withstand the rigors of everyday use. The device is built to last, an important consideration for those investing in long-term audio and visual solutions.

Overall, the Aiwa AV-14F703 stands out as a versatile and high-performance audio-visual device, offering exceptional sound quality, modern design, robust connectivity options, and energy efficiency. This makes it an ideal choice for anyone looking to enhance their entertainment experience at home.