BEFORE OPERATION

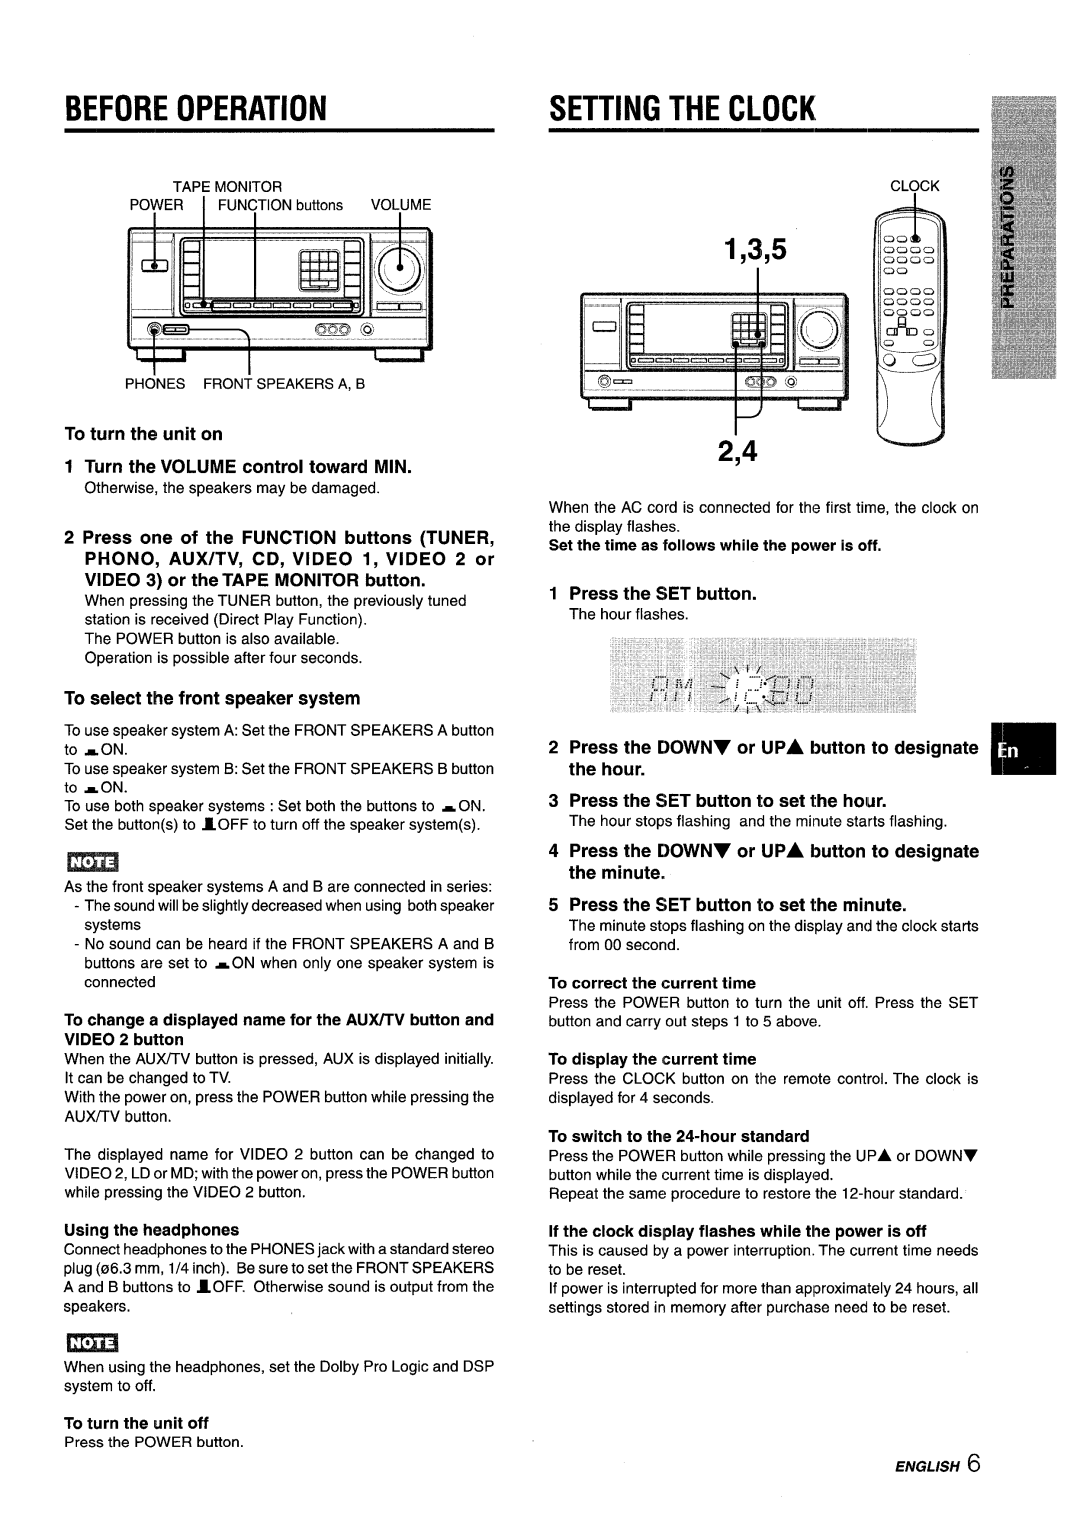
TAPE MONITOR

POWER I FUNCTION buttons VOLUME

1!

-t-l

PHONES FRONT SPEAKERS A, B

To turn the unit on

1 Turn the VOLUME control toward MIN.

Otherwise, the speakers may be damaged.

2 Press one of the FUNCTION buttons (TUNER, PHONO, AUX/TV, CD, VIDEO 1, VIDEO 2 or VIDEO 3) or the TAPE MONITOR button.

When pressing the TUNER button, the previously tuned station is received (Direct Play Function).

The POWER button is also available. Operation is possible after four seconds.

To select the front speaker system

To use speaker system A: Set the FRONT SPEAKERS A button to sON.

To use speaker system B: Set the FRONT SPEAKERS B button to wON.

To use both speaker systems : Set both the buttons to *ON. Set the button(s) to mOFF to turn off the speaker system(s).

m

As the front speaker systems A and B are connected in series:

-The sound will be slightly decreased when using both speaker systems

-No sound can be heard if the FRONT SPEAKERS A and B buttons are set to w ON when only one speaker system is connected

To change a displayed name for the AU)UTV button and VIDEO 2 button

When the AUX/TV button is pressed, AUX is displayed initially.

It can be changed to TV.

With the power on, press the POWER button while pressing the AUXfW button.

The displayed name for VIDEO 2 button can be changed to VIDEO 2, LD or MD; with the power on, press the POWER button while pressing the VIDEO 2 button.

Using the headphones

Connect headphones to the PHONES jack with a standard stereo plug (06.3 mm, 1/4 inch). Be sure to set the FRONT SPEAKERS A and B buttons to 10FF. Otherwise sound is output from the speakers.

m

When using the headphones, set the Dolby Pro Logic and DSP system to off.

To turn the unit off

Press the POWER button.

SETTING THE CLOCK

CL?CK

1,3,5

r

2,4

When the AC cord is connected for the first titme, the clock on the display flashes.

Set the time aa ‘follows while the power is off.

1 Press the SET button.

The hour flashes.

2

3Press the SET button to set the hour.

The hour stops flashing and the minute starts flashing.

4Press the [)OWN7 or UPA button to designate the minute.

5Press the SET button to set the minute.

The minute stops flashing on the display and the clock starts from 00 second.

To correct the current time

Press the POWEERbutton to turn the unit off, Press the SET button and carry out steps 1 to 5 above.

To display the current time

Press the CLOCK button on the remote control. The clock is displayed for 4 seconds.

To switch to the 24-hour standard

Press the POWER button while pressing the UPA or DOWNY

button while the current time is displayed.

Repeat the same procedure to restore the 12-hour standard.

If the clock dislplay flashes while the power is off

This is caused by a power interruption. The current time needs

to be reset.

If power is interrupted for more than approximately 24 hours, all settings stored in memory after purchase need to be reset.

ENGLISH6

Page 7
Image 7
Aiwa AV-X120 manual Before Operation, Setting the Clock

AV-X120 specifications

The Aiwa AV-X120 is a versatile mini stereo system that epitomizes compact design and powerful performance. Engineered to cater to modern audio needs, it combines functionality with an array of features that make it a desirable choice for music enthusiasts.

One of the standout features of the AV-X120 is its high-quality sound output, achieved through the integration of advanced audio technologies. The system boasts a built-in digital amplifier that enhances audio clarity and ensures crisp sound quality across various genres. Additionally, the stereo system comes equipped with a pair of well-designed speakers that deliver rich bass and bright treble, ensuring a balanced listening experience.

The AV-X120 supports multiple playback sources, providing users with flexibility in how they enjoy their music. It includes a CD player that is compatible with various disc formats, allowing users to relive their favorite albums with ease. For those who prefer digital music, the system features Bluetooth connectivity, enabling wireless streaming from smartphones and tablets. This is complemented by USB and AUX inputs, which further expand the range of devices that can be connected.

The user-friendly interface of the Aiwa AV-X120 makes it easy to navigate through different modes and settings. It features an LCD display that provides clear information about the currently playing track and allows for seamless switching between different playback options. The remote control functionality adds an element of convenience, enabling users to adjust settings and manage playlists without having to get up.

A notable characteristic of the AV-X120 is its compact size, making it an ideal choice for smaller living spaces such as apartments or dorms. Despite its diminutive form factor, it does not compromise on sound quality or performance. The sleek design ensures that it can fit into various decor styles while providing a modern touch to any room.

In summary, the Aiwa AV-X120 is a well-rounded mini stereo system that appeals to diverse audio needs. With its powerful sound performance, compatibility with multiple playback sources, user-friendly interface, and stylish design, it presents an excellent option for anyone looking to elevate their music listening experience in a compact package. Whether you are hosting a gathering, relaxing at home, or simply enjoying some time to yourself, the AV-X120 is designed to meet and exceed expectations.