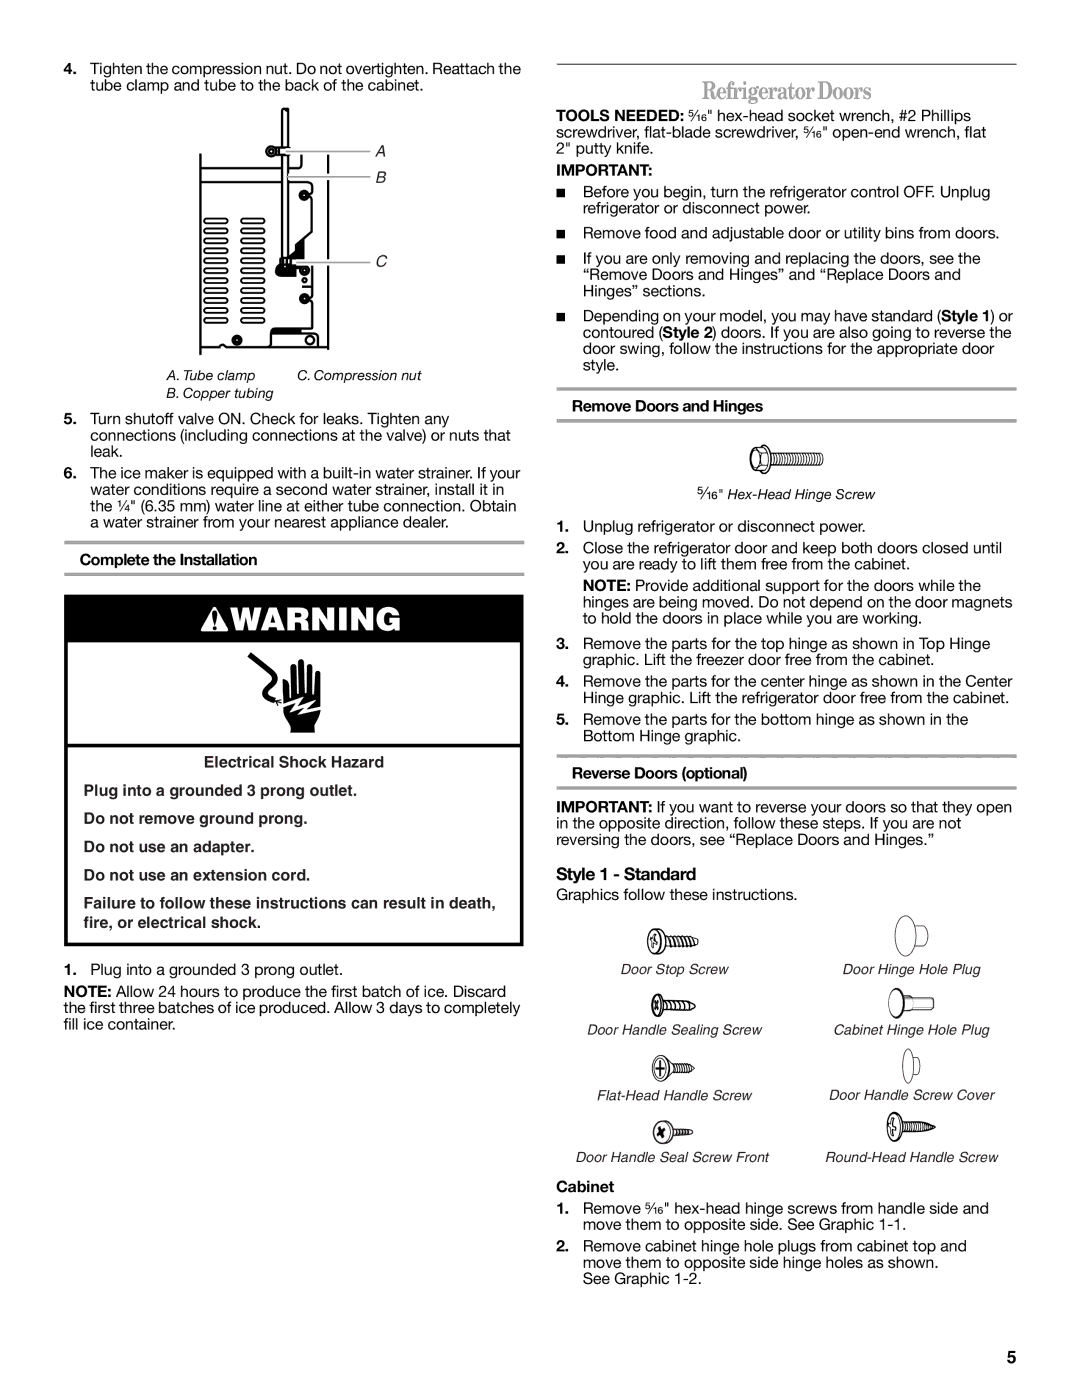
4.Tighten the compression nut. Do not overtighten. Reattach the tube clamp and tube to the back of the cabinet.

A

B

C

A. Tube clamp

C. Compression nut

B. Copper tubing


5.Turn shutoff valve ON. Check for leaks. Tighten any connections (including connections at the valve) or nuts that leak.

6.The ice maker is equipped with a built-in water strainer. If your water conditions require a second water strainer, install it in the ¹⁄₄" (6.35 mm) water line at either tube connection. Obtain a water strainer from your nearest appliance dealer.

Complete the Installation

WARNING

Electrical Shock Hazard

Plug into a grounded 3 prong outlet.

Do not remove ground prong.

Do not use an adapter.

Do not use an extension cord.

Failure to follow these instructions can result in death, fire, or electrical shock.

1.Plug into a grounded 3 prong outlet.

NOTE: Allow 24 hours to produce the first batch of ice. Discard the first three batches of ice produced. Allow 3 days to completely fill ice container.

Refrigerator Doors

TOOLS NEEDED: ⁵⁄₁₆" hex-head socket wrench, #2 Phillips screwdriver, flat-blade screwdriver, ⁵⁄₁₆" open-end wrench, flat 2" putty knife.

IMPORTANT:

Before you begin, turn the refrigerator control OFF. Unplug refrigerator or disconnect power.

Remove food and adjustable door or utility bins from doors.

If you are only removing and replacing the doors, see the “Remove Doors and Hinges” and “Replace Doors and Hinges” sections.

Depending on your model, you may have standard (Style 1) or contoured (Style 2) doors. If you are also going to reverse the door swing, follow the instructions for the appropriate door style.

Remove Doors and Hinges

⁵⁄₁₆" Hex-Head Hinge Screw

1.Unplug refrigerator or disconnect power.

2.Close the refrigerator door and keep both doors closed until you are ready to lift them free from the cabinet.

NOTE: Provide additional support for the doors while the hinges are being moved. Do not depend on the door magnets to hold the doors in place while you are working.

3.Remove the parts for the top hinge as shown in Top Hinge graphic. Lift the freezer door free from the cabinet.

4.Remove the parts for the center hinge as shown in the Center Hinge graphic. Lift the refrigerator door free from the cabinet.

5.Remove the parts for the bottom hinge as shown in the Bottom Hinge graphic.

Reverse Doors (optional)

IMPORTANT: If you want to reverse your doors so that they open in the opposite direction, follow these steps. If you are not reversing the doors, see “Replace Doors and Hinges.”

Style 1 - Standard

Graphics follow these instructions.

Door Stop Screw

Door Hinge Hole Plug

Door Handle Sealing Screw

Cabinet Hinge Hole Plug

Flat-Head Handle Screw

Door Handle Screw Cover

Door Handle Seal Screw Front

Round-Head Handle Screw

Cabinet

1.Remove ⁵⁄₁₆" hex-head hinge screws from handle side and move them to opposite side. See Graphic 1-1.

2.Remove cabinet hinge hole plugs from cabinet top and move them to opposite side hinge holes as shown. See Graphic 1-2.

5

Page 5
Image 5
Amana W10211588A Refrigerator Doors, Style 1 Standard, Remove Doors and Hinges, Reverse Doors optional, Cabinet

W10211588A, W10211609A specifications

The Amana W10211609A and W10211588A are two exceptional refrigerator water filters designed to deliver clean, great-tasting water and ice. They are engineered to fit seamlessly into a variety of Amana refrigerators, ensuring that you always have access to refreshing, filtered water.

One of the main features of the W10211609A and W10211588A is their advanced filtration technology. These filters utilize carbon block technology, which is highly effective at removing impurities from water. This includes chlorine, sediment, and other contaminants that can affect the taste and odor of drinking water. By reducing these elements, the filters provide a crisp, pure drinking experience with every glass.

The filters are also designed for easy installation. Users appreciate the simple, twist-and-lock mechanism that allows for quick replacement without the need for any tools. This feature is particularly valuable for homeowners who prefer a hassle-free maintenance process. Moreover, both filters are certified by the National Sanitation Foundation (NSF), assuring consumers of their quality and reliability.

In terms of longevity, the Amana W10211609A and W10211588A have a lifespan of approximately six months under normal usage conditions. This means that users can enjoy high-quality water without the frequent need for replacements. The filters are also designed to retain their performance standards throughout their lifespan, ensuring consistent water quality.

These models are designed to work with specific Amana refrigerator models, which enhances their compatibility and efficiency. They not only purify water but also contribute to the overall efficiency of the refrigerator by maintaining optimal operating conditions.

The dimensions of both filters are compact, allowing them to fit into the filtration system without taking up excess space. With features such as the 99% reduction in lead and other harmful contaminants, the W10211609A and W10211588A exemplify Amana’s commitment to safety and quality.

In summary, the Amana W10211609A and W10211588A water filters stand out due to their cutting-edge filtration technology, ease of installation, impressive lifespan, and excellent compatibility with various refrigerator models. They are a smart choice for any homeowner looking to enhance their water quality while ensuring the smooth operation of their kitchen appliances.