Functions
20 | 4 | 3 | 2 | 14 | 15 | 16 | 17 | 24 |
1
21 ![]()
![]()
![]()
![]()
![]()
![]()
![]()
![]()
![]()
![]()
![]()
![]()
![]()
![]()
![]()
![]()
![]() 18
18
22 |
|
23 | 19 |
|
5
6 | 7 | 8 | 9 | 10 | 11 | 12 | 13 |
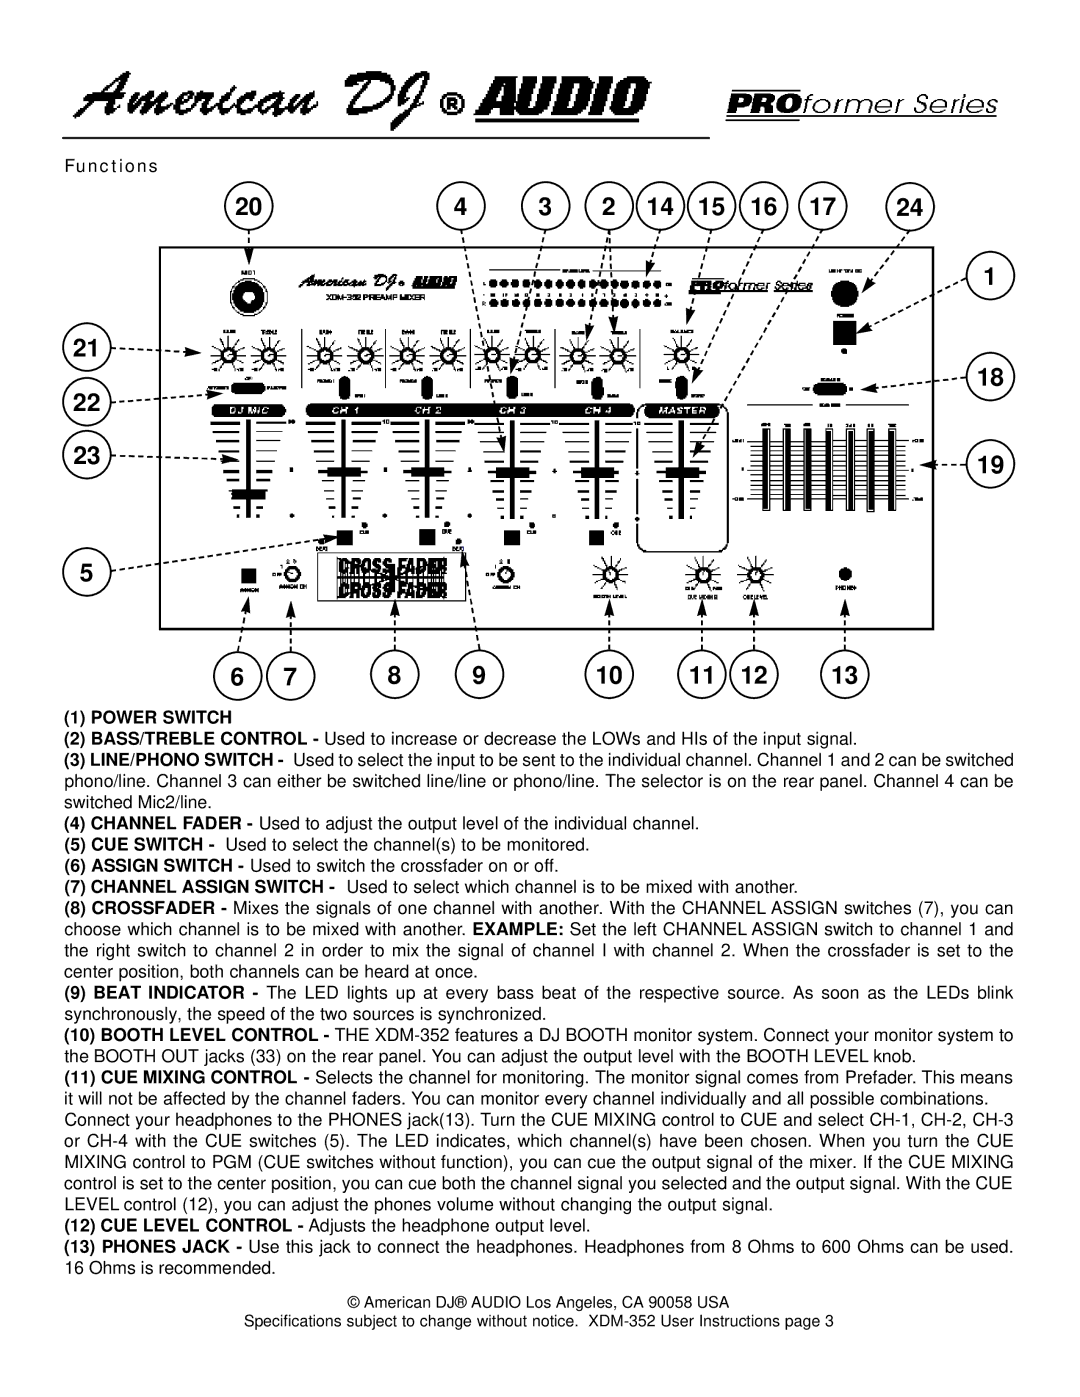
(1)POWER SWITCH
(2)BASS/TREBLE CONTROL - Used to increase or decrease the LOWs and HIs of the input signal.
(3)LINE/PHONO SWITCH - Used to select the input to be sent to the individual channel. Channel 1 and 2 can be switched phono/line. Channel 3 can either be switched line/line or phono/line. The selector is on the rear panel. Channel 4 can be switched Mic2/line.
(4)CHANNEL FADER - Used to adjust the output level of the individual channel.
(5)CUE SWITCH - Used to select the channel(s) to be monitored.
(6)ASSIGN SWITCH - Used to switch the crossfader on or off.
(7)CHANNEL ASSIGN SWITCH - Used to select which channel is to be mixed with another.
(8)CROSSFADER - Mixes the signals of one channel with another. With the CHANNEL ASSIGN switches (7), you can choose which channel is to be mixed with another. EXAMPLE: Set the left CHANNEL ASSIGN switch to channel 1 and the right switch to channel 2 in order to mix the signal of channel I with channel 2. When the crossfader is set to the center position, both channels can be heard at once.
(9)BEAT INDICATOR - The LED lights up at every bass beat of the respective source. As soon as the LEDs blink synchronously, the speed of the two sources is synchronized.
(10)BOOTH LEVEL CONTROL - THE
(11)CUE MIXING CONTROL - Selects the channel for monitoring. The monitor signal comes from Prefader. This means it will not be affected by the channel faders. You can monitor every channel individually and all possible combinations. Connect your headphones to the PHONES jack(13). Turn the CUE MIXING control to CUE and select
(12)CUE LEVEL CONTROL - Adjusts the headphone output level.
(13)PHONES JACK - Use this jack to connect the headphones. Headphones from 8 Ohms to 600 Ohms can be used. 16 Ohms is recommended.
© American DJ® AUDIO Los Angeles, CA 90058 USA
Specifications subject to change without notice.
