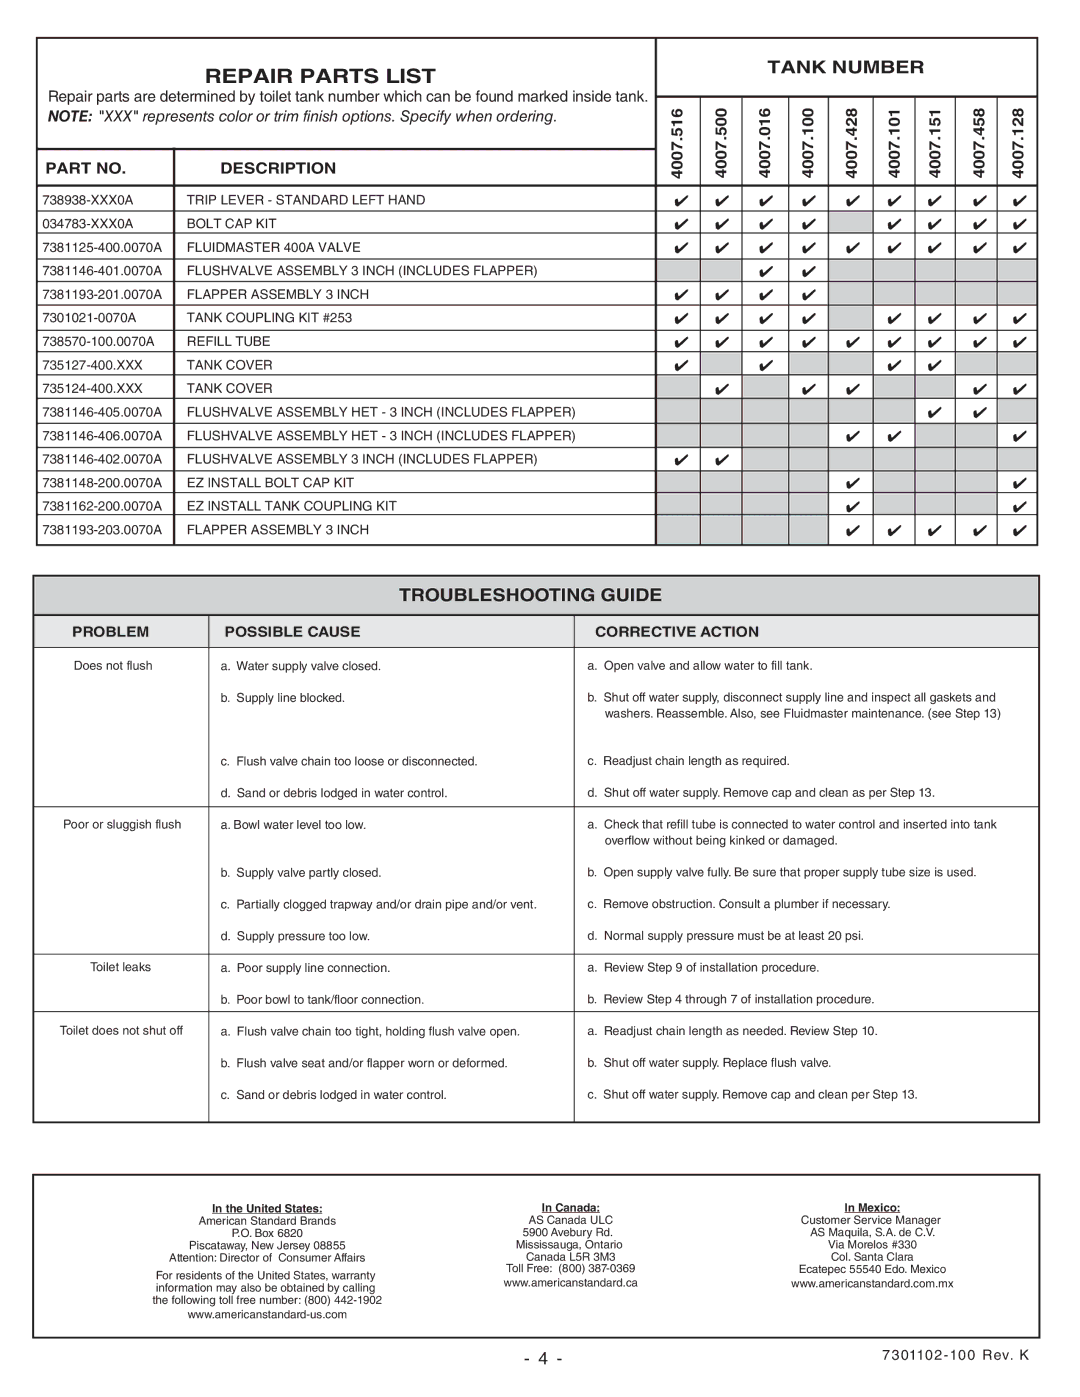
REPAIR PARTS LIST
Repair parts are determined by toilet tank number which can be found marked inside tank.
NOTE: "XXX" represents color or trim finish options. Specify when ordering.
PART NO. | DESCRIPTION |
TRIP LEVER - STANDARD LEFT HAND | |
BOLT CAP KIT | |
FLUIDMASTER 400A VALVE | |
FLUSHVALVE ASSEMBLY 3 INCH (INCLUDES FLAPPER) | |
FLAPPER ASSEMBLY 3 INCH | |
TANK COUPLING KIT #253 | |
REFILL TUBE | |
TANK COVER | |
TANK COVER | |
FLUSHVALVE ASSEMBLY HET - 3 INCH (INCLUDES FLAPPER) | |
FLUSHVALVE ASSEMBLY HET - 3 INCH (INCLUDES FLAPPER) | |
FLUSHVALVE ASSEMBLY 3 INCH (INCLUDES FLAPPER) | |
EZ INSTALL BOLT CAP KIT | |
EZ INSTALL TANK COUPLING KIT | |
FLAPPER ASSEMBLY 3 INCH | |
|
|
TANK NUMBER
4007.516 | 4007.500 | 4007.016 | 4007.100 | 4007.428 | 4007.101 | 4007.151 | 4007.458 | 4007.128 |
✔ | ✔ | ✔ | ✔ | ✔ | ✔ | ✔ | ✔ | ✔ |
✔ | ✔ | ✔ | ✔ |
| ✔ | ✔ | ✔ | ✔ |
| ||||||||
✔ | ✔ | ✔ | ✔ | ✔ | ✔ | ✔ | ✔ | ✔ |
|
| ✔ | ✔ |
|
|
|
|
|
|
|
|
|
|
|
| ||
✔ | ✔ | ✔ | ✔ |
|
|
|
|
|
✔ | ✔ | ✔ | ✔ |
| ✔ | ✔ | ✔ | ✔ |
✔ | ✔ | ✔ | ✔ | ✔ | ✔ | ✔ | ✔ | ✔ |
✔ |
| ✔ |
|
| ✔ | ✔ |
|
|
|
|
|
|
| ||||
| ✔ |
| ✔ | ✔ |
|
| ✔ | ✔ |
|
|
|
|
|
| ✔ | ✔ |
|
|
|
|
| ✔ | ✔ |
|
| ✔ |
✔ | ✔ |
|
|
|
|
|
|
|
|
|
|
| ✔ |
|
|
| ✔ |
|
|
|
| ✔ |
|
|
| ✔ |
|
|
|
| ✔ | ✔ | ✔ | ✔ | ✔ |
|
|
|
|
|
|
|
|
|
TROUBLESHOOTING GUIDE
PROBLEM | POSSIBLE CAUSE | CORRECTIVE ACTION |
|
|
|
Does not flush | a. Water supply valve closed. | a. Open valve and allow water to fill tank. |
| b. Supply line blocked. | b. Shut off water supply, disconnect supply line and inspect all gaskets and |
|
| washers. Reassemble. Also, see Fluidmaster maintenance. (see Step 13) |
| c. Flush valve chain too loose or disconnected. | c. Readjust chain length as required. |
| d. Sand or debris lodged in water control. | d. Shut off water supply. Remove cap and clean as per Step 13. |
|
|
|
Poor or sluggish flush | a. Bowl water level too low. | a. Check that refill tube is connected to water control and inserted into tank |
|
| overflow without being kinked or damaged. |
| b. Supply valve partly closed. | b. Open supply valve fully. Be sure that proper supply tube size is used. |
| c. Partially clogged trapway and/or drain pipe and/or vent. | c. Remove obstruction. Consult a plumber if necessary. |
| d. Supply pressure too low. | d. Normal supply pressure must be at least 20 psi. |
|
|
|
Toilet leaks | a. Poor supply line connection. | a. Review Step 9 of installation procedure. |
| b. Poor bowl to tank/floor connection. | b. Review Step 4 through 7 of installation procedure. |
|
|
|
Toilet does not shut off | a. Flush valve chain too tight, holding flush valve open. | a. Readjust chain length as needed. Review Step 10. |
| b. Flush valve seat and/or flapper worn or deformed. | b. Shut off water supply. Replace flush valve. |
| c. Sand or debris lodged in water control. | c. Shut off water supply. Remove cap and clean per Step 13. |
|
|
|
In the United States: | In Canada: | In Mexico: | |
American Standard Brands | AS Canada ULC | Customer Service Manager | |
P.O. Box 6820 | 5900 Avebury Rd. | AS Maquila, S.A. de C.V. | |
Piscataway, New Jersey 08855 | Mississauga, Ontario | Via Morelos #330 | |
Attention: Director of Consumer Affairs | Canada L5R 3M3 | Col. Santa Clara | |
For residents of the United States, warranty | Toll Free: (800) | Ecatepec 55540 Edo. Mexico | |
www.americanstandard.ca | www.americanstandard.com.mx | ||
information may also be obtained by calling | |||
|
| ||
the following toll free number: (800) |
|
| |
|
|
- 4 - |
