Installation
Instructions
T M
2808.222
2908.222
Widespread Lavatory Faucet with the
Speed Connect™ Drain
Congratulations on purchasing your American Standard faucet with the Speed Connect Drain, a feature found only on
American Standard faucets.
Speed Connect Drain*
•1/3 of the parts, installs in 1/3 of the time
•No tools needed
•Never needs adjustment
•Guaranteed to seal properly the first time, every time.
Certified to comply with ANSI A112.18.1
US60385 Rev. 1 . 2
*Your new American Standard faucet is designed to work only with the Speed Connect drain. Helpful tips for removing your current drain can be found in the Troubleshooting section of these instructions.
To ensure that your installation proceeds
Recommended tools |
|
|
|
Screwdriver | Channel Locks | Adjustable Wrench | Tubing Cutter |
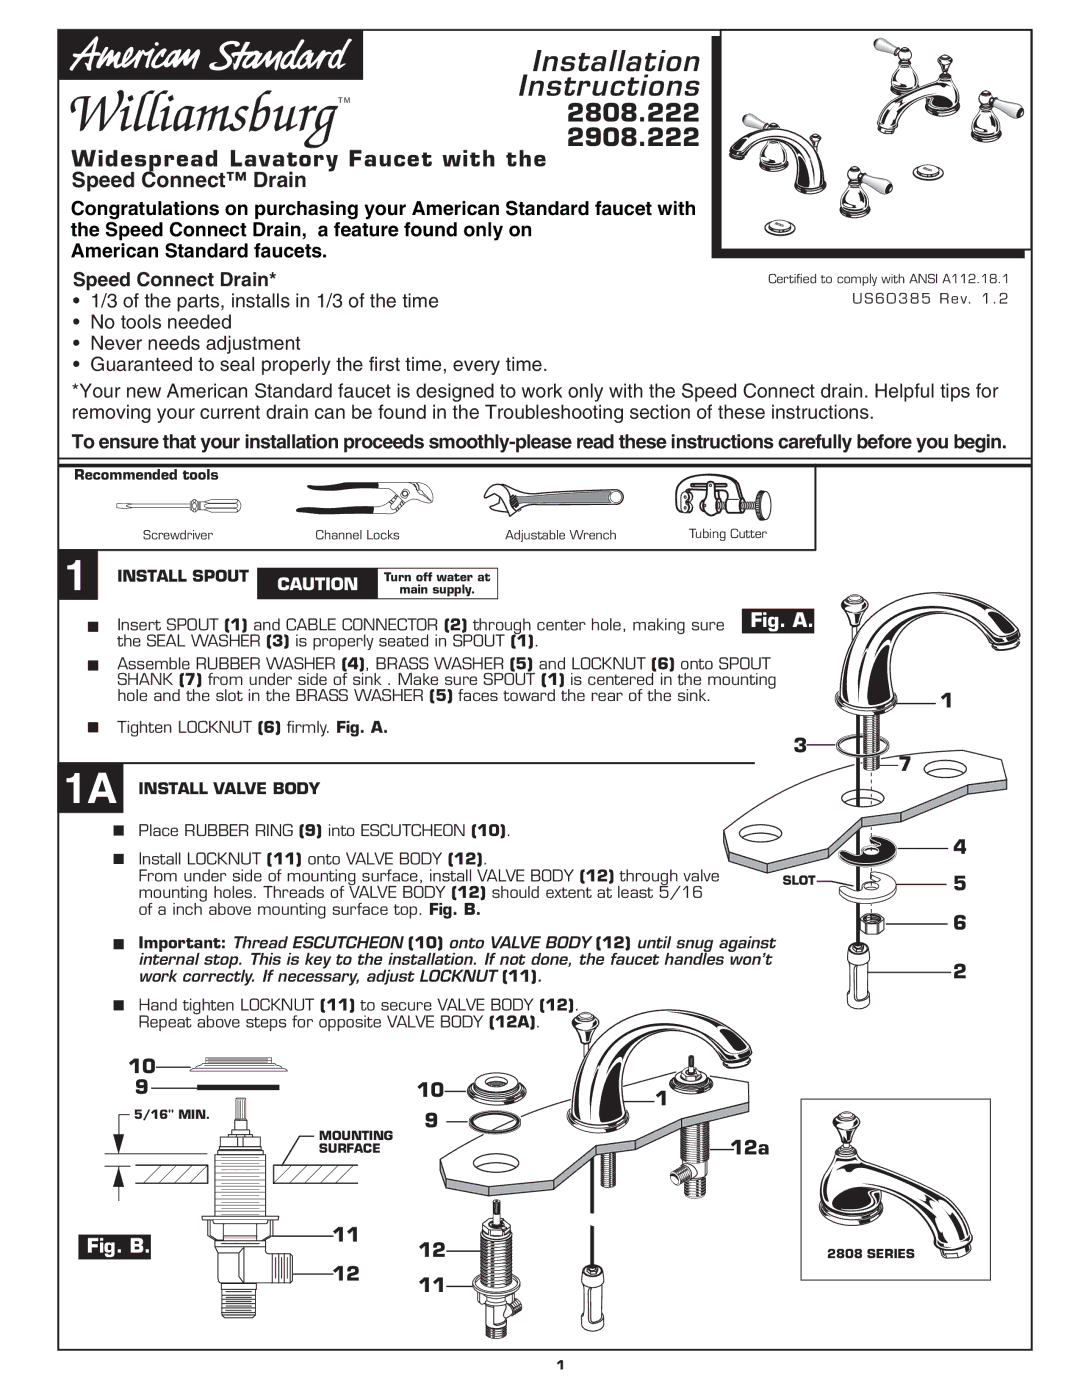
1 INSTALL SPOUT
CAUTION | Turn off water at |
main supply. |
Insert SPOUT (1) and CABLE CONNECTOR (2) through center hole, making sure Fig. A. the SEAL WASHER (3) is properly seated in SPOUT (1).
Assemble RUBBER WASHER (4), BRASS WASHER (5) and LOCKNUT (6) onto SPOUT SHANK (7) from under side of sink . Make sure SPOUT (1) is centered in the mounting hole and the slot in the BRASS WASHER (5) faces toward the rear of the sink.
Tighten LOCKNUT (6) firmly. Fig. A.
3
1A INSTALL VALVE BODY
1
![]()
![]()
![]() 7
7
Place RUBBER RING (9) into ESCUTCHEON (10).
Install LOCKNUT (11) onto VALVE BODY (12). |
| 4 | |
|
| ||
From under side of mounting surface, install VALVE BODY (12) through valve | SLOT | 5 | |
mounting holes. Threads of VALVE BODY (12) should extent at least 5/16 | |||
|
| ||
of a inch above mounting surface top. Fig. B. |
| 6 | |
Important: Thread ESCUTCHEON (10) onto VALVE BODY (12) until snug against |
| ||
|
| ||
internal stop. This is key to the installation. If not done, the faucet handles won’t |
| 2 | |
work correctly. If necessary, adjust LOCKNUT (11). |
|
Hand tighten LOCKNUT (11) to secure VALVE BODY (12).
Repeat above steps for opposite VALVE BODY (12A).
10 |
|
9 | 10 |
5/16'' MIN. | 9 |
| |
| MOUNTING |
| SURFACE |
Fig. B. | 11 | 12 | |
12 | |||
| 11 | ||
|
|
1
12a
2808 SERIES
1