TEST INSTALLED FITTING


3


PRUEBA DE AJUSTE INSTALADO


VÉRIFIER LA TUYAUTERIE INSTALLÉE


Coloque las MANIJAS en la posición


Tourner les POIGNÉES à la position OFF (ARRÊT).


Turn HANDLES to OFF position.


CERRADA.


Ouvrir les conduits d’alimentation en eau et


Turn on water supplies and


Abra el abastecimiento de agua y


vérifier s’il y a des fuites.


busque pérdidas.


check for leaks.


Opere ambas MANIJAS para abrir


Utiliser les deux POIGNÉES pour purger à fond les


conduits d’alimentation en eau et vérifier si la BUSE


Operate both HANDLES to flush


completamente el abastecimiento de agua y


DE REMPLISSAGE DE LA BAIGNOIRE présente


water lines thoroughly and check


busque pérdidas en el PICO DE LA TINA.


des fuites.


TUB SPOUT for leaks.


Opere la VÁLVULA DIVERSORA y


Faire fonctionner l’INVERSEUR et vérifier


Operate DIVERTER VALVE and


controle que no haya pérdidas en


s’il y a des fuites au niveau des


check all SHOWER HEAD


todas las conexiones del CABEZAL DE


connexions pour la POMME DE DOUCHE.


connections for leaks.


LA DUCHA


4SERVICE

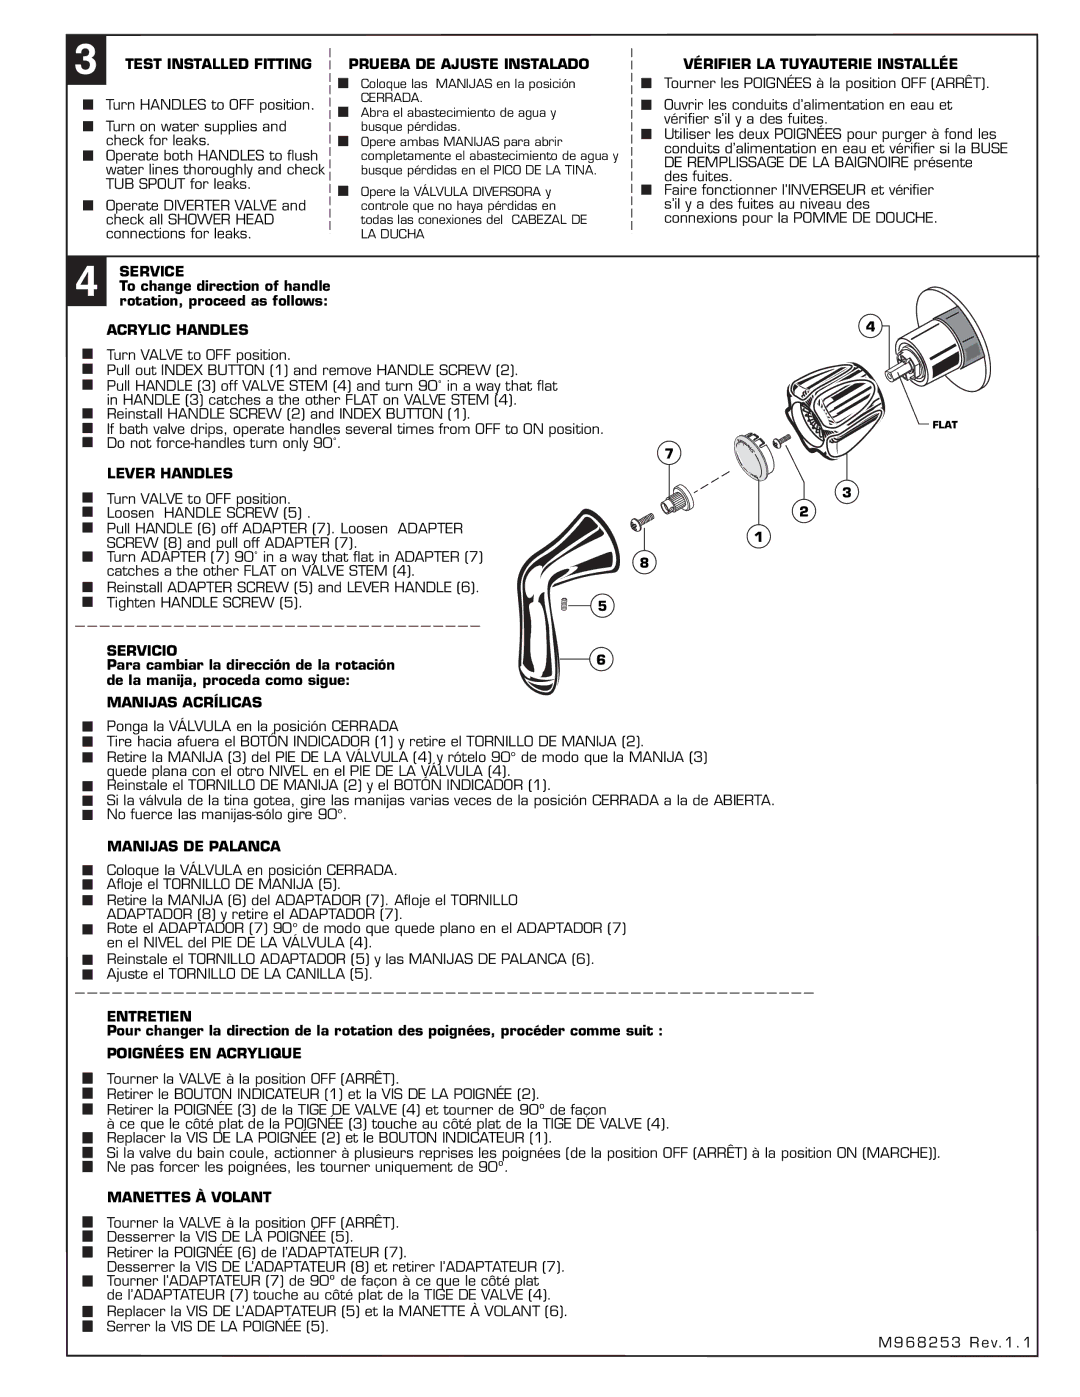
To change direction of handle rotation, proceed as follows:

ACRYLIC HANDLES

4

Turn VALVE to OFF position.

Pull out INDEX BUTTON (1) and remove HANDLE SCREW (2).

Pull HANDLE (3) off VALVE STEM (4) and turn 90˚ in a way that flat


in HANDLE (3) catches a the other FLAT on VALVE STEM (4).


Reinstall HANDLE SCREW (2) and INDEX BUTTON (1).

FLAT

If bath valve drips, operate handles several times from OFF to ON position.

Do not force-handles turn only 90˚.


7


LEVER HANDLES


Turn VALVE to OFF position.


3


2

Loosen HANDLE SCREW (5) .


Pull HANDLE (6) off ADAPTER (7). Loosen

ADAPTER

1

SCREW (8) and pull off ADAPTER (7).


Turn ADAPTER (7) 90˚ in a way that flat in ADAPTER (7)

8

catches a the other FLAT on VALVE STEM (4).


Reinstall ADAPTER SCREW (5) and LEVER HANDLE (6).


Tighten HANDLE SCREW (5).

5


SERVICIO


6

Para cambiar la dirección de la rotación


de la manija, proceda como sigue:

MANIJAS ACRÍLICAS

Ponga la VÁLVULA en la posición CERRADA

Tire hacia afuera el BOTÓN INDICADOR (1) y retire el TORNILLO DE MANIJA (2).

Retire la MANIJA (3) del PIE DE LA VÁLVULA (4) y rótelo 90° de modo que la MANIJA (3) quede plana con el otro NIVEL en el PIE DE LA VÁLVULA (4).

Reinstale el TORNILLO DE MANIJA (2) y el BOTÓN INDICADOR (1).

Si la válvula de la tina gotea, gire las manijas varias veces de la posición CERRADA a la de ABIERTA. No fuerce las manijas-sólo gire 90°.

MANIJAS DE PALANCA

Coloque la VÁLVULA en posición CERRADA. Afloje el TORNILLO DE MANIJA (5).

Retire la MANIJA (6) del ADAPTADOR (7). Afloje el TORNILLO ADAPTADOR (8) y retire el ADAPTADOR (7).

Rote el ADAPTADOR (7) 90° de modo que quede plano en el ADAPTADOR (7) en el NIVEL del PIE DE LA VÁLVULA (4).

Reinstale el TORNILLO ADAPTADOR (5) y las MANIJAS DE PALANCA (6). Ajuste el TORNILLO DE LA CANILLA (5).

ENTRETIEN

Pour changer la direction de la rotation des poignées, procéder comme suit :

POIGNÉES EN ACRYLIQUE

Tourner la VALVE à la position OFF (ARRÊT).

Retirer le BOUTON INDICATEUR (1) et la VIS DE LA POIGNÉE (2).

Retirer la POIGNÉE (3) de la TIGE DE VALVE (4) et tourner de 90º de façon

àce que le côté plat de la POIGNÉE (3) touche au côté plat de la TIGE DE VALVE (4). Replacer la VIS DE LA POIGNÉE (2) et le BOUTON INDICATEUR (1).

Si la valve du bain coule, actionner à plusieurs reprises les poignées (de la position OFF (ARRÊT) à la position ON (MARCHE)). Ne pas forcer les poignées, les tourner uniquement de 90º.

MANETTES À VOLANT

Tourner la VALVE à la position OFF (ARRÊT). Desserrer la VIS DE LA POIGNÉE (5). Retirer la POIGNÉE (6) de l’ADAPTATEUR (7).

Desserrer la VIS DE L’ADAPTATEUR (8) et retirer l’ADAPTATEUR (7). Tourner l’ADAPTATEUR (7) de 90º de façon à ce que le côté plat de l’ADAPTATEUR (7) touche au côté plat de la TIGE DE VALVE (4). Replacer la VIS DE L’ADAPTATEUR (5) et la MANETTE À VOLANT (6). Serrer la VIS DE LA POIGNÉE (5).

M968253 Rev. 1 . 1

Page 3
Image 3
American Standard 3375 Service, Acrylic Handles, Lever Handles, Servicio, Manijas Acrílicas, Manijas DE Palanca, Entretien

3375 specifications

The American Standard 3375 is a highly sought-after toilet model known for its combination of modern design and efficient performance. It is engineered for both functionality and aesthetic appeal, making it a popular choice for homeowners and builders alike.

One of the standout features of the American Standard 3375 is its powerful flushing system, which utilizes a unique EverClean surface that helps to inhibit the growth of stain and odor-causing bacteria, mold, and mildew. This innovative feature not only ensures a cleaner bowl but also reduces the frequency of deep cleaning required, enhancing the overall convenience of the toilet.

The 3375 model is designed with a dual flush system, offering users the option of a full flush for solid waste and a reduced flush for liquid waste. This eco-friendly technology promotes water conservation, allowing homeowners to save on their water bills while contributing to environmental sustainability. The toilet achieves a maximum flush of 1.6 gallons per flush (GPF) while also providing an efficient 1.28 GPF option, proving its capability to handle waste effectively without compromising performance.

In terms of comfort, the American Standard 3375 features a height that meets the standards of the ADA (Americans with Disabilities Act), making it accessible for individuals of all mobility levels. Its comfortable elongated bowl design provides additional sitting space, ensuring a pleasant user experience.

The toilet is constructed from vitreous china, offering durability and a sleek, polished finish that complements a variety of bathroom styles. Its compact design aids in space-saving without compromising comfort, making it an ideal choice for smaller bathrooms as well as larger fixtures.

Installation of the American Standard 3375 is straightforward, as it is designed to fit standard plumbing layouts. Additionally, the toilet comes with a sleek tank design that not only enhances its visual appeal but also minimizes noise during flushing, adding to the overall serene bathroom environment.

The combination of efficient water usage, durable construction, and stylish design positions the American Standard 3375 as a leading choice in the market for those looking to upgrade their bathroom fixtures. Whether building new or renovating an existing space, this toilet model offers a perfect balance of performance, comfort, and aesthetics.