Quick Start Guide
Mio Modero® R-4 Remote
Overview
The Mio Modero®
wireless ZigBee® network. Use TPDesign4 (TPD4) to program this device. The
Note: The
• TPDesign4 - v2.7 (build 545 or higher)
• AMX USB LAN - v2.01.05 (or higher)
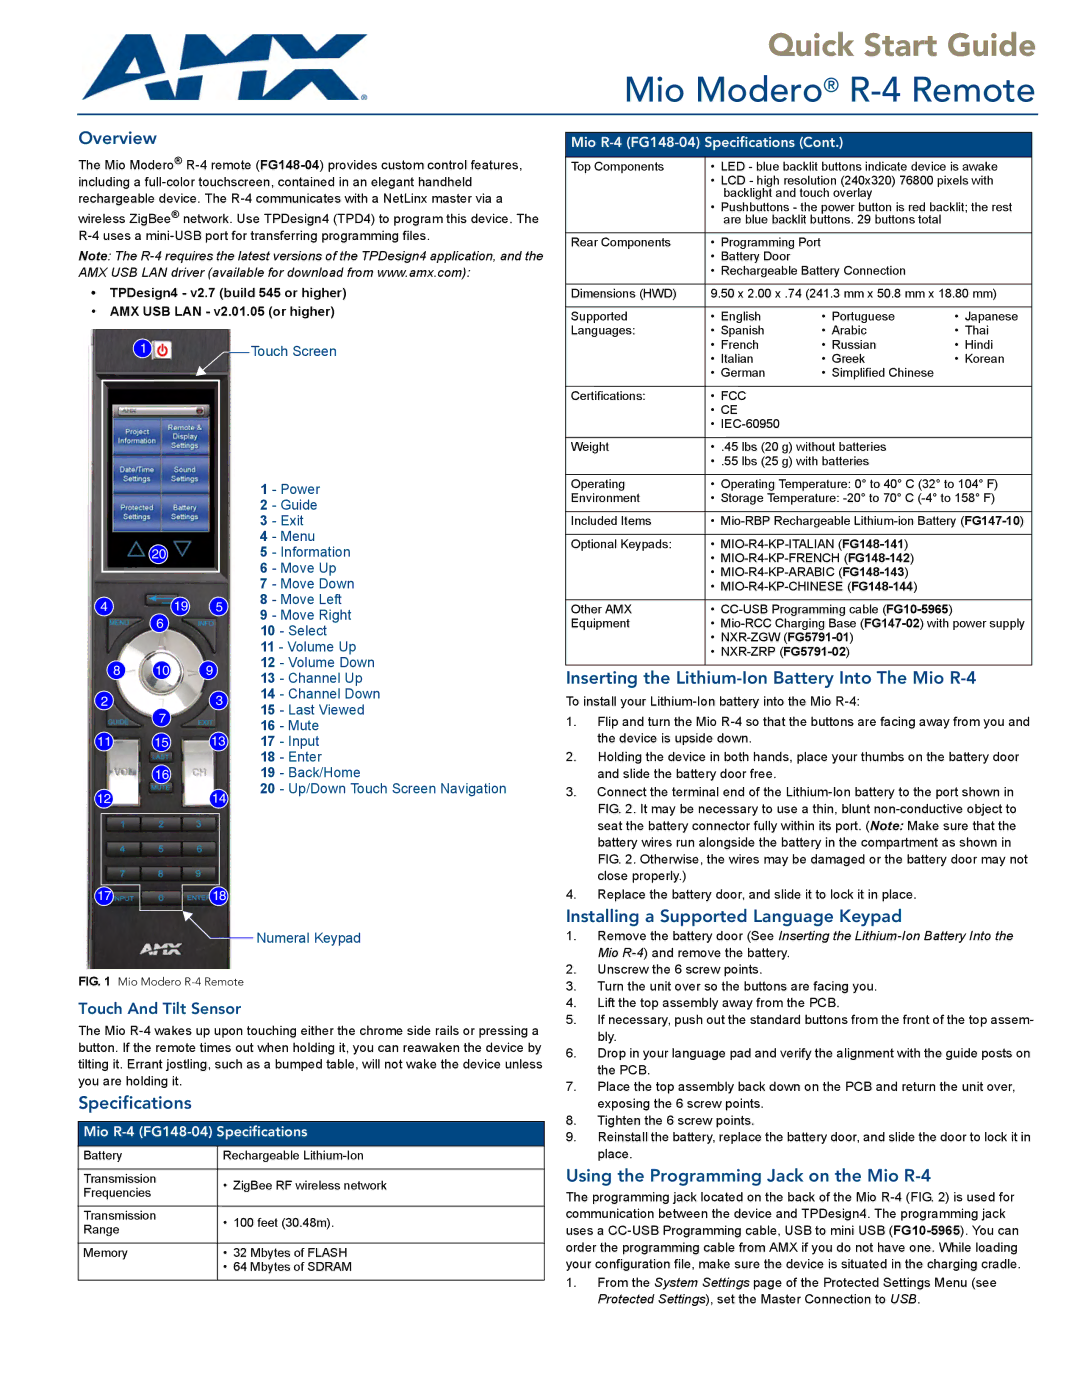
1 |
| Touch Screen |
|
1 - Power
2 - Guide
3 - Exit
4 - Menu
205 - Information
6 - Move Up
7 - Move Down
4 | 19 | 5 | 8 - Move Left | ||
9 - Move Right | |||||
| 6 |
| |||
|
| 10 | - Select | ||
|
|
| |||
|
|
| 11 - Volume Up | ||
8 | 10 | 9 | 12 | - Volume Down | |
13 | - Channel Up | ||||
|
|
| |||
2 |
| 3 | 14 | - Channel Down | |
| 15 | - Last Viewed | |||
| 7 |
| |||
|
| 16 | - Mute | ||
|
|
| |||
11 | 15 | 13 | 17 | - Input | |
|
|
| 18 | - Enter | |
1619 - Back/Home
20 - Up/Down Touch Screen Navigation
1214
17 | 18 |
Numeral Keypad
FIG. 1 Mio Modero R-4 Remote
Touch And Tilt Sensor
The Mio
Specifications
Mio R-4 (FG148-04) Specifications
Battery | Rechargeable | |
|
| |
Transmission | • ZigBee RF wireless network | |
Frequencies | ||
| ||
|
| |
Transmission | • 100 feet (30.48m). | |
Range | ||
| ||
|
| |
Memory | • 32 Mbytes of FLASH | |
| • 64 Mbytes of SDRAM | |
|
|
Mio
Top Components | • LED - blue backlit buttons indicate device is awake | |||
| • LCD - high resolution (240x320) 76800 pixels with | |||
|
| backlight and touch overlay |
| |
| • | Pushbuttons - the power button is red backlit; the rest | ||
|
| are blue backlit buttons. 29 buttons total |
| |
|
|
|
| |
Rear Components | • Programming Port |
|
| |
| • Battery Door |
|
| |
| • Rechargeable Battery Connection |
| ||
|
| |||
Dimensions (HWD) | 9.50 x 2.00 x .74 (241.3 mm x 50.8 mm x 18.80 mm) | |||
|
|
|
| |
Supported | • English | • Portuguese | • Japanese | |
Languages: | • Spanish | • Arabic | • Thai | |
| • French | • Russian | • Hindi | |
| • | Italian | • Greek | • Korean |
| • German | • Simplified Chinese |
| |
|
|
|
|
|
Certifications: | • | FCC |
|
|
| • CE |
|
| |
| • |
|
| |
|
|
|
| |
Weight | • | .45 lbs (20 g) without batteries |
| |
| • | .55 lbs (25 g) with batteries |
| |
|
| |||
Operating | • Operating Temperature: 0° to 40° C (32° to 104° F) | |||
Environment | • Storage Temperature: | |||
|
| |||
Included Items | • | |||
|
|
| ||
Optional Keypads: | • |
| ||
| • |
| ||
| • |
| ||
| • |
| ||
|
|
| ||
Other AMX | • |
| ||
Equipment | • | |||
| • |
| ||
| • |
| ||
|
|
|
|
|
Inserting the Lithium-Ion Battery Into The Mio R-4
To install your
1.Flip and turn the Mio
2.Holding the device in both hands, place your thumbs on the battery door and slide the battery door free.
3.Connect the terminal end of the
4.Replace the battery door, and slide it to lock it in place.
Installing a Supported Language Keypad
1.Remove the battery door (See Inserting the
2.Unscrew the 6 screw points.
3.Turn the unit over so the buttons are facing you.
4.Lift the top assembly away from the PCB.
5.If necessary, push out the standard buttons from the front of the top assem- bly.
6.Drop in your language pad and verify the alignment with the guide posts on the PCB.
7.Place the top assembly back down on the PCB and return the unit over, exposing the 6 screw points.
8.Tighten the 6 screw points.
9.Reinstall the battery, replace the battery door, and slide the door to lock it in place.
Using the Programming Jack on the Mio R-4
The programming jack located on the back of the Mio
1.From the System Settings page of the Protected Settings Menu (see Protected Settings), set the Master Connection to USB.