1.Remove the faceplate from the front panel of the server.
2.Remove the damaged HDD. Each HDD is mounted in a tray that slides in and out of the server. To remove the drive/tray assembly (FIG. 4):
a.Push the tab on the front of the drive tray to the right to unlock the hinged front panel. Flip the hinged panel out and use it as a handle to gently pull the drive/tray assembly out of its slot.
b.Remove the drive from the drive tray. The drive is secured to the tray with four screws on the bottom panel.
3.Install and secure the replacement drive into the drive tray.
4.Slide the replacement drive/tray assembly fully into the slot, and push the hinged front panel back into its locked position. The LEDs on the front of the HDD should light to indicate that it has been connected and is communicating properly.
5.Replace the faceplate on the server.
Step 3: Rebuild the RAID Array
Once the new HDD has been installed, the drive must be added to the server’s RAID array. This entails rebuilding the RAID array on the new HDD.
To rebuild the RAID array, you must have a PC connected to the MMS server:
•If you intend to connect to the MMS via a LAN connection, verify that the PC is communicating properly with the network.
•Use an
Once you have established communication between the MMS server and your PC, you’ll use your web browser to access the server’s Disk Management Utility interface:
1.Launch a web browser.
2.Enter the IP address of the target MMS server in the address bar (example: http://192.168.1.30:1080). You can use the WinMAX program to determine the server’s IP address (displayed in the System Information tab). Don’t forget to include the port number.
3.Press Enter to open the Disk Management Utility - Home Page (FIG. 1).
4.Click on the Configure tab at the top of the screen to access the Configure page (FIG. 2) which lists all drives in each array and their status. If a drive has failed, it will be indicated on this page (labeled “Degraded” rather than “OK”).
5.Check the box next to the failed drive that you are removing, and click the Remove Drive button at the bottom of the screen.
6.Check the box again and click the Add Drive button at the bottom of the page.
7.Check all boxes next to all the drives (only in the array that contains the replaced HDD).
8.Check the Force Continue On Source Errors checkbox at the bottom of the screen.
9.Click the Rebuild Unit button. Expect a delay of approximately two minutes before the rebuild process begins.
10.Click on the Home tab at the top of the screen to return to the Home page, where you can monitor the process of the rebuild.
Once started, the process of rebuilding the array should take approximately 1.5 hours to complete. Do not interrupt this process.
The message “Rebuild Complete” is displayed next to the drive (on the Home page) when the process is finished.
At this point you can close the Disk Management Utility, and continue to use the server as usual. There is no need to reboot the server.
Step 4: Authenticate the New HDD
When an HDD is replaced in a MMS server, it must be authenticated before the system will play media content. HDDs are authenticated using two criteria, unique to each replacement HDD:
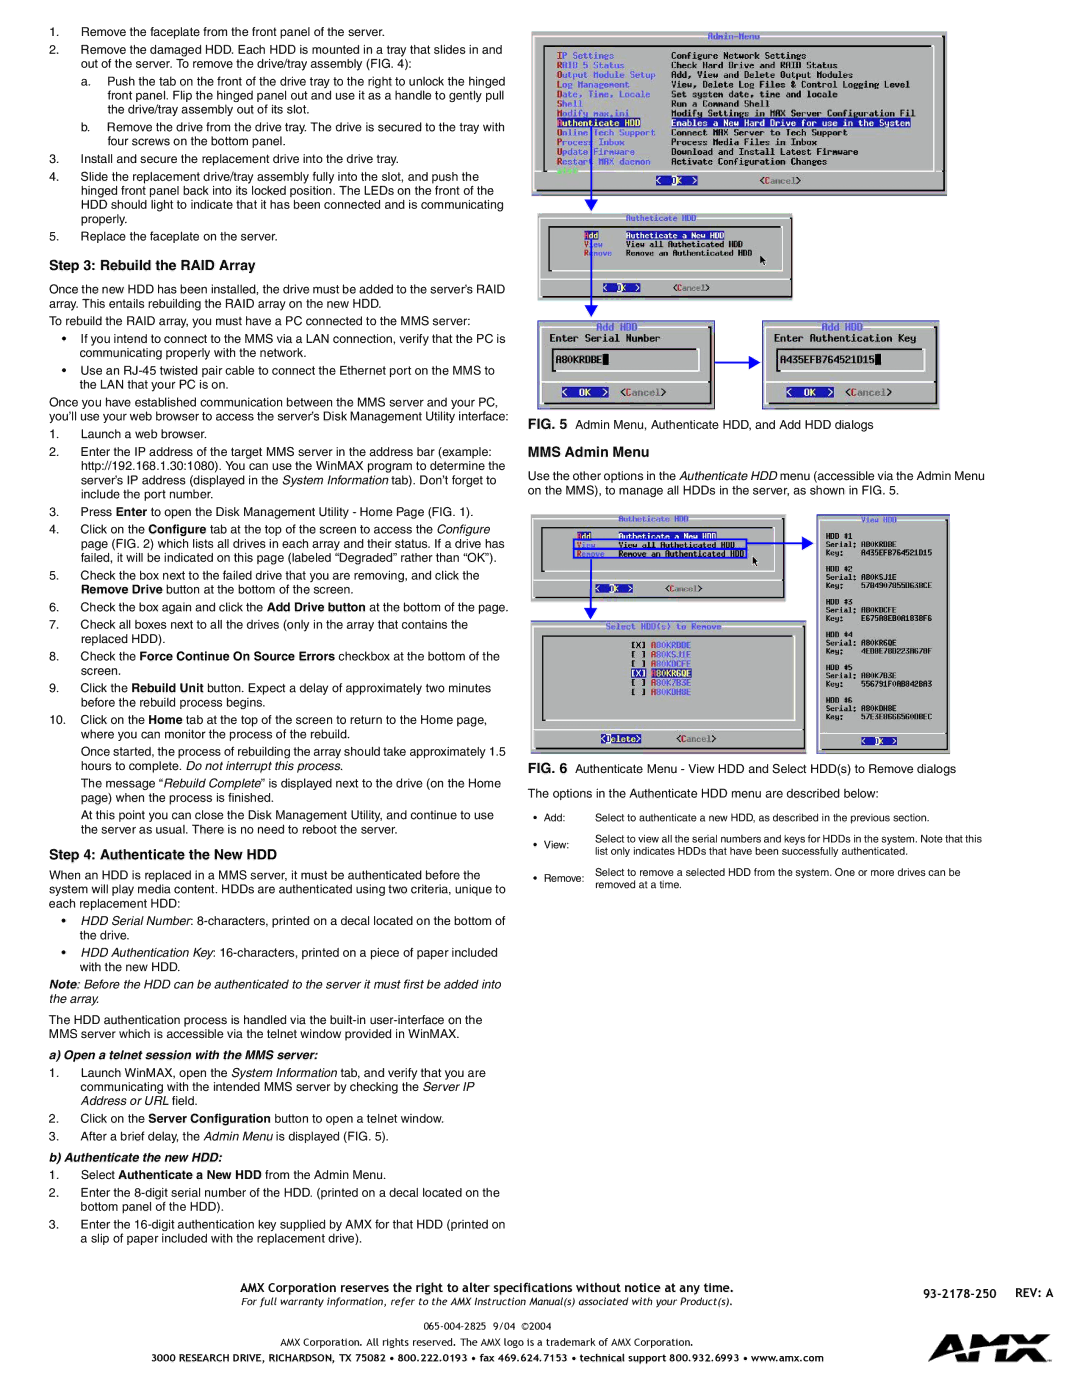
FIG. 5 Admin Menu, Authenticate HDD, and Add HDD dialogs
MMS Admin Menu
Use the other options in the Authenticate HDD menu (accessible via the Admin Menu on the MMS), to manage all HDDs in the server, as shown in FIG. 5.
FIG. 6 Authenticate Menu - View HDD and Select HDD(s) to Remove dialogs
The options in the Authenticate HDD menu are described below:
• | Add: | Select to authenticate a new HDD, as described in the previous section. | |
• | View: | Select to view all the serial numbers and keys for HDDs in the system. Note that this | |
list only indicates HDDs that have been successfully authenticated. | |||
|
|
•Remove: Select to remove a selected HDD from the system. One or more drives can be removed at a time.
•HDD Serial Number:
•HDD Authentication Key:
Note: Before the HDD can be authenticated to the server it must first be added into the array.
The HDD authentication process is handled via the
MMS server which is accessible via the telnet window provided in WinMAX.
a) Open a telnet session with the MMS server:
1.Launch WinMAX, open the System Information tab, and verify that you are communicating with the intended MMS server by checking the Server IP Address or URL field.
2.Click on the Server Configuration button to open a telnet window.
3.After a brief delay, the Admin Menu is displayed (FIG. 5).
b) Authenticate the new HDD:
1.Select Authenticate a New HDD from the Admin Menu.
2.Enter the
3.Enter the
AMX Corporation reserves the right to alter specifications without notice at any time. | REV: A | ||
For full warranty information, refer to the AMX Instruction Manual(s) associated with your Product(s). | |||
|
|
AMX Corporation. All rights reserved. The AMX logo is a trademark of AMX Corporation.
3000 RESEARCH DRIVE, RICHARDSON, TX 75082 • 800.222.0193 • fax 469.624.7153 • technical support 800.932.6993 • www.amx.com