IMPORTANT SAFEGUARDS
When using an electrical appliance, basic precautions should always be followed, including the following: Read all instructions before using the Andis Shaver.
DANGER: To reduce the risk of electric shock:
1.Do not reach for an appliance that has fallen into water. Unplug immediately.
2.Do not use while bathing or in a shower.
3.Do not place or store appliance where it can fall or be pulled into a tub or sink. Do not place in or drop into water or other liquid.
4.Except when charging, always unplug this appliance from the electric outlet immediately after using.
5.Unplug this appliance before cleaning.
WARNING:To reduce the risk of burns, fire, electric shock, or injury to persons:
1.Close supervision is necessary when this appliance is used by, on or near children or individuals with certain disabilities.
2.Use this appliance only for its intended use as described in this manual. Do not use attachments not recommended by Andis.
3.Never operate this appliance if it has a damaged cord or plug, if it is not working properly, if it has been dropped or damaged, or dropped into water. Return the appliance to an Andis Authorized Repair Station for examination or repair.
4.Keep the cord away from heated surfaces.
5.Never drop or insert any object into any opening. Insert only recharging transformer plug into trimmer receptacle.
6.Do not use outdoors or operate where aerosol (spray) products are being used or where oxygen is being administered.
7.Do not use this appliance with a damaged or broken blade, as injury to the skin may occur.
8.Always attach plug to appliance first, then to outlet. To disconnect, turn all controls to “off” then remove plug from outlet.
SAVE THESE INSTRUCTIONS
THIS PRODUCT INTENDED FOR PROFESSIONAL USE
OPERATING INSTRUCTIONS
Please read the following instructions before using your new Andis Shaver. Give it the care that a fine precision built instrument deserves and it will give you years of service.
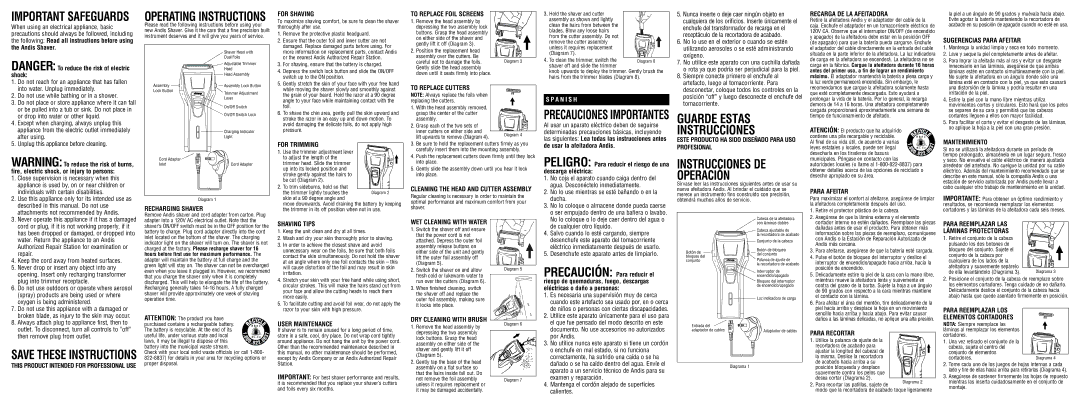
| Shaver Head with |
| Dual Foils |
| Adjustable Trimmer |
| Head |
| Head Assembly |
Assembly | Assembly Lock Button |
Lock Button | Trimmer Adjustment |
|
| Lever |
| On/Off Switch |
| On/Off Switch Lock |
| Charging Indicator |
| Light |
Cord Adapter | |
Inlet | Cord Adapter |
Diagram 1
RECHARGING SHAVER
Remove Andis shaver and cord adapter from carton. Plug adapter into a 120V AC electrical outlet. Note that the shaver’s ON/OFF switch must be in the OFF position for the battery to charge. Plug cord adapter directly into the cord inlet located on the bottom of the shaver. The charging indicator light on the shaver will turn on. The shaver is not charged at the factory. Please recharge shaver for 16 hours before first use for maximum performance. The adapter will maintain the battery at full charge and the green light will stay on. The shaver can not be overcharged even when you leave it plugged in. However, we recommend that you charge the shaver only when it is completely discharged. This will help to elongate the life of the battery. Recharging generally takes 14-16 hours. A fully charged shaver will provide approximately one week of shaving operation time.
ATTENTION: The product you have purchased contains a rechargeable battery. The battery is recyclable. At the end of its useful life, under various state and local laws, it may be illegal to dispose of this battery into the municipal waste stream.
Check with your local solid waste officials (or call 1-800- 822-8837) for details in your area for recycling options or proper disposal.
For Shaving
To maximize shaving comfort, be sure to clean the shaver thoroughly after use.
1.Remove the protective plastic headguard.
2.Ensure that the outer foil and inner cutter are not damaged. Replace damaged parts before using. For more information on replacement parts, contact Andis or the nearest Andis Authorized Repair Station.
3.For shaving, ensure that the battery is charged.
4.Depress the switch lock button and slide the ON/OFF switch up to the ON position.
5.Gently stretch the skin of your face with your free hand while moving the shaver slowly and smoothly against the grain of your beard. Hold the razor at a 90 degree angle to your face while maintaining contact with the foil.
6.To shave the chin area, gently pull the skin upward and stroke the razor in an easy up and down motion. To avoid damaging the delicate foils, do not apply high pressure.
For Trimming
1. Use the trimmer adjustment lever to adjust the length of the
trimmer head. Slide the trimmer up into its locked position and stroke gently against the hairs to be cut (Diagram 2).
2. To trim sideburns, hold so that the trimmer lightly touches the
skin at a 90 degree angle and
move downwards. Avoid draining the battery by keeping the trimmer in its off position when not in use.
Shaving Tips
1.Keep the unit clean and dry at all times.
2.Wash and dry your skin thoroughly prior to shaving.
3.In order to achieve the closest shave and avoid unnecessary wear on the foils, be sure that both foils contact the skin simultaneously. Do not hold the shaver at an angle where only one foil contacts the skin – this will cause distortion of the foil and may result in skin irritation.
4.Stretch your skin with your free hand while using short, circular strokes. This will make the hairs stand out from your face and allow the cutting heads to reach them more easily.
5.To facilitate cutting and avoid foil wear, do not apply the razor to your skin with high pressure.
USER MAINTENANCE
If shaver is to remain unused for a long period of time, store in a safe, cool, dry place. Do not wrap cord tightly around appliance. Do not hang the unit by the power cord. Other than the recommended maintenance described in this manual, no other maintenance should be performed, except by Andis Company or an Andis Authorized Repair Station.
IMPORTANT: For best shaver performance and results, it is recommended that you replace your shaver’s cutters and foils every six months.
TO REPLACE FOIL SCREENS
1. Remove the head assembly by
depressing the two assembly lock buttons. Grasp the head assembly
on either side of the shaver and gently lift it off (Diagram 3).
2. Position the replacement head assembly over the cutters. Be
careful not to damage the foils. Diagram 3 Gently slide the head assembly
down until it seats firmly into place.
TO REPLACE CUTTERS
NOTE: Always replace the foils when replacing the cutters.
1.With the head assembly removed, grasp the center of the cutter assembly.
2.Grasp each of the two sets of
| inner cutters on either side and | Diagram 4 |
| lift upwards to remove (Diagram 4). |
| |
3.Be sure to hold the replacement cutters firmly as you carefully insert them into the mounting assembly.
4.Push the replacement cutters down firmly until they lock into place.
5.Gently slide the assembly down until you hear it lock into place.
CLEANING THE HEAD AND CUTTER ASSEMBLY
Regular cleaning is necessary in order to maintain the optimal performance and maximum comfort from your shaver.
WET CLEANING with WATER
1. Switch the shaver off and ensure that the power cord is not attached. Depress the outer foil assembly release buttons on either side of the unit and gently lift the outer foil assembly off (Diagram 5).
2. | Switch the shaver on and allow | Diagram 5 |
| fresh cold or lukewarm water to | |
| |
| run over the cutters (Diagram 6). | |
3. | When finished cleaning, switch | |
| the shaver off and replace the | |
| outer foil assembly, making sure | |
| it locks into place. | |
| DRY CLEANING WITH BRUSH | Diagram 6 |
| 1. Remove the head assembly by |
| |
| depressing the two assembly | |
| lock buttons. Grasp the head | |
| assembly on either side of the | |
| shaver and gently lift it off | |
| (Diagram 5). | |
| 2. Gently tap the base of the head | |
| assembly on a flat surface so | |
| that the hairs inside fall out. Do | |
| not remove the foil assembly | Diagram 7 |
| unless it requires replacement or | |
it may be damaged accidentally.
3.Hold the shaver and cutter assembly as shown and lightly clean the hairs from between the blades. Blow any loose hairs from the cutter assembly. Do not remove the cutter assembly unless it requires replacement (Diagram 7).
4. To clean the trimmer, switch the shaver off and slide the trimmer
knob upwards to deploy the trimmer. Gently brush the hairs from the trimmer blades (Diagram 8).
S P A N I S H
PRECAUCIONES IMPORTANTES
Al usar un aparato eléctrico deben de seguirse determinadas precauciones básicas, incluyendo las siguientes: Lea todas las instrucciones antes de usar la afeitadora Andis.
PELIGRO:
descarga eléctrica:
1.No coja el aparato cuando caiga dentro del agua. Desconéctelo inmediatamente.
2.No lo use mientras se esté bañando o en la ducha.
3.No lo coloque o almacene donde pueda caerse o ser empujado dentro de una bañera o lavabo. No lo coloque o lo deje caer dentro del agua o de cualquier otro líquido.
4.Salvo cuando lo esté cargando, siempre desenchufe este aparato del tomacorriente eléctrico inmediatamente después de usarlo.
5.Desenchufe este aparato antes de limpiarlo.
PRECAUCIÓN: Para reducir el riesgo de quemaduras, fuego, descargas eléctricas o daño a personas:
1.Es necesaria una supervisión muy de cerca cuando este artefacto sea usado por, en o cerca de niños o personas con ciertas discapacidades.
2.Utilice este aparato únicamente para el uso para el que fue pensado del modo descrito en este documento. No use accesorios no autorizados por Andis.
3.No utilice nunca este aparato si tiene un cordón o enchufe en mal estado, si no funciona correctamente, ha sufrido una caída o se ha dañado o se ha caído dentro del agua. Envíe el aparato a un servicio técnico de Andis para su examen y reparación.
4.Mantenga el cordón alejado de superficies calientes.
5.Nunca inserte o deje caer ningún objeto en cualquiera de los orificios. Inserte únicamente el enchufe del transformador de recarga en el receptáculo de la recortadora de acabado.
6.No lo use en el exterior o cuando se estén utilizando aerosoles o se esté administrando oxígeno.
7.No utilice este aparato con una cuchilla dañada o rota ya que podría ser perjudicial para la piel.
8.Siempre conecte primero el enchufe al artefacto, luego al tomacorriente. Para desconectar, coloque todos los controles en la posición “off” y luego desconecte el enchufe del tomacorriente.
GUARDE ESTAS
INSTRUCCIONES
Este producto ha sido diseñado para uso profesional
INSTRUCCIONES DE
OPERACIÓN
Sírvase leer las instrucciones siguientes antes de usar su nueva afeitadora Andis. Al brindar el cuidado que se merece un instrumento fino construido con precisión, obtendrá muchos años de servicio.
| | Cabeza de la afeitadora |
| | con láminas dobles |
| | Cabeza ajustable de |
| | la recortadora de acabado |
| | Conjunto de la cabeza |
| Botón de | Botón de bloqueo |
| del conjunto |
| bloqueo del |
| Palanca de ajuste de |
| conjunto |
| | la recortadora de acabado |
| | Interruptor de |
| | encendido/apagado |
| | Bloqueo del interruptor |
| | de encendido/apagado |
| | Luz indicadora de carga |
| Entrada del | |
| adaptador de cables | Adaptador de cables |
Diagrama 1
RECARGA DE LA AFEITADORA
Retire la afeitadora Andis y el adaptador del cable de la caja. Enchufe el adaptador en un tomacorriente eléctrico de 120V CA. Observe que el interruptor ON/OFF (de encendido y apagado) de la afeitadora debe estar en la posición OFF (de apagado) para que la batería pueda cargarse. Enchufe el adaptador del cable directamente en la entrada del cable situada en la parte inferior de la afeitadora. La luz indicadora de carga en la afeitadora se encenderá. La afeitadora no se
carga en la fábrica. Cargue la afeitadora durante 16 horas antes del primer uso, a fin de lograr un rendimiento máximo. El adaptador mantendrá la batería a plena carga y
la luz verde permanecerá encendida. Sin embargo, le recomendamos que cargue la afeitadora solamente hasta que esté completamente descargada. Esto ayudará a prolongar la vida de la batería. Por lo general, la recarga demora de 14 a 16 horas. Una afeitadora completamente cargada proporcionará aproximadamente una semana de tiempo de funcionamiento de afeitado.
ATENCIÓN: El producto que ha adquirido contiene una pila recargable y reciclable. Al final de su vida útil, de acuerdo a varias leyes estatales y locales, puede ser ilegal desecharla en los tiraderos de basura municipales. Póngase en contacto con las autoridades locales (o llame al 1-800-822-8837) para obtener detalles acerca de las opciones de reciclado o desecho apropiado en su área.
Para afeitar
Para maximizar el confort al afeitarse, asegúrese de limpiar la afeitadora completamente después del uso.
1.Retire el protector plástico de la cabeza.
2.Asegúrese de que la lámina externa y el elemento cortador interno no estén dañados. Reemplace las piezas dañadas antes de usar el producto. Para obtener más información sobre las piezas de reemplazo, comuníquese con Andis o la Estación de Reparación Autorizada de Andis más cercana.
3.Para afeitarse, asegúrese de que la batería esté cargada.
4.Pulse el botón de bloqueo del interruptor y deslice el interruptor de encendido/apagado hacia arriba, hacia la posición de encendido.
5.Delicadamente estire la piel de la cara con la mano libre, mientras mueve la afeitadora lenta y suavemente en contra del grano de la barba. Sujete la hoja a un ángulo de 90 grados con respecto a la cara mientras mantiene el contacto con la lámina.
6.Para afeitar el área del mentón, tire delicadamente de la piel hacia arriba y desplace la hoja en un movimiento sencillo hacia arriba y hacia abajo. Para evitar causar daños a las láminas delicadas, no aplique una alta presión.
| Para recortar | |
| 1. Utilice la palanca de ajuste de la | |
| recortadora de acabado para | |
| ajustar la longitud del cabezal de | |
| la misma. Deslice la recortadora | |
| de acabado hacia arriba a su | |
| posición bloqueada y desplace | |
| suavemente contra los pelos que | |
| desea cortar (Diagrama 2). | Diagrama 2 |
| 2. Para recortar las patillas, sujete de |
| |
modo que la recortadora de acabado toque ligeramente
la piel a un ángulo de 90 grados y muévala hacia abajo. Evite agotar la batería manteniendo la recortadora de acabado en su posición de apagado cuando no esté en uso.
SUGERENCIAS PARA AFEITAR
1.Mantenga la unidad limpia y seca en todo momento.
2.Lave y seque la piel completamente antes de afeitar.
3.Para lograr la afeitada más al ras y evitar un desgaste innecesario en las láminas, asegúrese de que ambas láminas estén en contacto simultáneamente con la piel. No sujete la afeitadora en un ángulo donde sólo una lámina esté en contacto con la piel, ya que esto causará una distorsión de la lámina y podría resultar en una irritación de la piel.
4.Estire la piel con la mano libre mientras utiliza movimientos cortos y circulares. Esto hará que los pelos se separen de su cara y permitirá que las cabezas cortantes lleguen a ellos con mayor facilidad.
5.Para facilitar el corte y evitar el desgaste de las láminas, no aplique la hoja a la piel con una gran presión.
MANTENIMIENTO
Si no se utilizará la afeitadora durante un período de tiempo prolongado, almacénela en un lugar seguro, fresco y seco. No envuelva el cable eléctrico de manera ajustada alrededor del artefacto. No cuelgue la unidad por su cable eléctrico. Además del mantenimiento recomendado que se describe en este manual, sólo la compañía Andis o una estación de servicio autorizada por Andis puede llevar a cabo cualquier otro trabajo de mantenimiento en la unidad.
IMPORTANTE: Para obtener un óptimo rendimiento y resultados, se recomienda reemplazar los elementos cortadores y las láminas de la afeitadora cada seis meses.
PARA REEMPLAZAR LAS | |
LÁMINAS PROTECTORAS | |
1. Retire el conjunto de la cabeza | |
pulsando los dos botones de | |
bloqueo del conjunto. Sujete el | |
conjunto de la cabeza por | |
cualquiera de los lados de la | |
afeitadora y suavemente sepárelo | |
de ella levantándolo (Diagrama 3). | Diagrama 3 |
2.Posicione el conjunto de la cabeza de reemplazo sobre los elementos cortadores. Tenga cuidado de no dañarlo. Delicadamente deslice el conjunto de la cabeza hacia abajo hasta que quede asentado firmemente en posición.
PARA REEMPLAZAR LOS
ELEMENTOS CORTADORES
NOTA: Siempre reemplace las láminas al reemplazar los elementos cortadores.
1. Una vez retirado el conjunto de la | |
cabeza, sujete el centro del | |
conjunto de elementos | |
cortadores. | Diagrama 4 |
2.Tome cada uno de los juegos de hojas internas a cada lado y tire de ellas hacia arriba para retirarlas (Diagrama 4).
3.Asegúrese de sostener firmemente las hojas de repuesto mientras las inserta cuidadosamente en el conjunto de montaje.