IMPORTANT SAFEGUARDS
When using an electrical appliance, basic precautions should always be followed, including the following: Read all instructions before using the Andis Trimmer.
DANGER: To reduce the risk of electric shock:
1.Do not reach for an appliance that has fallen into water. Unplug immediately.
2.Do not use while bathing or in a shower.
3.Do not place or store appliance where it can fall or be pulled into a tub or sink. Do not place in or drop into water or other liquid.
4.Always unplug this appliance from the electrical outlet immediately after using.
5.Unplug this appliance before cleaning, removing, or assembling parts.
WARNING: To reduce the risk of burns, fire, electric shock, or injury to persons:
1.An appliance should never be left unattended when plugged in.
2.Close supervision is necessary when this appliance is used by, on or near children or individuals with certain disabilities.
3.Use this appliance only for its intended use as described in this manual. Do not use attachments not recommended by Andis.
4.Never operate this appliance if it has a damaged cord or plug, if it is not working properly, if it has been dropped or damaged, or dropped into water. Return the appliance to an Andis Service Center for examination or repair.
5.Keep the cord away from heated surfaces.
6.Never drop or insert any object into any opening.
7.Do not use outdoors or operate where aerosol (spray) products are being used or where oxygen is being administered.
8.Do not use this appliance with a damaged or broken blade or comb, as injury to the skin may occur.
9.To disconnect turn control to “off” then remove plug from outlet.
SAVE THESE INSTRUCTIONS
THIS PRODUCT INTENDED FOR HOUSEHOLD USE
This appliance has a polarized plug (one blade is wider than the other). As a safety feature, the plug will fit in a polarized outlet only one way. If the plug does not fit fully in the outlet, reverse the plug. If it still does not fit, contact a qualified electrician to install the proper outlet. Do not change the plug in any way.
OPERATING INSTRUCTIONS
Please read the following instructions before using your new Andis Trimmer. Give it the care that a fine precision built instrument deserves and it will give you years of service. Before starting trimmer remove blade guard (some models may not have a blade guard). Plug cord into electrical outlet, operate at 120 volt, 60 cycle AC electrical current or as noted on the unit. To start trimmer move switch button to on position, to stop, move switch button back to original position. After using your Andis Trimmer, rewrap cord and store in a safe place. Some of the “basic” uses for a trimmer are illustrated below:
| SHAVES BACK OF NECK– | | SHAPES HAIRLINE– |
Extra fine blade takes just the right | Trimmer cuts a sharp hairline. Helps |
amount of hair… thoroughly shaves | you give a neat, smooth shave right |
| neck in seconds. | | up to the line. |
| | | | | |
| | | | | |
TRIMS AROUND THE EARS– | FINISHES SIDEBURNS– |
Extra fine blade and narrow head makes | The trimmer’s cutting head makes a |
shaping and trimming hairline around | clean, level, professional line. A few |
ears fast and easy. | upward strokes shaves hair below line. |
USER MAINTENANCE
The internal mechanism of your trimmer has been permanently lubricated at the factory. Other than the recommended maintenance described in this manual, no other maintenance should be performed, except by Andis Company or an Andis Authorized Repair Service Station.
CARE AND SERVICING OF YOUR
ANDIS TRIMMER BLADES
Blades should be oiled before, | | Oil |
during, and after each use. If your | |
| |
trimmer blades leave streaks or | | |
slows down, it’s a sure sign blades | Oil | Oil |
need oil. The trimmer should be held |
in a position shown (Diagram B) to | | |
prevent oil from getting into motor. | | |
Place a few drops of Andis Trimmer | | |
Oil on the front and side of the cutter | | Diagram A |
blades (Diagram A). Wipe excess | | |
oil off blades with a soft dry cloth.
Spray lubricants contain insufficient oil for good lubrication, but are an
excellent trimmer coolant. Always replace broken or nicked blades to prevent injury. You can clean the
excess hair from your blades by using a small brush or worn out toothbrush. To clean the blades we suggest to immerse the blades only into a shallow pan of Andis Trimmer Oil, while the trimmer is running. Any excess hair and dirt that has accumulated between the blades should come out. After cleaning, turn your trimmer off and dry blades with a dry cloth and start clipping again.
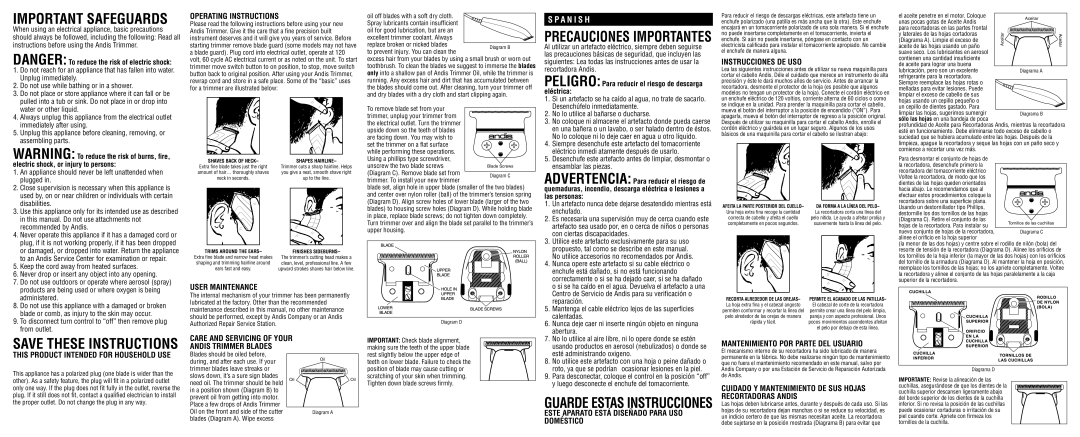
To remove blade set from your trimmer, unplug your trimmer from the electrical outlet. Turn the trimmer
upside down so the teeth of blades are facing down. You may wish to set the trimmer on a flat surface while performing these operations. Using a phillips type screwdriver,
unscrew the two blade screws (Diagram C). Remove blade set from trimmer. To install your new trimmer
blade set, align hole in upper blade (smaller of the two blades) and center over nylon roller (ball) of the trimmer’s tension spring (Diagram D). Align screw holes of lower blade (larger of the two blades) to housing screw holes (Diagram D). While holding blade in place, replace blade screws; do not tighten down completely. Turn trimmer over and align the blade set parallel to the trimmer’s upper housing.
Diagram D
IMPORTANT: Check blade alignment, making sure the teeth of the upper blade rest slightly below the upper edge of teeth on lower blade. Failure to check the position of blade may cause cutting or scratching of your skin when trimming. Tighten down blade screws firmly.
S P A N I S H
PRECAUCIONES IMPORTANTES
Al utilizar un artefacto eléctrico, siempre deben seguirse las precauciones básicas de seguridad, que incluyen las siguientes: Lea todas las instrucciones antes de usar la recortadora Andis.
PELIGRO: Para reducir el riesgo de descarga eléctrica:
1.Si un artefacto se ha caído al agua, no trate de sacarlo. Desenchúfelo inmediatamente.
2.No lo utilice al bañarse o ducharse.
3.No coloque ni almacene el artefacto donde pueda caerse en una bañera o un lavabo, o ser halado dentro de éstos. No lo coloque ni lo deje caer en agua u otro líquido.
4.Siempre desenchufe este artefacto del tomacorriente eléctrico inmedi atamente después de usarlo.
5.Desenchufe este artefacto antes de limpiar, desmontar o ensamblar las piezas.
ADVERTENCIA: Para reducir el riesgo de quemaduras, incendio, descarga eléctrica o lesiones a las personas:
1.Un artefacto nunca debe dejarse desatendido mientras está enchufado.
2.Es necesaria una supervisión muy de cerca cuando este artefacto sea usado por, en o cerca de niños o personas con ciertas discapacidades.
3.Utilice este artefacto exclusivamente para su uso propuesto, tal como se describe en este manual. No utilice accesorios no recomendados por Andis.
4.Nunca opere este artefacto si su cable eléctrico o enchufe está dañado, si no está funcionando correctamente o si se ha dejado caer, si se ha dañado o si se ha caído en el agua. Devuelva el artefacto a una Centro de Servicio de Andis para su verificación o reparación.
5.Mantenga el cable eléctrico lejos de las superficies calentadas.
6.Nunca deje caer ni inserte ningún objeto en ninguna abertura.
7.No lo utilice al aire libre, ni lo opere donde se estén usando productos en aerosol (nebulizados) o donde se esté administrando oxigeno.
8.No utilice este artefacto con una hoja o peine dañado o roto, ya que se podrían ocasionar lesiones en la piel.
9.Para desconectar, coloque el control en la posición “off” y luego desconecte el enchufe del tomacorriente.
GUARDE ESTAS INSTRUCCIONES
ESTE APARATO ESTÁ DISEÑADO PARA USO DOMÉSTICO
Para reducir el riesgo de descargas eléctricas, este artefacto tiene un enchufe polarizado (una patilla es más ancha que la otra). Este enchufe encajará en un tomacorriente polarizado de una sola manera. Si el enchufe no puede insertarse completamente en el tomacorriente, invierta el enchufe. Si aún no puede insertarse, póngase en contacto con un electricista calificado para instalar el tomacorriente apropiado. No cambie el enchufe de manera alguna.
INSTRUCCIONES DE USO
Lea las siguientes instrucciones antes de utilizar su nueva maquinilla para cortar el cabello Andis. Déle el cuidado que merece un instrumento de alta precisión y éste le dará muchos años de servicio. Antes de arrancar la recortadora, desmonte el protector de la hoja (es posible que algunos modelos no tengan un protector de la hoja). Conecte el cordón eléctrico en un enchufe eléctrico de 120 voltios, corriente alterna de 60 ciclos o como se indique en la unidad. Para prender la maquinilla para cortar el cabello, mueva el botón del interruptor a la posición de encendido (“ON”). Para apagarla, mueva el botón del interruptor de regreso a la posición original. Después de utilizar su maquinilla para cortar el cabello Andis, enrolle el cordón eléctrico y guárdela en un lugar seguro. Algunos de los usos básicos de una maquinilla para cortar el cabello se ilustran abajo:
AFEITA LA PARTE POSTERIOR DEL CUELLO– | DA FORMA A LA LÍNEA DEL PELO– |
Una hoja extra fina recoge la cantidad | La recortadora corta una línea del |
correcta de cabello y afeita el cuello | pelo nítida. Le ayuda a afeitar prolija y |
completamente en pocos segundos. | suavemente hasta la línea del pelo. |
| | | | | |
| | | | | |
RECORTA ALREDEDOR DE LAS OREJAS– | PERMITE EL ACABADO DE LAS PATILLAS– |
La hoja extra fina y el cabezal angosto | El cabezal de corte de la recortadora |
permiten conformar y recortar la línea del | permite crear una línea del pelo limpia, |
pelo alrededor de las orejas de manera | pareja y con aspecto profesional. Unos |
rápida y fácil. | pocos movimientos ascendentes afeitan |
| el pelo por debajo de esta línea. |
MANTENIMIENTO POR PARTE DEL USUARIO
El mecanismo interno de su recortadora ha sido lubricado de manera permanente en la fábrica. No debe realizarse ningún tipo de mantenimiento que no fuera el mantenimiento recomendado en este manual, salvo por Andis Company o por una Estación de Servicio de Reparación Autorizada de Andis.
CUIDADO Y MANTENIMIENTO DE SUS HOJAS RECORTADORAS ANDIS
Las hojas deben lubricarse antes, durante y después de cada uso. Si las hojas de su recortadora dejan manchas o si se reduce su velocidad, es un indicio certero de que las mismas necesitan aceite. La recortadora debe sujetarse en la posición mostrada (Diagrama B) para evitar que
| el aceite penetre en el motor. Coloque | | Aceitar |
| unas pocas gotas de Aceite Andis | |
| | |
| para recortadoras en las partes frontal | | |
| y laterales de las hojas cortadoras | Aceitar | Aceitar |
| (Diagrama A). Limpie el exceso de |
| aceite de las hojas usando un paño |
| | |
| suave seco. Los lubricantes en aerosol | | |
| contienen una cantidad insuficiente | | |
| de aceite para lograr una buena | | |
| lubricación, pero son un excelente | | Diagrama A |
| refrigerante para la recortadora. | | |
| Siempre reemplace las hojas rotas o | | |
| melladas para evitar lesiones. Puede | | |
| limpiar el exceso de cabello de sus | | |
| hojas usando un cepillo pequeño o | | |
| un cepillo de dientes gastado. Para | | |
| limpiar las hojas, sugerimos sumergir | | Diagrama B |
| sólo las hojas en una bandeja de poca | | |
profundidad de Aceite para Recortadoras Andis, mientras la recortadora esté en funcionamiento. Debe eliminarse todo exceso de cabello o suciedad que se hubiera acumulado entre las hojas. Después de la limpieza, apague la recortadora y seque las hojas con un paño seco y comience a recortar una vez más.
Para desmontar el conjunto de hojas de la recortadora, desenchufe primero la recortadora del tomacorriente eléctrico Voltee la recortadora, de modo que los dientes de las hojas queden orientados
hacia abajo. Le recomendamos que al efectuar estos procedimientos coloque la recortadora sobre una superficie plana. Usando un destornillador tipo Phillips,
destornille los dos tornillos de las hojas (Diagrama C). Retire el conjunto de las
hojas de la recortadora. Para instalar su nuevo conjunto de hojas de la recortadora, alinee el orificio en la hoja superior
(la menor de las dos hojas) y centre sobre el rodillo de nilón (bola) del resorte de tensión de la recortadora (Diagrama D). Alinee los orificios de los tornillos de la hoja inferior (la mayor de las dos hojas) con los orificios del tornillo de la armadura (Diagrama D). Al mantener la hoja en posición, reemplace los tornillos de las hojas; no los apriete completamente. Voltee la recortadora y alinee el conjunto de las hojas paralelamente a la caja superior de la recortadora.
Diagrama D
IMPORTANTE: Revise la alineación de las cuchillas, asegurándose de que los dientes de la cuchilla superior descansen ligeramente abajo del borde superior de los dientes de la cuchilla inferior. Si no revisa la posición de las cuchillas puede ocasionar cortaduras o irritación de su piel cuando corte. Apriete con firmeza los tornillos de la cuchilla.