R
www.apc.com
50-Watt-Hour
Universal Notebook Battery
(UPB50)
User’s Manual
Introduction
Thank you for purchasing APC’s
Features
•Compact design weighs less than one pound
•Up to four hours of additional runtime1 for your notebook computer
•Two selectable output voltages
•Four LED status indicators
•Letter coded power tips provide compatibility with most notebook computers in the market today
•Compatible with APC Universal Power Adapters
•Up to 70 Watts continuous power and 80 Watts peak power
Inspection
Prior to use, please check the package contents for the following items. If any item listed below is not in the package, please contact APC Customer Service at 800.800.4APC (800.800.4272).
•Universal Notebook Battery (UPB50)
•Input / Output Power Cable
•Conversion Plug & Jack Tips
•Compatibility Guide
Safety Precautions
Please read the following warnings carefully before using the UPB50. Use the product according to the procedures outlined in this manual.
Warnings:
•Caution: Burn Hazard
•Do not attempt to disassemble or alter any part of this product.
•Do not store outside of the following temperature range:
•Do not operate outside of the following range: 32~104oF (0~40oC), as this will damage or reduce the life of the battery.
•Do not allow this product to come in contact with water or other liquids. If any liquid should reach the interior of the battery, immediately unplug the battery from your notebook. Continued use of the battery is not recommended, and may result in fire or electric shock.
•Do not expose the battery to a direct flame or heat source, as the battery may explode.
Prior to Use
This user manual provides operating instructions for the UPB50. Please read the entire user manual prior to use and remember to register your product. You can do this via the enclosed warranty card or by visiting http://warranty.apc.com and using keycode p668y.
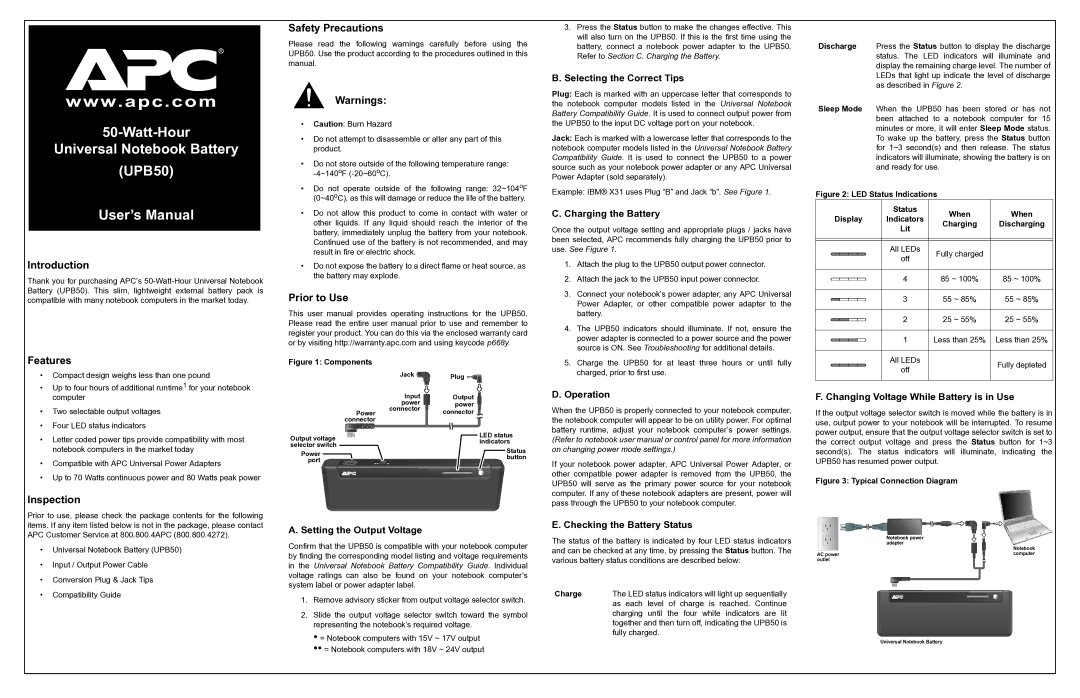
Figure 1: Components
|
| Jack |
| Plug | |
|
| Input |
| Output | |
|
| power |
| power | |
| Power | connector |
| connector | |
|
| ||||
| connector |
|
|
|
|
Output voltage |
|
| LED status | ||
|
| indicators | |||
selector switch |
|
| |||
|
|
| Status | ||
Power |
|
|
| ||
|
|
| button | ||
port |
|
|
| ||
|
|
|
| ||
|
|
|
|
|
|
A. Setting the Output Voltage
Confirm that the UPB50 is compatible with your notebook computer by finding the corresponding model listing and voltage requirements in the Universal Notebook Battery Compatibility Guide. Individual voltage ratings can also be found on your notebook computer’s system label or power adapter label.
1.Remove advisory sticker from output voltage selector switch.
2.Slide the output voltage selector switch toward the symbol representing the notebook’s required voltage.
•= Notebook computers with 15V ~ 17V output •• = Notebook computers with 18V ~ 24V output
3.Press the Status button to make the changes effective. This will also turn on the UPB50. If this is the first time using the battery, connect a notebook power adapter to the UPB50. Refer to Section C. Charging the Battery.
B.Selecting the Correct Tips
Plug: Each is marked with an uppercase letter that corresponds to the notebook computer models listed in the Universal Notebook Battery Compatibility Guide. It is used to connect output power from the UPB50 to the input DC voltage port on your notebook.
Jack: Each is marked with a lowercase letter that corresponds to the notebook computer models listed in the Universal Notebook Battery Compatibility Guide. It is used to connect the UPB50 to a power source such as your notebook power adapter or any APC Universal Power Adapter (sold separately).
Example: IBM® X31 uses Plug “B” and Jack “b”. See Figure 1.
C. Charging the Battery
Once the output voltage setting and appropriate plugs / jacks have been selected, APC recommends fully charging the UPB50 prior to use. See Figure 1.
1.Attach the plug to the UPB50 output power connector.
2.Attach the jack to the UPB50 input power connector.
3.Connect your notebook’s power adapter, any APC Universal Power Adapter, or other compatible power adapter to the battery.
4.The UPB50 indicators should illuminate. If not, ensure the power adapter is connected to a power source and the power source is ON. See Troubleshooting for additional details.
5.Charge the UPB50 for at least three hours or until fully charged, prior to first use.
D.Operation
When the UPB50 is properly connected to your notebook computer, the notebook computer will appear to be on utility power. For optimal battery runtime, adjust your notebook computer’s power settings. (Refer to notebook user manual or control panel for more information on changing power mode settings.)
If your notebook power adapter, APC Universal Power Adapter, or other compatible power adapter is removed from the UPB50, the UPB50 will serve as the primary power source for your notebook computer. If any of these notebook adapters are present, power will pass through the UPB50 to your notebook computer.
E. Checking the Battery Status
The status of the battery is indicated by four LED status indicators and can be checked at any time, by pressing the Status button. The various battery status conditions are described below:
Charge | The LED status indicators will light up sequentially | |
| as each | level of charge is reached. Continue |
| charging | until the four white indicators are lit |
| together and then turn off, indicating the UPB50 is | |
| fully charged. | |
Discharge Press the Status button to display the discharge status. The LED indicators will illuminate and display the remaining charge level. The number of LEDs that light up indicate the level of discharge as described in Figure 2.
Sleep Mode When the UPB50 has been stored or has not been attached to a notebook computer for 15 minutes or more, it will enter Sleep Mode status. To wake up the battery, press the Status button for 1~3 second(s) and then release. The status indicators will illuminate, showing the battery is on and ready for use.
Figure 2: LED Status Indications
|
|
|
|
|
|
| Status | When | When | |
Display | Indicators | |||||||||
Charging | Discharging | |||||||||
|
|
|
|
|
|
| Lit | |||
|
|
|
|
|
|
|
|
| ||
|
|
|
|
|
|
|
|
|
| |
|
|
|
|
|
|
|
|
|
| |
|
|
|
|
|
|
| All LEDs | Fully charged |
| |
|
|
|
|
|
|
| off |
| ||
|
|
|
|
|
|
|
|
| ||
|
|
|
|
|
|
|
|
|
| |
|
|
|
|
|
|
| 4 | 85 ~ 100% | 85 ~ 100% | |
|
|
|
|
|
|
|
|
|
| |
|
|
|
|
|
|
| 3 | 55 ~ 85% | 55 ~ 85% | |
|
|
|
|
|
|
|
|
|
| |
|
|
|
|
|
|
| 2 | 25 ~ 55% | 25 ~ 55% | |
|
|
|
|
|
|
| ||||
|
|
|
|
|
|
|
|
|
| |
|
|
|
|
|
|
| 1 | Less than 25% | Less than 25% | |
|
|
|
|
|
|
| ||||
|
|
|
|
|
|
|
|
|
| |
|
|
|
|
|
|
| All LEDs |
| Fully depleted | |
|
|
|
|
|
|
| off |
| ||
|
|
|
|
|
|
|
|
| ||
|
|
|
|
|
|
|
|
|
| |
F. Changing Voltage While Battery is in Use
If the output voltage selector switch is moved while the battery is in use, output power to your notebook will be interrupted. To resume power output, ensure that the output voltage selector switch is set to the correct output voltage and press the Status button for 1~3 second(s). The status indicators will illuminate, indicating the UPB50 has resumed power output.
Figure 3: Typical Connection Diagram
| Notebook power |
| adapter |
| Notebook |
AC power | computer |
outlet |
|
Universal Notebook Battery