Installation

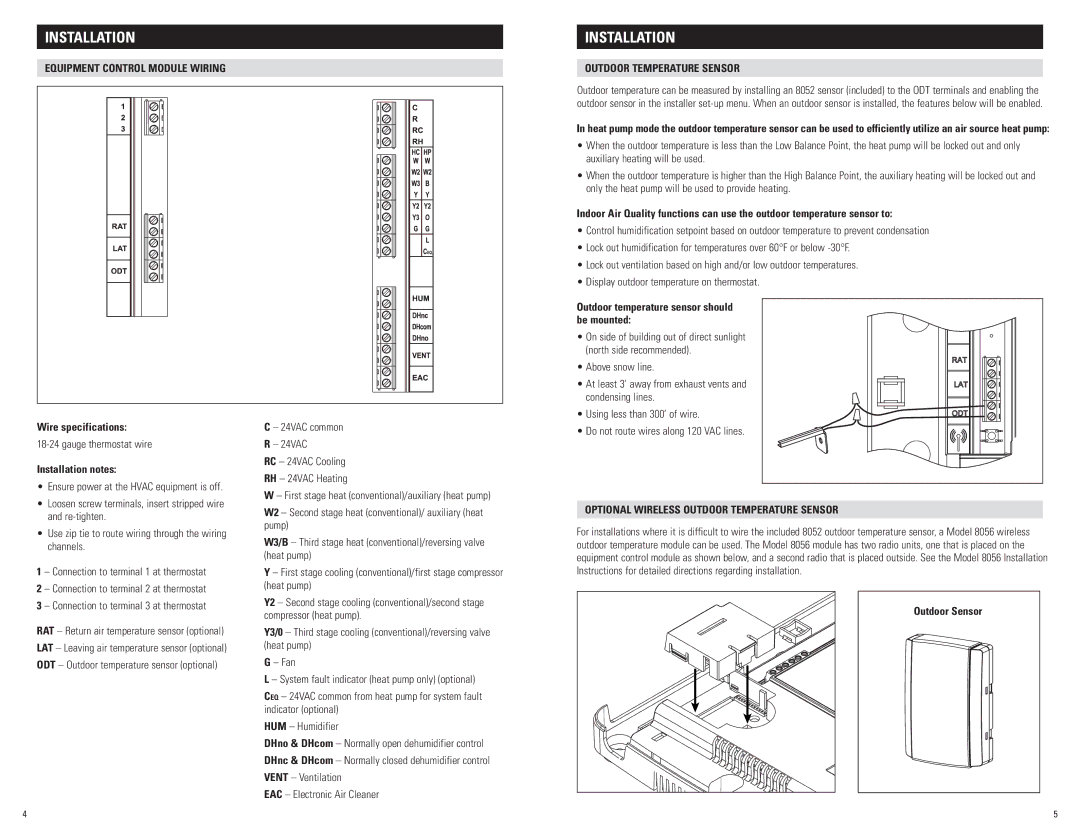
Equipment Control Module Wiring

Installation

Outdoor temperature sensor

Outdoor temperature can be measured by installing an 8052 sensor (included) to the ODT terminals and enabling the outdoor sensor in the installer set-up menu. When an outdoor sensor is installed, the features below will be enabled.

In heat pump mode the outdoor temperature sensor can be used to efficiently utilize an air source heat pump:

When the outdoor temperature is less than the Low Balance Point, the heat pump will be locked out and only auxiliary heating will be used.

When the outdoor temperature is higher than the High Balance Point, the auxiliary heating will be locked out and only the heat pump will be used to provide heating..

Indoor Air Quality functions can use the outdoor temperature sensor to:

Control humidification setpoint based on outdoor temperature to prevent condensation

Lock out humidification for temperatures over 60°F or below -30°F.

Lock out ventilation based on high and/or low outdoor temperatures.

Display outdoor temperature on thermostat.

Outdoor temperature sensor should be mounted:

On side of building out of direct sunlight

(north side recommended)..

Above snow line.

At least 3’ away from exhaust vents and condensing lines..

• Using less than 300’ of wire.

Wire specifications:

18-24 gauge thermostat wire

Installation notes:

Ensure power at the HVAC equipment is off.

Loosen screw terminals, insert stripped wire and re-tighten..

Use zip tie to route wiring through the wiring channels..

1 – Connection to terminal 1 at thermostat

2 – Connection to terminal 2 at thermostat

3 – Connection to terminal 3 at thermostat

RAT – Return air temperature sensor (optional) LAT – Leaving air temperature sensor (optional) ODT – Outdoor temperature sensor (optional)

C – 24VAC common

R – 24VAC

RC – 24VAC Cooling

RH – 24VAC Heating

W – First stage heat (conventional)/auxiliary (heat pump)

W2 – Second stage heat (conventional)/ auxiliary (heat pump)

W3/B – Third stage heat (conventional)/reversing valve (heat pump)

Y – First stage cooling (conventional)/first stage compressor (heat pump)

Y2 – Second stage cooling (conventional)/second stage compressor (heat pump)..

Y3/0 – Third stage cooling (conventional)/reversing valve (heat pump)

G – Fan

L – System fault indicator (heat pump only) (optional)

CEQ – 24VAC common from heat pump for system fault indicator (optional)

HUM – Humidifier

DHno & DHcom – Normally open dehumidifier control DHnc & DHcom – Normally closed dehumidifier control VENT – Ventilation

EAC – Electronic Air Cleaner

• Do not route wires along 120 VAC lines.

optional wireless Outdoor temperature sensor

For installations where it is difficult to wire the included 8052 outdoor temperature sensor, a Model 8056 wireless outdoor temperature module can be used. The Model 8056 module has two radio units, one that is placed on the equipment control module as shown below, and a second radio that is placed outside. See the Model 8056 Installation Instructions for detailed directions regarding installation..

Outdoor Sensor

4

5

Page 3
Image 3
Aprilaire 8910 Equipment Control Module Wiring, Outdoor temperature sensor should be mounted, Outdoor Sensor

8910 specifications

The Aprilaire 8910 is a state-of-the-art thermostat designed to provide homeowners with precise control over their indoor climate. This smart thermostat is equipped with advanced features that enhance comfort while promoting energy efficiency.

One of the standout features of the Aprilaire 8910 is its intuitive touchscreen interface. The large, easy-to-read display allows users to navigate through a variety of settings with ease. The touchscreen is responsive and provides a seamless user experience, making it simple to adjust temperature settings or program schedules.

The Aprilaire 8910 supports both heating and cooling systems, offering flexibility for homeowners with diverse HVAC setups. It is compatible with forced air, heat pump, and radiant systems, as well as multi-stage heating and cooling setups, making it a versatile option for any home.

One of the key technologies integrated into the Aprilaire 8910 is its ability to manage humidity levels. The thermostat works in conjunction with whole-home humidifiers and dehumidifiers, allowing users to maintain optimal humidity levels for health and comfort. This feature is particularly beneficial in climates where humidity fluctuations can lead to discomfort or damage to home interiors.

The 8910 also boasts Wi-Fi connectivity, enabling remote access and control through a smartphone app. This feature allows homeowners to monitor and adjust their home's temperature and humidity levels from anywhere, ensuring comfort upon returning home. The app provides real-time updates and alerts, helping users stay informed about their HVAC system’s performance.

Another notable characteristic of the Aprilaire 8910 is its energy-saving capabilities. The thermostat offers programmable and adaptive scheduling options, allowing users to set different temperature schedules for weekdays and weekends. This reduces energy consumption and helps lower utility bills, all while maintaining a comfortable living environment.

With a sleek design and high-quality build, the Aprilaire 8910 is not only functional but also aesthetically pleasing. It can blend seamlessly with any home decor, making it an attractive addition to any wall.

In summary, the Aprilaire 8910 is a sophisticated thermostat that combines user-friendly technology with energy-efficient features. Its touchscreen interface, humidity control, Wi-Fi connectivity, and energy-saving programming make it a top choice for homeowners seeking ultimate comfort and convenience in climate control.