Bi-wiring and bi-amping loudspeakers

Before you start

Bi-amping your system

WARNING: Do not make any connections to your amplifier while it is switched on or connected to the mains supply.

Before switching on please check all connections thoroughly, making sure bare wires or cables are not touching the amplifier chassis (which could cause short circuits) and you have connected positive (+) to positive and negative (–) to negative.

Always ensure that the volume control on your amplifier is set to minimum before starting these procedures.

Bi-wiring your loudspeakers

Bi-wiring improves the sound of your system because it divides the high and low frequency signal currents into separate speaker cables. This avoids signal distortions arising from the high and low frequency currents interacting with one another within a single cable, as in conventionally wired systems.

You will need:

Speakers – with four input terminals each: these will be marked HF (High Frequency) and LF (Low Frequency).

Loudspeaker cables – two pairs of cables per loudspeaker (which may be joined at the amplifier end if your amplifier has only one pair of output terminals per channel), or a suitably terminated cable set (a loom, probably prepared by your dealer and capable of being used for bi-amping in one length).

How to bi-wire loudspeakers

1.Remove the terminal links on the rear of your loudspeakers

WARNING: This step is essential or damage to your amplifier may result which is not covered under warranty.

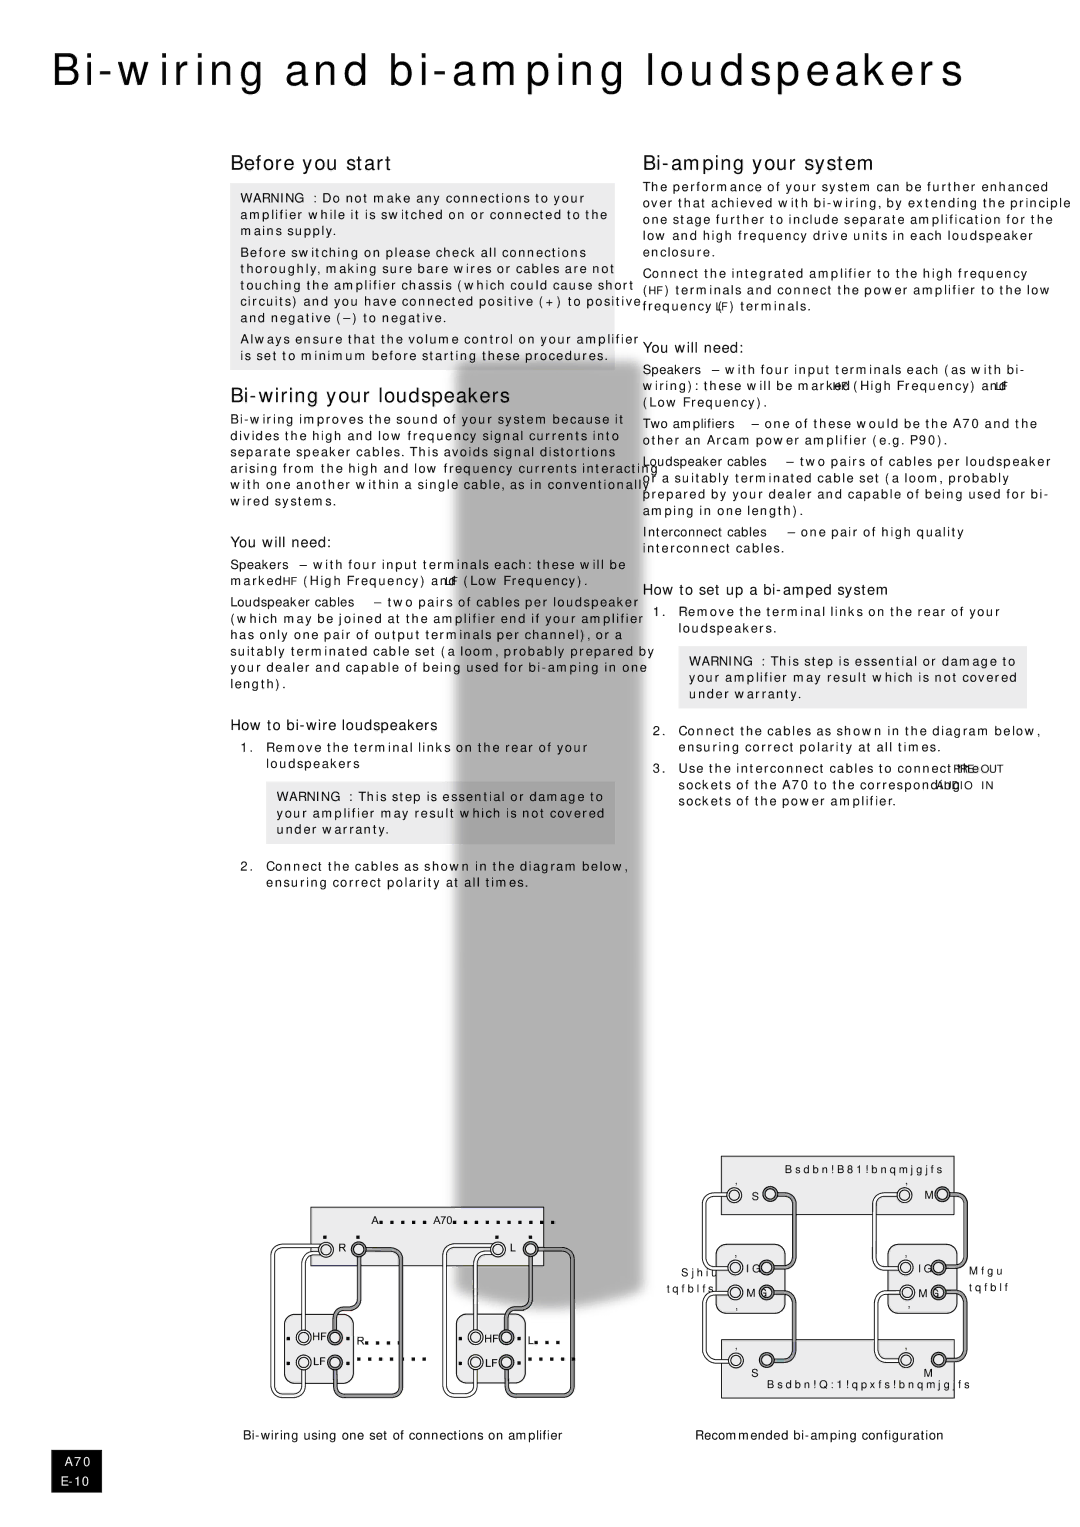
2.Connect the cables as shown in the diagram below, ensuring correct polarity at all times.


�������������������


��

�����

��

����

��

�������

��

�������


The performance of your system can be further enhanced over that achieved with bi-wiring, by extending the principle one stage further to include separate amplification for the low and high frequency drive units in each loudspeaker enclosure.

Connect the integrated amplifier to the high frequency

(HF) terminals and connect the power amplifier to the low frequency (LF) terminals.

You will need:

Speakers – with four input terminals each (as with bi- wiring): these will be marked HF (High Frequency) and LF (Low Frequency).

Two amplifiers – one of these would be the A70 and the other an Arcam power amplifier (e.g. P90).

Loudspeaker cables – two pairs of cables per loudspeaker or a suitably terminated cable set (a loom, probably prepared by your dealer and capable of being used for bi- amping in one length).

Interconnect cables – one pair of high quality interconnect cables.

How to set up a bi-amped system

1.Remove the terminal links on the rear of your loudspeakers.

WARNING: This step is essential or damage to your amplifier may result which is not covered under warranty.

2.Connect the cables as shown in the diagram below, ensuring correct polarity at all times.

3.Use the interconnect cables to connect the PRE OUT sockets of the A70 to the corresponding AUDIO IN sockets of the power amplifier.


�������������������


�����

��


��

����

�������

��


��

�������


�������������������������


Bi-wiring using one set of connections on amplifier

Recommended bi-amping configuration

A70

E-10

Page 10
Image 10
Arcam A70 manual Bi-wiring and bi-amping loudspeakers, Before you start Bi-amping your system, Bi-wiring your loudspeakers

A70 specifications

The Arcam A70 is a high-performance integrated amplifier designed to deliver exceptional sound quality and robust features for audiophiles and music enthusiasts. Combining sophisticated engineering with a sleek aesthetic, the A70 sets a standard for audio fidelity in its class.

One of the standout features of the Arcam A70 is its Class G amplification technology. This innovative approach ensures high efficiency, allowing the amplifier to produce a powerful output while minimizing heat generation. The Class G design effectively uses multiple power supplies, seamlessly switching between them to optimize performance for various sound levels. This results in a cleaner, more dynamic sound, allowing users to enjoy their music without distortion.

Another notable characteristic of the A70 is its extensive connectivity options. The amplifier includes multiple analog inputs, ideal for connecting various sources such as CD players, turntables, and streaming devices. In addition, the A70 features digital inputs, including optical and coaxial connections, which allow for the integration of digital audio sources with ease. This versatility ensures that users can build a comprehensive audio system tailored to their preferences.

The Arcam A70 also supports advanced technology such as Bluetooth connectivity. This allows users to stream music directly from their smartphones or tablets, providing added convenience without sacrificing sound quality. With a built-in high-quality DAC, the amplifier enhances digital audio from any compatible device, ensuring that users experience a rich and detailed listening experience.

Overall, the design of the Arcam A70 is both elegant and functional. Its solid build quality and intuitive layout make it easy to navigate through settings and adjustments. The front panel features a clear display that provides essential information, while the overall design complements modern audio setups.

The A70 is also recognized for its low noise floor, which contributes to a more immersive soundstage. This attention to detail in engineering ensures that subtle nuances in music are accurately reproduced, making it an excellent choice for critical listening.

In conclusion, the Arcam A70 Integrated Amplifier combines advanced Class G amplification, extensive connectivity options, and modern streaming capabilities, making it a top contender for anyone looking to enhance their audio experience. With its stylish design and commitment to sound quality, the A70 is a valuable addition to any high-fidelity audio system.