Manuals
/
Aspire Digital
/
Computer Equipment
/
Laptop
Aspire Digital
1360, 1520
manual
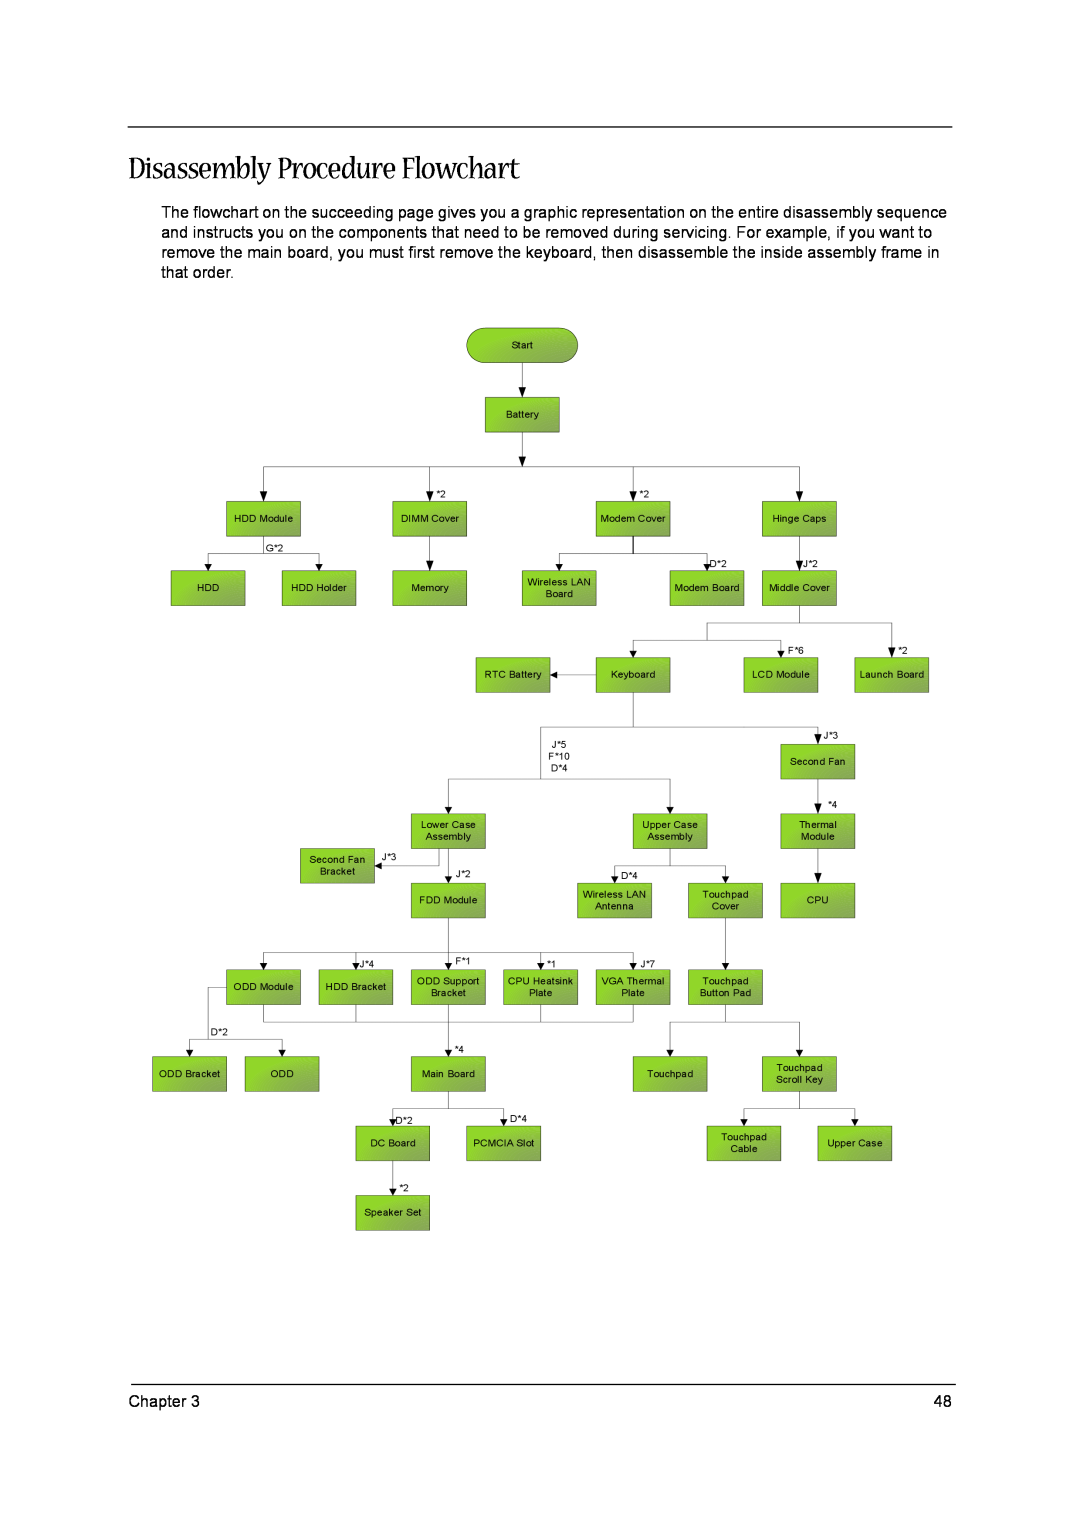
Disassembly Procedure Flowchart
Models:
1520
1360
1
57
142
142
Download
142 pages
50.26 Kb
54
55
56
57
58
59
60
61
Troubleshooting
Specification
Install
Code list
EGRET Block Diagram
Password
Indicators
Base Unit to Wireless Unit
LCD-Related Symptoms
Desired access
Page 57
Image 57
Page 56
Page 58
Page 57
Image 57
Page 56
Page 58
Contents
Aspire 1360/1520 Series
Service Guide
Revision History
Disclaimer
Copyright
Screen messages
Conventions
Preface
Page
Chapter 3 Machine Disassembly and Replacement
Table of Contents
Chapter 1 System Introduction
Chapter 2 System Utilities
Chapter 4 Troubleshooting
Page
System Introduction
Features
Chapter
Performance
Expansion
Human-centric design
I/O Ports
Diagram
EGRET Block Diagram
L1 Signal
L3 Signal
Top View
Board Layout
DC Charger Board Connector
Bottom View
Front View
Panel
Left view
Right View
Icon
Rear Panel
Description
Indicators
Keyboard
Special keys
Lock keys
Desired access
Embedded numeric keypad
Num lock on
Num lock off
Windows keys
Hot Key
Hot Keys
2. Double-click on Regional and Language Options
1. Click on Start, Control Panel
Launch Keys
BIOS
Hardware Specifications and Configurations
Bluetooth Controller/Chipset Does this
System Board Major Chips
System Memory
Second Level Cache
Memory Combinations
LAN Interface
Hard Disk Drive Interface
Modem Interface
DVD-ROM Interface
CD-ROM Interface
Soft eject with emergency eject hole
Combo Drive Interface
DVD Dual Interface
Low Speed CD-RW
CD-R
High Speed CD-RW
Ultra Speed CD-RW
Audio Interface
VGA Display Resolution
Video Interface
Source image in the frame buffer
CRT Display Resolutions
LCD Display Resolution
Video Memory
Parallel Port
USB Port
Battery
PCMCIA Port
Keyboard
AC Adapter
Environmental Requirements
Power Management
Mechanical Specification
Chapter
System Utilities
BIOS Setup Utility
Boot
Main
Navigating the BIOS Utility
Exit
Information
Main
Info
System Time
Chapter
Infrared Port FIR
Advanced
Base I/O address
Interrupt
Parameter
Boot
Security
User Password is
Supervisor Password is
Clear or Set
Setting a Password
Changing a Password
Removing a Password
Chapter
Network Boot
Boot
+Hard Drive
Esc Exit
Exit
Exit Saving Changes
Discard Changes Save Changes
BIOS Flash Utility
Machine Disassembly and Replacement
Before You Begin
General Information
Disassembly Procedure Flowchart
Cushions
Screw List
H*8 for
H*6 for
Removing the Battery
1. To remove the battery, push the battery release latch
2. Then slide the battery out from the machine
1. See “Removing the Battery” on page
Removing the Memory Module
3. Remove the dimm cover 4. Pop up the memory
5. Then remove the memory
Removing the Wireless LAN Board and the Modem Board
Disassembling the Hard Disk Drive Module
Removing the Hard Disk Drive Module
Removing the LCD Module
Removing the Middle Cover
Removing the Launch Board
Removing the LCD Module
Chapter
Disassembling the LCD Module
Removing the LCD Bezel
Removing the Inverter Board 15” LCD
Removing the 15” TFT LCD
Removing the LCD Coaxial Cable
Removing the LCD Brackets
Removing the LCD Hinges
Disassembling the Main Unit
Removing the RTC Battery
Removing the Keyboard
Removing the Middle Cover Hook /Fan
Installing the Processor
Removing the Thermal Module
Removing the Processor
Removing the Upper Case Assemly
Removing the Touchpad Board
Removing the Touchpad Cable
Removing the VGA Thermal Plate
Removing the Second Fan Bracket
Removing the CPU Heatsink Plate
Removing the ODD Module1
Removing the ODD Module2
Removing the HDD Bracket
Removing the Main Board
Removing the I/O Port Bracket
Removing the DC Board
Removing the Speaker Set
Removing the PCMCIA Slot
13. See “Removing the DC Board” on page
Base Unit to Wireless Unit
System Upgrade Procedure
Troubleshooting
Symptoms Verified
Go To
External Diskette Drive Check
System Check Procedures
External CD-ROM Drive Check
Keyboard or Auxiliary Input Device Check
Memory check
Power System Check
Check the Power Adapter
Touchpad Check
Check the Battery Pack
Power-On Self-Test POST Error Message
Index of Error Messages
Error Code List
Error Message List
Error Message List
No beep, power-on indicator turns off and LCD is
Code
POST Code
Beeps
POST Routine Description
2-1-2-3
Code
For Boot Block in Flash ROM
LCD-Related Symptoms
Index of Symptom-to-FRU Error Message
Indicator-Related Symptoms
Power-Related Symptoms
Memory-Related Symptoms
PCMCIA-Related Symptoms
Speaker-Related Symptoms
Power Management-Related Symptoms
Peripheral-Related Symptoms
Keyboard/Touchpad-Related Symptoms
Modem-Related Symptoms
Intermittent Problems
Undetermined Problems
CD to Disk Recovery
How to Build NAPP Master Hard Disc Drive
6. Put the Recovery CD to the optical drive. This step is to create image files to the system, you do not have to put the Recovery CD to the optical drive in order. Place one Recovery CD to the drive at one time till you finish all Recovery CDs
7. Then insert the System CD to the optical drive
Disk to Disk Recovery
Page
Chapter
7. Then insert the System CD to the optical drive
Chapter
Chapter
Jumper and Connector Locations
SW1-8
SW Settings
SW2-7
SW3-6
FRU Field Replaceable Unit List
Aspire 1360/1520 Exploded Diagram
Aspire
Aspire
Chapter
Aspire
Aspire
Chapter
Aspire
Aspire
Chapter
Aspire
Aspire
Chapter
Aspire
Aspire
Chapter
Aspire
Aspire
Chapter
WIRELESS ANTENNA LEFT GRAY
WIRELESS ANTENNA RIGHT BLACK
50.A20V1.001
50.A20V1.002
Chapter
Aspire
Aspire
Chapter
Aspire
Aspire
Chapter
Aspire
Chapter
Model Definition and Configuration
Appendix A
Model Name Definition
ODD/Card
Appendix B
Test Compatible Components
Specifications
Microsoft Windows XP Environment Test
DVD Dual
Appendix B
Specifications
Appendix B
Specifications
Appendix B
Appendix C Online Support Information
Appendix C
Index
Windows XP Environment Test
Top
Page
Image
Contents