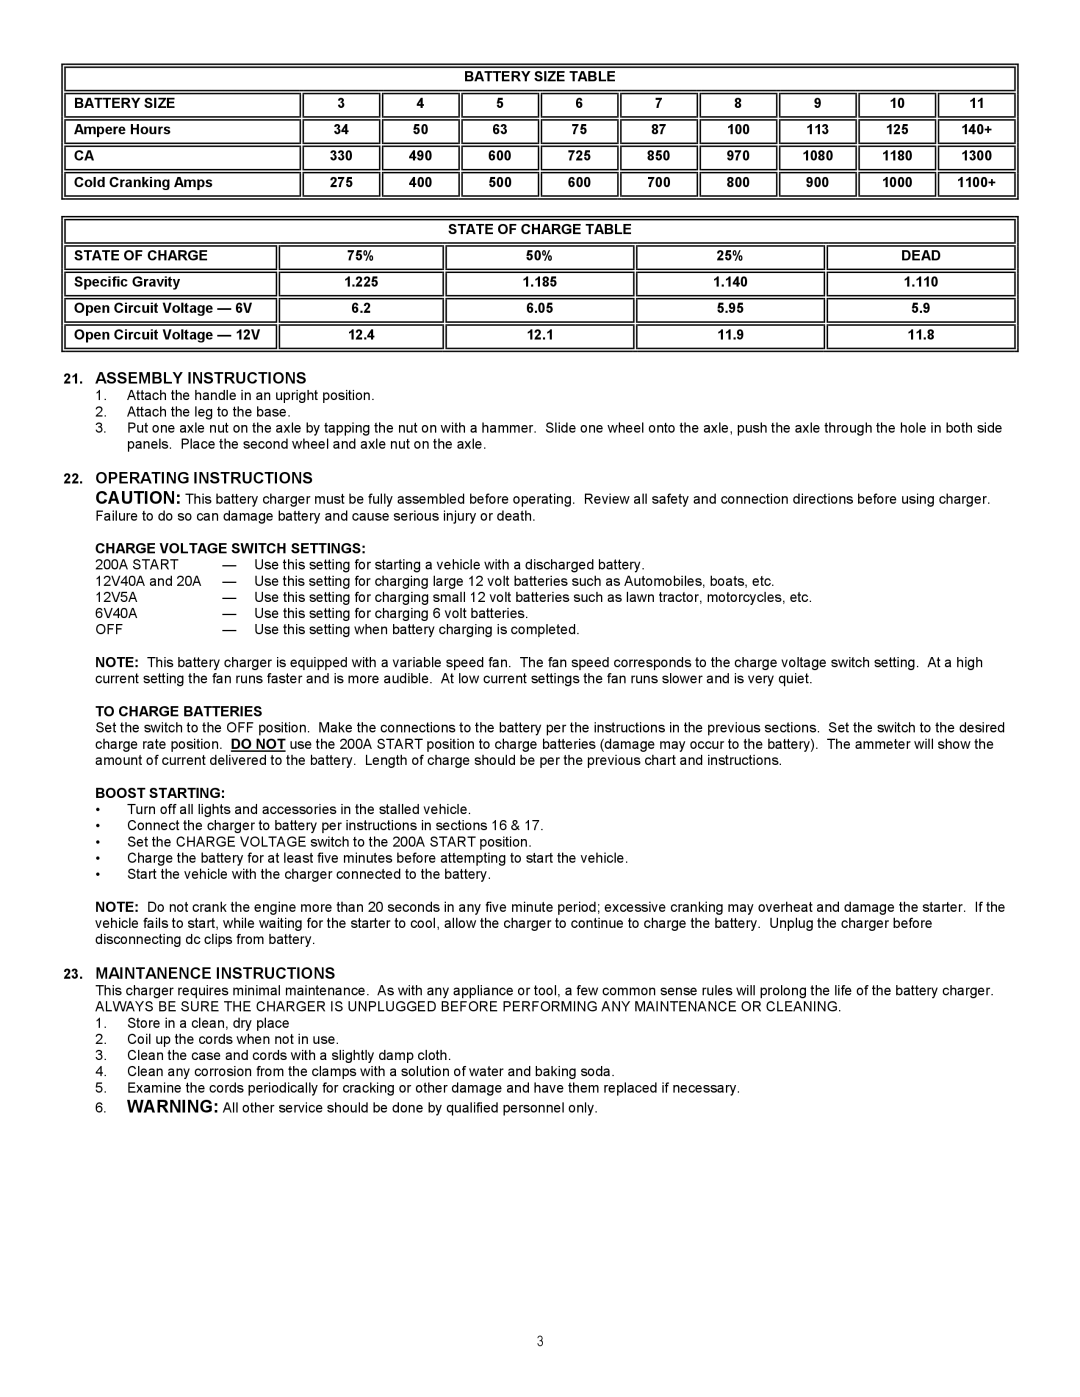
BATTERY SIZE TABLE
| BATTERY SIZE | 3 | 4 |
| 5 |
| 6 |
| 7 | 8 | 9 |
| 10 |
| 11 | |
|
|
|
|
|
|
|
|
|
|
|
|
|
|
|
|
|
| Ampere Hours | 34 | 50 |
| 63 |
| 75 |
| 87 | 100 | 113 | 125 |
| 140+ | ||
|
|
|
|
|
|
|
|
|
|
|
|
|
|
|
|
|
|
|
|
|
|
|
|
|
|
|
|
|
|
|
| ||
| CA | 330 | 490 |
| 600 |
| 725 |
| 850 | 970 | 1080 | 1180 |
| 1300 | ||
|
|
|
|
|
|
|
|
|
|
|
|
|
|
|
|
|
|
|
|
|
|
|
|
|
|
|
|
|
|
|
| ||
| Cold Cranking Amps | 275 | 400 |
| 500 |
| 600 |
| 700 | 800 | 900 | 1000 |
| 1100+ | ||
|
|
|
|
|
|
|
|
|
|
|
|
|
|
|
| |
|
|
|
|
|
|
|
|
|
|
|
|
| ||||
|
|
|
|
|
|
|
|
|
|
|
|
| ||||
|
|
|
|
| STATE OF CHARGE TABLE |
|
|
|
|
|
|
| ||||
|
|
|
|
|
|
|
|
|
|
|
|
|
|
| ||
| STATE OF CHARGE |
| 75% |
|
|
| 50% |
|
| 25% |
|
| DEAD |
| ||
|
|
|
|
|
|
|
|
|
|
|
|
|
|
|
| |
| Specific Gravity |
| 1.225 |
|
|
| 1.185 |
|
| 1.140 |
|
| 1.110 |
|
| |
|
|
|
|
|
|
|
|
|
|
|
|
|
|
|
| |
|
|
|
|
|
|
|
|
|
|
|
|
|
|
| ||
| Open Circuit Voltage — 6V |
| 6.2 |
|
|
| 6.05 |
|
| 5.95 |
|
| 5.9 |
|
| |
|
|
|
|
|
|
|
|
|
|
|
|
|
|
|
| |
|
|
|
|
|
|
|
|
|
|
|
|
|
|
| ||
| Open Circuit Voltage — 12V |
| 12.4 |
|
|
| 12.1 |
|
| 11.9 |
|
| 11.8 |
|
| |
|
|
|
|
|
|
|
|
|
|
|
|
|
|
|
|
|
|
|
|
|
|
|
|
|
|
|
|
|
|
|
|
|
|
21.ASSEMBLY INSTRUCTIONS
1.Attach the handle in an upright position.
2.Attach the leg to the base.
3.Put one axle nut on the axle by tapping the nut on with a hammer. Slide one wheel onto the axle, push the axle through the hole in both side panels. Place the second wheel and axle nut on the axle.
22.OPERATING INSTRUCTIONS
CAUTION: This battery charger must be fully assembled before operating. Review all safety and connection directions before using charger. Failure to do so can damage battery and cause serious injury or death.
CHARGE VOLTAGE SWITCH SETTINGS:
200A START | — Use this setting for starting a vehicle with a discharged battery. | |
12V40A and 20A | — Use this setting for charging large 12 volt batteries such as Automobiles, boats, etc. | |
12V5A | — Use this setting for charging small 12 volt batteries such as lawn tractor, motorcycles, etc. | |
6V40A | — | Use this setting for charging 6 volt batteries. |
OFF | — | Use this setting when battery charging is completed. |
NOTE: This battery charger is equipped with a variable speed fan. The fan speed corresponds to the charge voltage switch setting. At a high current setting the fan runs faster and is more audible. At low current settings the fan runs slower and is very quiet.
TO CHARGE BATTERIES
Set the switch to the OFF position. Make the connections to the battery per the instructions in the previous sections. charge rate position. DO NOT use the 200A START position to charge batteries (damage may occur to the battery). amount of current delivered to the battery. Length of charge should be per the previous chart and instructions.
BOOST STARTING:
•Turn off all lights and accessories in the stalled vehicle.
•Connect the charger to battery per instructions in sections 16 & 17.
•Set the CHARGE VOLTAGE switch to the 200A START position.
•Charge the battery for at least five minutes before attempting to start the vehicle.
•Start the vehicle with the charger connected to the battery.
Set the switch to the desired The ammeter will show the
NOTE: Do not crank the engine more than 20 seconds in any five minute period; excessive cranking may overheat and damage the starter. If the vehicle fails to start, while waiting for the starter to cool, allow the charger to continue to charge the battery. Unplug the charger before disconnecting dc clips from battery.
23.MAINTANENCE INSTRUCTIONS
This charger requires minimal maintenance. As with any appliance or tool, a few common sense rules will prolong the life of the battery charger.
ALWAYS BE SURE THE CHARGER IS UNPLUGGED BEFORE PERFORMING ANY MAINTENANCE OR CLEANING.
1.Store in a clean, dry place
2.Coil up the cords when not in use.
3.Clean the case and cords with a slightly damp cloth.
4.Clean any corrosion from the clamps with a solution of water and baking soda.
5.Examine the cords periodically for cracking or other damage and have them replaced if necessary.
6.WARNING: All other service should be done by qualified personnel only.
3