6100_book_1ATT 11/25/00 12:37 PM Page 7
INSTALLATION
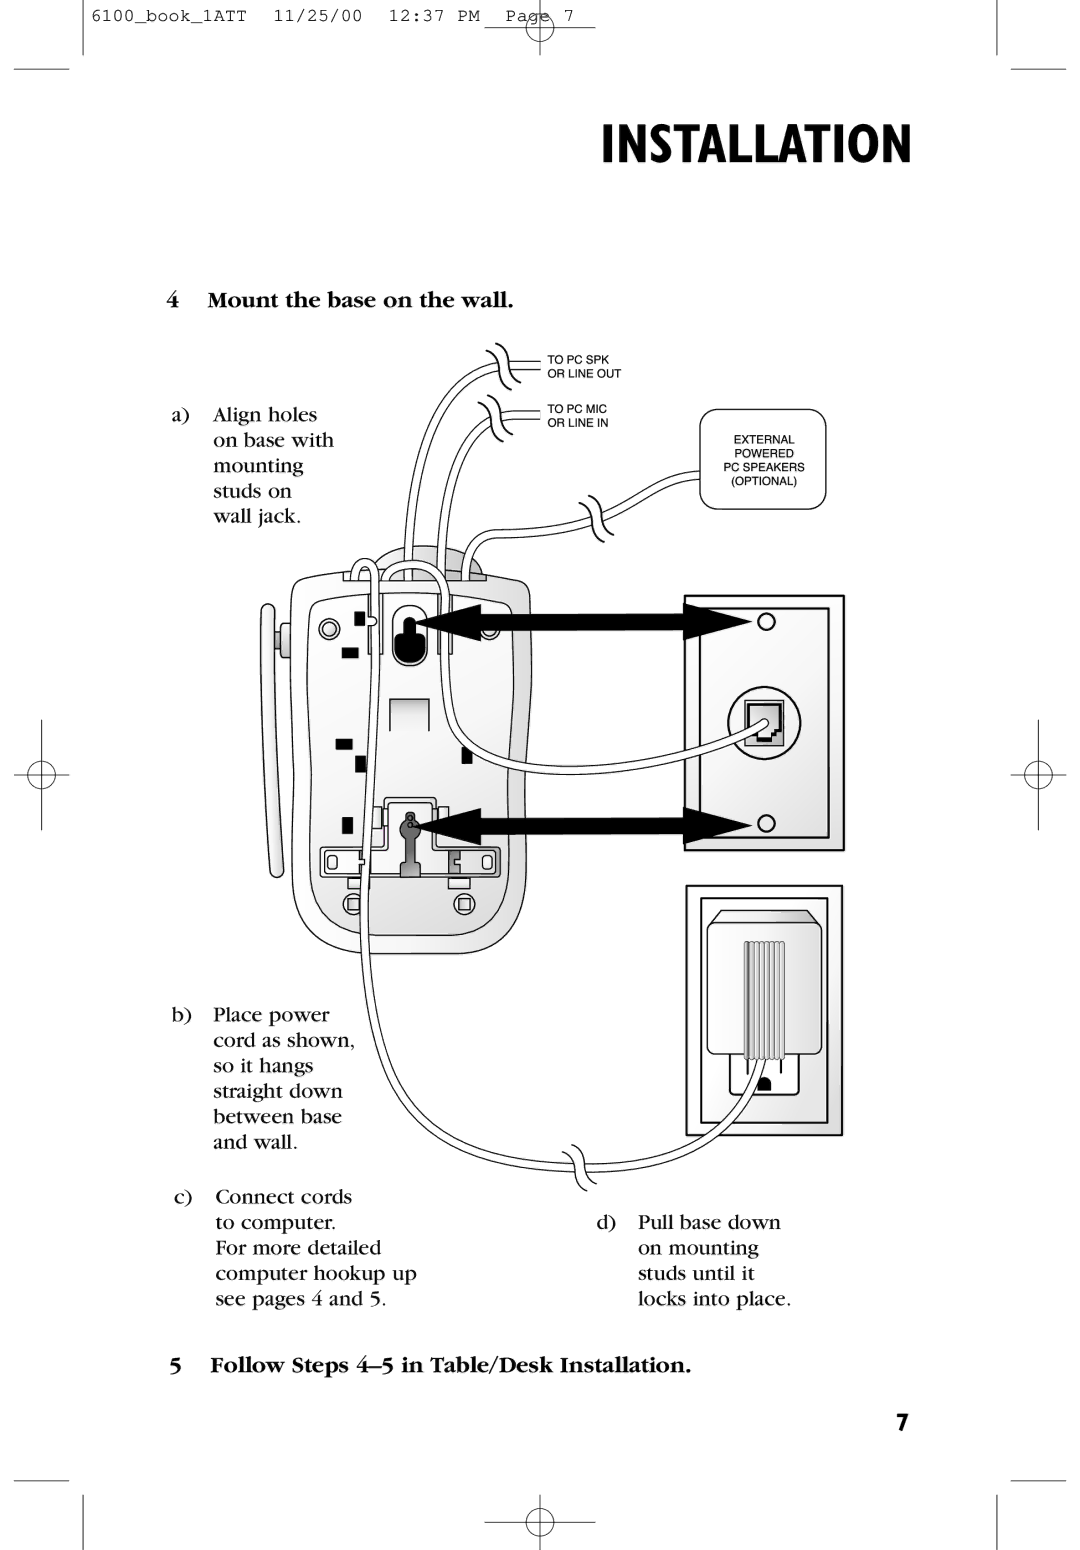
4 Mount the base on the wall.
a) Align holes on base with mounting studs on wall jack.
|
|
|
|
|
|
|
|
|
|
|
|
|
|
|
|
|
|
|
|
|
|
|
|
|
|
|
|
|
|
|
|
|
|
|
|
|
|
|
|
|
|
|
|
|
|
|
|
|
|
|
|
|
|
|
|
|
|
|
|
|
|
|
|
|
|
|
|
|
|
|
|
|
|
|
|
|
|
|
|
|
|
|
|
|
|
|
|
|
|
|
|
|
|
|
|
|
|
|
|
|
|
|
|
|
|
|
|
|
|
|
|
|
|
|
|
|
|
|
|
|
|
|
|
|
|
|
|
|
|
|
|
|
|
|
|
|
|
|
|
|
|
|
|
|
|
|
|
|
|
|
|
|
|
|
|
|
|
|
|
|
|
|
|
|
|
|
|
|
|
|
|
|
|
|
|
|
|
|
|
|
|
|
|
|
|
|
|
|
|
|
|
|
|
|
|
|
|
|
|
|
|
|
|
|
|
|
|
|
|
|
|
|
|
|
|
|
|
|
|
|
|
|
|
|
|
|
|
|
|
|
|
|
|
|
|
|
|
|
|
|
|
|
|
|
|
|
|
|
|
|
|
|
|
|
|
|
|
|
|
|
|
|
|
|
|
|
|
|
|
b) | Place power |
|
|
|
|
|
|
|
| ||||||||
|
|
|
|
|
|
|
| ||||||||||
|
|
|
|
|
|
|
| ||||||||||
| cord as shown, |
|
|
|
|
|
|
|
| ||||||||
| so it hangs |
|
|
|
|
|
|
|
| ||||||||
|
|
|
|
|
|
|
|
| |||||||||
| straight down |
|
|
|
|
|
|
|
| ||||||||
| between base |
|
|
|
|
|
|
|
| ||||||||
| and wall. |
|
|
|
|
|
|
|
| ||||||||
|
|
|
|
|
|
|
|
| |||||||||
c) | Connect cords |
|
|
|
|
|
|
|
| ||||||||
| to computer. |
|
| d) Pull base down | |||||||||||||
| For more detailed |
|
| on mounting | |||||||||||||
| computer hookup up |
|
| studs until it | |||||||||||||
| see pages 4 and 5. |
|
| locks into place. | |||||||||||||
5 Follow Steps 4–5 in Table/Desk Installation.
7
