AT&T U-verse
Advanced Series
A10 Remote Control
NOTE:
The remote control will only control the device which is selected by the appropriate mode key (AT&T, TV, DVD, and AUX). The mode key light for the selected device flashes each time a valid key is pressed.
Controlling Other Devices
In order to control other devices with your 4:1 Universal Remote Control, you need to tell the remote control what types of devices you have. Sections A and B bring you through the steps needed to do this. The volume controls will work for the device mode you are in. If you want to change this, you should follow the steps in Section F.
Programming the remote to control other devices
To use the
Please refer to the code list for a list of supported brands and models. If you do not find the brand of your device on the supported code list, please refer to section B for the search function or you may use section C for instructions on the learning feature of your remote control. If you have an integrated or combination unit such as a TV/DVD, each component of the unit may require being set up separately by setting up both the TV and DVD mode keys.
NOTE: The DVD and AUX mode keys can be set up with any code. The TV mode key can only be set up with TV codes.
A. Manual Programming
Use the following steps to set up the TV, DVD or AUX mode keys:
1.Power on the device you want to program and locate the
2.Press and hold the mode key (TV, DVD, or AUX) and while holding it pressed, press the OK key for one second.
3.Release both keys and all of the mode keys will flash then the selected mode key light will stay lit.
4.Enter the
5.Point the remote control at the selected device and press the power key once. The device should turn off. If the device stayed on, repeat the steps 1 thru 4 trying each code for your brand until you find the correct code.
Repeat above steps to set up another device.
To use the remote control for your
NOTE: If an invalid code is entered or no key is pressed at all for 30 seconds, the mode key light flashes for 3 seconds and turns off. The remote control returns to normal operation and you will need to start over from step A2 to set up the device.
B. Using the Search Function
To search for a particular device code for DVD or AUX e.g. VCR, use the Manual Programming for section A and program DVD or AUX with any VCR code prior to starting a search.
1.Turn on the device you want to control and point the remote at that device.
2.Press and hold the mode key (TV, DVD, or AUX) and while holding it pressed, press the OK key for one second.
3.Release both keys and all of the mode keys will flash then the selected mode key light will stay lit.
4.Press the power button repetitively until the selected device responds. Once your device has responded, press OK to save the code.
5.To indicate a successful set up, the selected mode key will turn off and you are ready to set up another device by following steps 1 thru 3 of this section.
C. Learning
If the code for your device is not found in the code list and the search feature does not work with your device, then the learning feature may be your best option. The learning feature lets you "learn" functions from your original remote control.
C-I. Learning Commands
1.Press and hold the mode key (TV, DVD, or AUX) and while holding it pressed, press the LEARN key for one second then release both keys.
2.All of the mode keys will flash and then the selected mode key light will remain on.
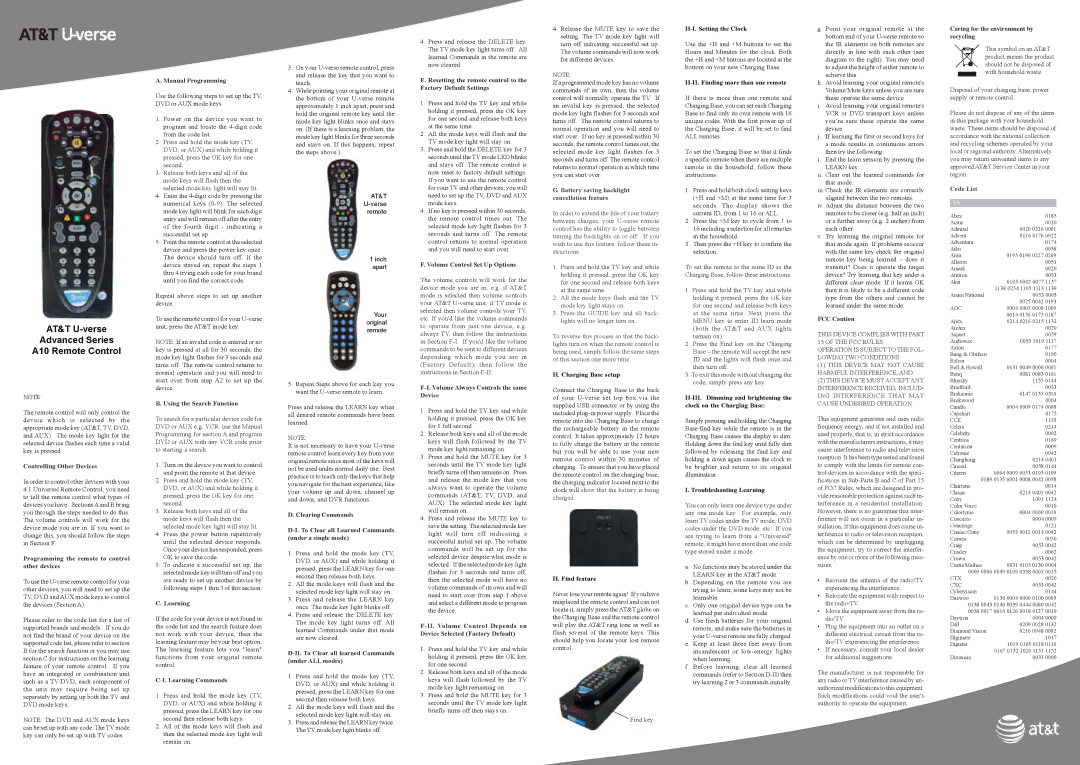
3.On your
4.While pointing your original remote at the bottom of your
AT&T U-verse remote
1 inch apart
Your original remote
5.Repeat Steps above for each key you want the
Press and release the LEARN key when all desired remote commands have been learned.
NOTE:
It is not necessary to have your
D. Clearing Commands
1.Press and hold the mode key (TV, DVD, or AUX) and while holding it pressed, press the LEARN key for one second then release both keys.
2.All the mode keys will flash and the selected mode key light will stay on.
3.Press and release the LEARN key once. The mode key light blinks off.
4.Press and release the DELETE key. The mode key light turns off. All learned Commands under that mode are now cleared.
D-II. To Clear all learned Commands (under ALL modes)
1.Press and hold the mode key (TV, DVD, or AUX) and while holding it pressed, press the LEARN key for one second then release both keys.
2.All the mode keys will flash and the selected mode key light will stay on.
3.Press and release the LEARN key twice. The TV mode key light blinks off.
4.Press and release the DELETE key. The TV mode key light turns off. All learned Commands in the remote are now cleared.
E. Resetting the remote control to the Factory Default Settings
1.Press and hold the TV key and while holding it pressed, press the OK key for one second and release both keys at the same time.
2.All the mode keys will flash and the TV mode key light will stay on.
3.Press and hold the DELETE key for 3 seconds until the TV mode LED blinks and stays off. The remote control is now reset to factory default settings. If you want to use the remote control for your TV and other devices, you will need to set up the TV, DVD and AUX mode keys.
4.If no key is pressed within 30 seconds, the remote control times out. The selected mode key light flashes for 3 seconds and turns off. The remote control returns to normal operation and you will need to start over.
F. Volume Control Set Up Options
The volume controls will work for the device mode you are in, e.g. if AT&T mode is selected then volume controls your AT&T
F-I. Volume Always Controls the same Device
1.Press and hold the TV key and while holding it pressed, press the OK key for 1 full second.
2.Release both keys and all of the mode keys will flash followed by the TV mode key light remaining on.
3.Press and hold the MUTE key for 3 seconds until the TV mode key light briefly turns off then remains on. Press and release the mode key that you always want to operate the volume commands (AT&T, TV, DVD, and AUX). The selected mode key light will remain on.
4.Press and release the MUTE key to save the setting. The selected mode key light will turn off indicating a successful initial set up. The volume commands will be set up for the selected device despite what mode is selected. If the selected mode key light flashes for 3 seconds and turns off, then the selected mode will have no volume commands of its own and will need to start over from step 1 above and select a different mode to program the device.
1.Press and hold the TV key and while holding it pressed, press the OK key for one second.
2.Release both keys and all of the mode keys will flash followed by the TV mode key light remaining on.
3.Press and hold the MUTE key for 3 seconds until the TV mode key light briefly turns off then stays on.
4.Release the MUTE key to save the setting. The TV mode key light will turn off indicating successful set up. The volume commands will now work for different devices.
NOTE:
If a programmed mode key has no volume commands of its own, then the volume control will normally operate the TV. If an invalid key is pressed, the selected mode key light flashes for 3 seconds and turns off. The remote control returns to normal operation and you will need to start over. If no key is pressed within 30 seconds, the remote control times out, the selected mode key light flashes for 3 seconds and turns off. The remote control returns to normal operation at which time you can start over.
G. Battery saving backlight cancellation feature
In order to extend the life of your battery between charges, your
1.Press and hold the TV key and while holding it pressed, press the OK key for one second and release both keys at the same time.
2.All the mode keys flash and the TV mode key light stays on.
3.Press the GUIDE key and all back- lights will no longer turn on.
To reverse this process so that the back- lights turn on when the remote control is being used, simply follow the same steps of this section one more time.
H. Charging Base setup
Connect the Charging Base to the back of your
H. Find feature
Never lose your remote again! If you have misplaced the remote control and can not locate it, simply press the AT&T globe on the Charging Base and the remote control will play the AT&T ring tone as well as flash several of the remote keys. This should help you locate your lost remote control.
Find key
H-I. Setting the Clock
Use the +H and +M buttons to set the Hours and Minutes for the clock. Both the +H and +M buttons are located at the bottom on your new Charging Base.
H-II. Finding more than one remote
If there is more than one remote and Charging Base, you can set each Charging Base to find only its own remote with 16 unique codes. With the first power up of the Charging Base, it will be set to find ALL remotes.
To set the Charging Base so that it finds a specific remote when there are multiple remote in the household, follow these instructions:
1.Press and hold both clock setting keys (+H and +M) at the same time for 3 seconds. The display shows the current ID, from 1 to 16 or ALL.
2.Press the +M key to cycle from 1 to 16 including a selection for all remotes in the household.
3.Then press the +H key to confirm the selection.
To set the remote to the same ID as the Charging Base, follow these instructions:
1.Press and hold the TV key and while holding it pressed, press the OK key for one second and release both keys at the same time. Next press the MENU key to enter ID learn mode (both the AT&T and AUX lights remain on).
2.Press the Find key on the Charging Base – the remote will accept the new ID and the lights will flash once and then turn off.
3.To exit this mode without changing the code, simply press any key.
H-III. Dimming and brightening the clock on the Charging Base:
Simply pressing and holding the Charging Base find key while the remote is in the Charging Base causes the display to dim. Holding down the find key until fully dim followed by releasing the find key and holding it down again causes the clock to be brighter and return to its original illumination.
I. Troubleshooting Learning
You can only learn one device type under any one mode key. For example, only learn TV codes under the TV mode, DVD codes under the DVD mode, etc. If you are trying to learn from a "Universal" remote, it might have more than one code type stored under a mode.
a.No functions may be stored under the LEARN key in the AT&T mode.
b.Depending on the remote you are trying to learn, some keys may not be learnable.
c.Only one original device type can be learned per individual mode.
d.Use fresh batteries for your original remote, and make sure the batteries in your
e.Keep at least three feet away from incandescent or
f.Before learning, clear all learned commands (refer to Section
g. Point your original remote at the bottom end of your
h.Avoid learning your original remote's Volume/Mute keys unless you are sure these operate the same device.
i.Avoid learning your original remote's VCR or DVD transport keys unless you’re sure these operate the same device.
j.If learning the first or second keys for
a mode results in continuous errors then try the following:
i.End the learn session by pressing the LEARN key.
ii.Clear out the learned commands for that mode.
iii.Check the IR elements are correctly aligned between the two remotes.
iv.Adjust the distance between the two remotes to be closer (e.g. half an inch) or a further away (e.g. 2 inches) from each other.
v.Try learning the original remote for that mode again. If problems reoccur with the same key check the original remote key being learned – does it transmit? Does it operate the target device? Try learning that key under a different clear mode. If it learns OK then it is likely to be a different code type from the others and cannot be learned under the same mode.
FCC Caution
THIS DEVICE COMPLIES WITH PART 15 OF THE FCC RULES.
OPERATION IS SUBJECT TO THE FOL- LOWING TWO CONDITIONS:
(1)THIS DEVICE MAY NOT CAUSE HARMFUL INTERFERENCE, AND
(2)THIS DEVICE MUST ACCEPT ANY INTERFERENCE RECEIVED, INCLUD- ING INTERFERENCE THAT MAY CAUSE UNDESIRED OPERATION.
This equipment generates and uses radio frequency energy, and if not installed and used properly, that is, in strict accordance with the manufacturers instructions, it may cause interference to radio and television reception. It has been type tested and found to comply with the limits for remote con- trol devices in accordance with the speci- fications in
•Reorient the antenna of the radio/TV experiencing the interference.
•Relocate the equipment with respect to the radio/TV.
•Move the equipment away from the ra- dio/TV.
•Plug the equipment into an outlet on a different electrical circuit from the ra- dio/TV experiencing the interference.
•If necessary, consult your local dealer for additional suggestions.
The manufacturer is not responsible for any radio or TV interference caused by un- authorized modifications to this equipment. Such modifications could void the user's authority to operate the equipment.
Caring for the environment by recycling
This symbol on an AT&T product means the product should not be disposed of with household waste.
Disposal of your charging base, power supply or remote control.
Please do not dispose of any of the items in this package with your household waste. These items should be disposed of accordance with the national collection and recycling schemes operated by your local or regional authority. Alternatively you may return unwanted items to any approved AT&T Service Center in your region.
Code List
TV |
|
Abex | 0185 |
Acme | 0010 |
Admiral | 0020 0226 0001 |
Advent | 0116 0176 0922 |
Adventura | 0174 |
Aiko | 0058 |
Aiwa | 0195 0196 0227 0269 |
Alleron | 0051 |
Amark | 0020 |
Amtron | 0053 |
Akai | 0105 0002 0077 1137 |
| 1138 0254 1105 1113 1139 |
Anam National | 0053 0003 |
| 0025 0042 0193 |
AOC | 0004 0005 0009 1009 |
| 0014 0156 0175 0187 |
Apex | 0214 0216 0215 1132 |
Archer | 0020 |
Aspect | 0059 |
Audiovox | 0053 1019 1117 |
Axion | 0177 |
Bang & Olufsen | 0190 |
Belcor | 0004 |
Bell & Howell | 0031 0049 0000 0001 |
Benq | 0081 0083 0101 |
Bluesky | 1155 0144 |
Bradford | 0053 |
Broksonic | 0147 0135 0310 |
Brokwood | 0004 |
Candle | 0004 0009 0174 0008 |
Capehart | 0175 |
CCE | 1153 |
Celera | 0214 |
Celebrity | 0002 |
Centrios | 0169 |
Centurion | 0009 |
Cetronic | 0042 |
Changhong | 0214 0401 |
Cineral | 0058 0144 |
Citizen | 0004 0009 0053 0105 0109 |
0189 0135 0001 0008 0042 0058 | |
Clairtone | 0014 |
Classic | 0214 0401 0042 |
Coby | 1091 1124 |
Color Voice | 0010 |
Colortyme | 0004 0009 0010 |
Concerto | 0004 0009 |
Concierge | 0121 |
Contec/Cony | 0053 0012 0014 0042 |
Cornea | 0050 |
Craig | 0053 0042 |
Crosley | 0062 |
Crown | 0053 0042 |
Curtis Mathes | 0031 0105 0130 0004 |
0009 0000 0049 0109 0358 0001 0015 | |
CTX | 0020 |
CXC | 0053 0042 |
Cybervision | 0144 |
Daewoo | 0130 0004 0009 0100 0005 |
0138 0043 0140 0039 0444 0080 0042 | |
0058 0017 0010 0126 0018 0127 0019 | |
Daytron | 0004 0009 |
Dell | 0209 0028 0132 |
Diamond Vision | 0210 0948 0092 |
Digimate | 1017 |
Digistar | 1019 0165 0118 0116 |
| 0167 0132 1020 1151 1152 |
Dimensia | 0031 0000 |