I N S T A L L A T I O N

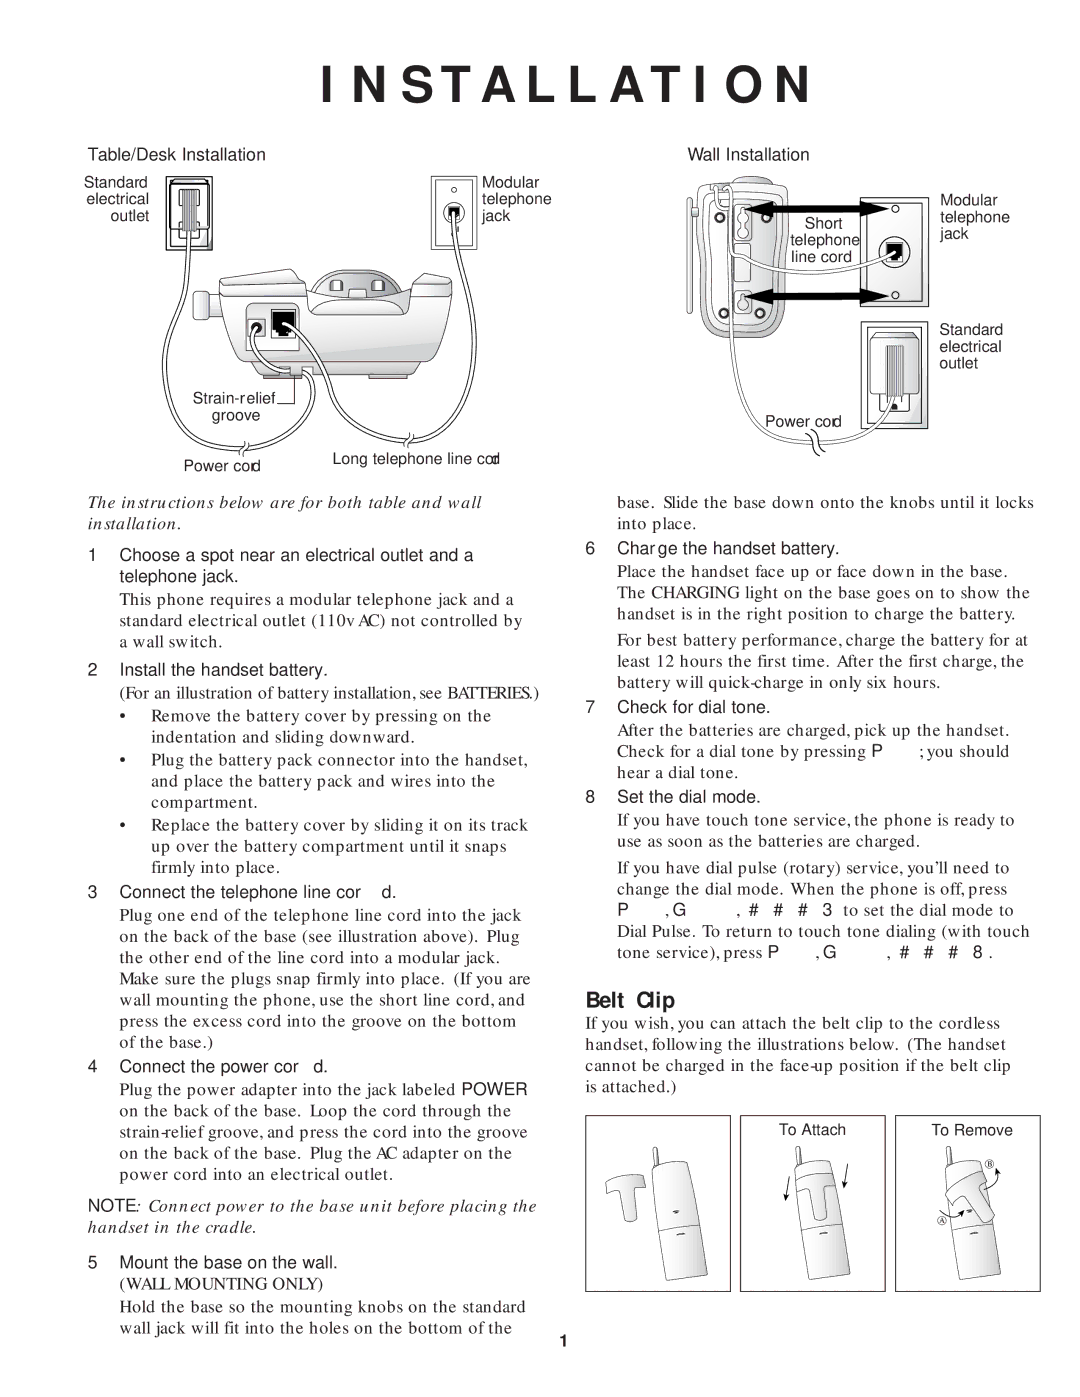
Table/Desk Installation

Standard

Modular

electrical

telephone

outlet

jack

Strain-relief groove

Power cord

Long telephone line cord


The instructions below are for both table and wall installation.

1Choose a spot near an electrical outlet and a telephone jack.

This phone requires a modular telephone jack and a standard electrical outlet (110v AC) not controlled by a wall switch.

2Install the handset battery.

(For an illustration of battery installation, see BATTERIES.)

Remove the battery cover by pressing on the indentation and sliding downward.

Plug the battery pack connector into the handset, and place the battery pack and wires into the compartment.

Replace the battery cover by sliding it on its track up over the battery compartment until it snaps firmly into place.

3Connect the telephone line cord.

Plug one end of the telephone line cord into the jack on the back of the base (see illustration above). Plug the other end of the line cord into a modular jack.

Make sure the plugs snap firmly into place. (If you are wall mounting the phone, use the short line cord, and press the excess cord into the groove on the bottom of the base.)

4Connect the power cord.

Plug the power adapter into the jack labeled POWER on the back of the base. Loop the cord through the strain-relief groove, and press the cord into the groove on the back of the base. Plug the AC adapter on the power cord into an electrical outlet.

NOTE: Connect power to the base unit before placing the handset in the cradle.

5Mount the base on the wall.

(WALL MOUNTING ONLY)

Hold the base so the mounting knobs on the standard wall jack will fit into the holes on the bottom of the

Wall Installation


Modular

Short

telephone

jack

telephone


line cord


Standard


electrical


outlet

Power cord


base. Slide the base down onto the knobs until it locks into place.

6Charge the handset battery.

Place the handset face up or face down in the base. The CHARGING light on the base goes on to show the handset is in the right position to charge the battery.

For best battery performance, charge the battery for at least 12 hours the first time. After the first charge, the battery will quick-charge in only six hours.

7Check for dial tone.

After the batteries are charged, pick up the handset. Check for a dial tone by pressing P; you should

hear a dial tone.

8Set the dial mode.

If you have touch tone service, the phone is ready to use as soon as the batteries are charged.

If you have dial pulse (rotary) service, you’ll need to

change the dial mode. When the phone is off, press P, G, ###3to set the dial mode to

Dial Pulse. To return to touch tone dialing (with touch tone service), press P, G, ###8.

Belt Clip

If you wish, you can attach the belt clip to the cordless handset, following the illustrations below. (The handset cannot be charged in the face-up position if the belt clip is attached.)

To Attach


To Remove


1

Page 2
Image 2
AT&T HS-8200 user manual Installation, Belt Clip

HS-8200 specifications

The AT&T HS-8200 is a versatile and innovative device that has made a significant impact in the realm of telecommunications. As a part of AT&T's expanding portfolio, the HS-8200 stands out with its compelling features and advanced technology, making it a popular choice among both consumers and businesses.

One of the most notable characteristics of the HS-8200 is its enhanced connectivity options. Designed to support various communication needs, it integrates multiple network protocols such as VoIP, LTE, and 5G, enabling seamless communication regardless of the network environment. This multi-connectivity feature ensures users can enjoy uninterrupted service, whether on the go or at a fixed location.

The HS-8200 also emphasizes user-friendliness with its intuitive interface. This device features a sleek design with a vibrant display that simplifies navigation and accessibility. Users can easily manage settings and preferences, making it suitable for individuals of all tech-savvy levels. The device supports voice-activated commands, enhancing the hands-free experience for users, which is particularly beneficial for busy professionals or individuals multitasking.

Security is another critical feature of the AT&T HS-8200. The device employs robust encryption methods to safeguard sensitive information transmitted over its networks. This level of security is essential in today's digital landscape, where data breaches and cyber threats are rampant. By prioritizing user security, AT&T demonstrates its commitment to providing a safe communication experience.

Furthermore, the HS-8200 incorporates smart technology, allowing it to adapt to network conditions automatically. This adaptability ensures optimal performance, reducing dropped calls and enhancing call quality. Users can expect clear audio and reduced latency, even in high-demand situations, making it an ideal choice for both personal and business use.

In terms of battery life, the HS-8200 is equipped with a powerful rechargeable battery that provides extended usage between charges. This ensures that users can rely on the device for long hours, whether for daily communication or during important business meetings.

Overall, the AT&T HS-8200 combines advanced connectivity, user-friendly design, robust security, smart technology, and impressive battery life to meet the diverse communication needs of modern users. Its competitive features position it as a leading choice for those seeking a reliable and efficient telecommunications device. By continuously innovating and expanding its offerings, AT&T remains a significant player in the telecommunications industry, and the HS-8200 exemplifies this commitment to excellence.