care not to apply power to the motor/accessory connectors, as they utilize the same connector. Doing so will void the unit’s warranty.
set up of wireless remote
mwarning
personal injury & product damage
• Do not replace or charge batteries in a potentially explosive |
atmosphere. Contact sparking may occur while installing or removing |
batteries and cause an explosion. |
• All batteries can cause property damage and/or bodily injury such |
as burns if a conductive material such as jewelry, keys or beaded |
mcaution
product damage
•Do not
To lift | Truck Camper |
|
chains touches exposed terminals. The material may complete an |
electrical circuit (short circuit) and become quite hot. Exercise care |
in handling any charged battery, particularly when placing it inside a |
pocket, purse or other container with metal objects. |
remote battery installation:
1.Firmly slide battery cover (remote back) down to remove. NOTE: The audio cable can optionally be used to power the transmitter directly from the switch assembly.
2.Insert one 9V battery.
3.Replace the battery cover and slide up until secure.
The battery type is 9V alkaline battery which will provide approximately 45 minutes of continuous use.
OPERATION
mwarning
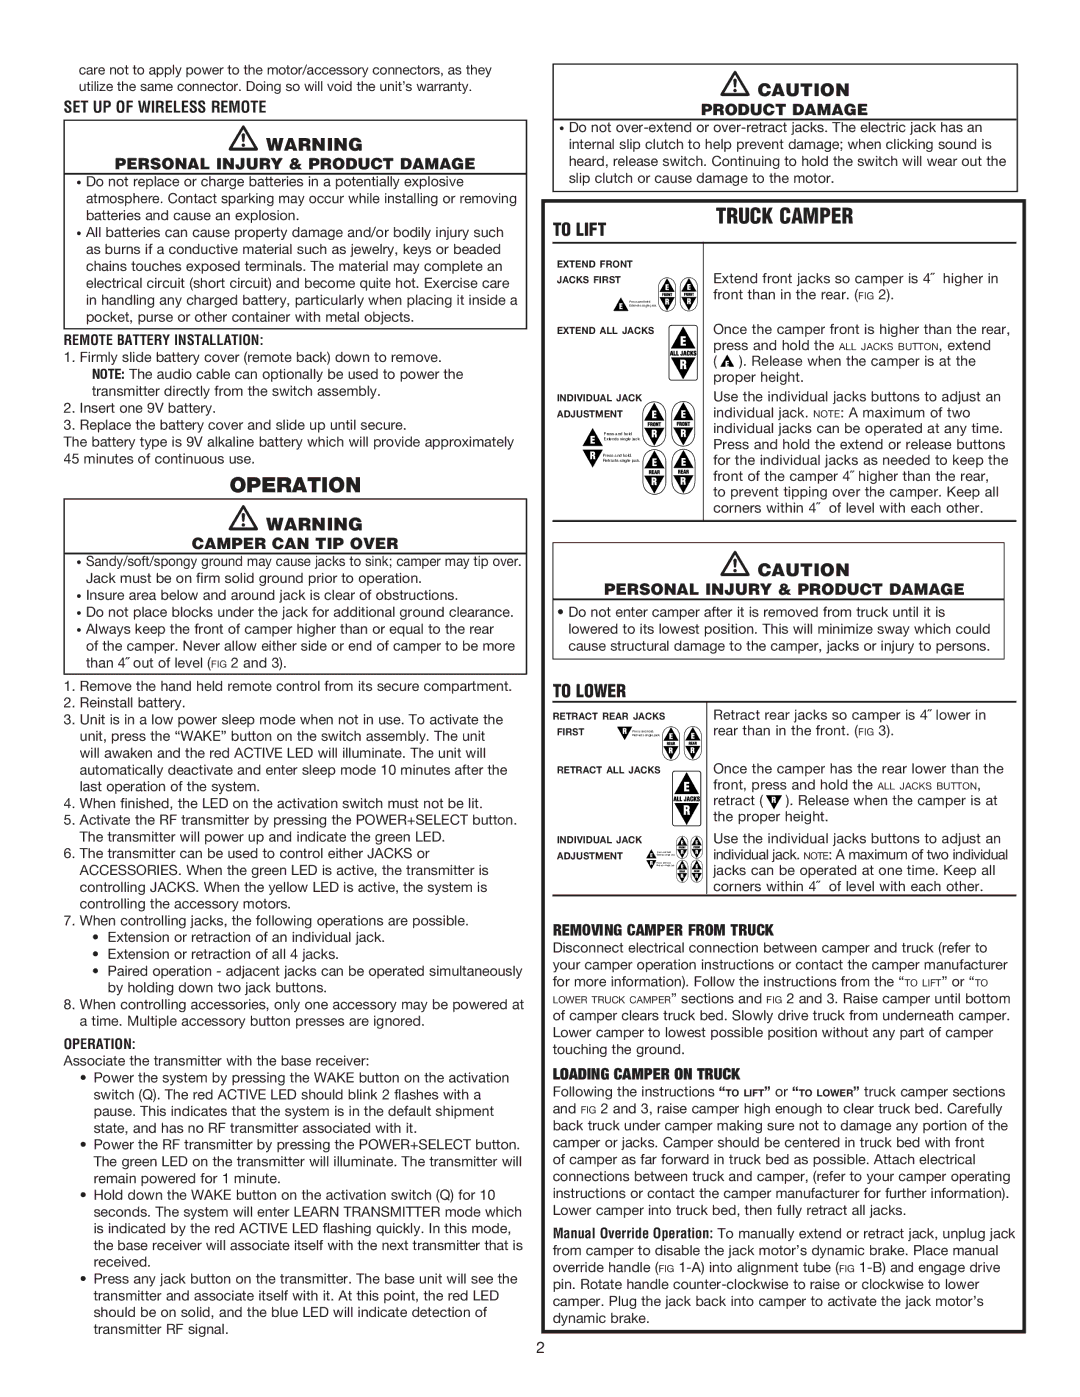
extend front jacks first
Press and hold
Extends single jack.
extend all jacks
individual jack adjustment ![]()
Press and hold
Extends single jack.
Press and hold.
Retracts single jack.
Extend front jacks so camper is 4˝ higher in front than in the rear. (fig 2).
Once the camper front is higher than the rear, press and hold the all jacks button, extend
( ![]() ). Release when the camper is at the proper height.
). Release when the camper is at the proper height.
Use the individual jacks buttons to adjust an individual jack. note: A maximum of two individual jacks can be operated at any time. Press and hold the extend or release buttons for the individual jacks as needed to keep the front of the camper 4˝ higher than the rear, to prevent tipping over the camper. Keep all corners within 4˝ of level with each other.
camper can tip over
• Sandy/soft/spongy ground may cause jacks to sink; camper may tip over. |
Jack must be on firm solid ground prior to operation. |
• Insure area below and around jack is clear of obstructions. |
• Do not place blocks under the jack for additional ground clearance. |
• Always keep the front of camper higher than or equal to the rear |
of the camper. Never allow either side or end of camper to be more |
than 4˝ out of level (fig 2 and 3). |
1. Remove the hand held remote control from its secure compartment. |
2. Reinstall battery. |
mcaution
Personal injury & product damage
•Do not enter camper after it is removed from truck until it is lowered to its lowest position. This will minimize sway which could cause structural damage to the camper, jacks or injury to persons.
To Lower
3. | Unit is in a low power sleep mode when not in use. To activate the |
| unit, press the “WAKE” button on the switch assembly. The unit |
| will awaken and the red ACTIVE LED will illuminate. The unit will |
| automatically deactivate and enter sleep mode 10 minutes after the |
| last operation of the system. |
4. | When finished, the LED on the activation switch must not be lit. |
5. | Activate the RF transmitter by pressing the POWER+SELECT button. |
| The transmitter will power up and indicate the green LED. |
6. | The transmitter can be used to control either JACKS or |
| ACCESSORIES. When the green LED is active, the transmitter is |
| controlling JACKS. When the yellow LED is active, the system is |
| controlling the accessory motors. |
7. | When controlling jacks, the following operations are possible. |
retract rear jacks
first Press and hold. Retracts single jack.
retract all jacks
individual jack
adjustment ![]() Press and hold Extends single jack.
Press and hold Extends single jack.
Press and hold. Retracts single jack.
Retract rear jacks so camper is 4˝ lower in rear than in the front. (fig 3).
Once the camper has the rear lower than the front, press and hold the all jacks button, retract ( ![]() ). Release when the camper is at the proper height.
). Release when the camper is at the proper height.
Use the individual jacks buttons to adjust an individual jack. note: A maximum of two individual jacks can be operated at one time. Keep all corners within 4˝ of level with each other.
• | Extension or retraction of an individual jack. |
• | Extension or retraction of all 4 jacks. |
• | Paired operation - adjacent jacks can be operated simultaneously |
| by holding down two jack buttons. |
8. When controlling accessories, only one accessory may be powered at | |
a time. Multiple accessory button presses are ignored. | |
OPERATION:
Associate the transmitter with the base receiver:
•Power the system by pressing the WAKE button on the activation switch (Q). The red ACTIVE LED should blink 2 flashes with a pause. This indicates that the system is in the default shipment state, and has no RF transmitter associated with it.
•Power the RF transmitter by pressing the POWER+SELECT button.
The green LED on the transmitter will illuminate. The transmitter will remain powered for 1 minute.
•Hold down the WAKE button on the activation switch (Q) for 10 seconds. The system will enter LEARN TRANSMITTER mode which is indicated by the red ACTIVE LED flashing quickly. In this mode, the base receiver will associate itself with the next transmitter that is received.
•Press any jack button on the transmitter. The base unit will see the transmitter and associate itself with it. At this point, the red LED should be on solid, and the blue LED will indicate detection of transmitter RF signal.
Removing Camper from Truck
Disconnect electrical connection between camper and truck (refer to your camper operation instructions or contact the camper manufacturer for more information). Follow the instructions from the “to lift” or “to lower truck camper” sections and fig 2 and 3. Raise camper until bottom of camper clears truck bed. Slowly drive truck from underneath camper. Lower camper to lowest possible position without any part of camper touching the ground.
Loading camper on Truck
Following the instructions “to lift” or “to lower” truck camper sections and fig 2 and 3, raise camper high enough to clear truck bed. Carefully back truck under camper making sure not to damage any portion of the camper or jacks. Camper should be centered in truck bed with front of camper as far forward in truck bed as possible. Attach electrical connections between truck and camper, (refer to your camper operating instructions or contact the camper manufacturer for further information). Lower camper into truck bed, then fully retract all jacks.
Manual Override Operation: To manually extend or retract jack, unplug jack from camper to disable the jack motor’s dynamic brake. Place manual override handle (fig
2