Features
•Industry-standard sound quality—extremely intelligible natural audio for stage/television talent, lecturers, houses of worship
•Handles high sound pressure levels with ease
•Microphone diameter of just 2.6 mm for the ultimate in low-profile, high-performance audio
•Comes equipped with AT8464 Dual-Ear Microphone Mount
that converts single ear-worn MicroSet to a dual-ear-worn unit for maximum stability and comfort
•Locking 4-pin microphone output connector compatible with included power module and all Audio-Technica UniPak® body-pack wireless transmitters
•UniSteep® filter provides a steep low-frequency attenuation to improve sound pickup without affecting voice quality
•Offered in black and beige (-TH) models
•Also available in wireless models (without power module) terminated for use with all Audio-Technica UniPak® wireless systems and many other manufacturers' wireless systems
BP892 Description
The BP892 is a headworn condenser microphone with an omnidirectional polar pattern. It is designed to provide intelligible natural audio for stage and television talent, lecturers and houses of worship.
The microphone requires 11V to 52V phantom power for operation.
The microphone includes a 1.4 m (55") permanently attached miniature cable. Its free end connects to the provided AT8539 power module via a locking 4-pin connector. The connector is also compatible with all Audio-Technica UniPak® body-pack transmitters. The output of the power module is a 3-pin XLRM-type connector.
A recessed switch in the power module permits choice of flat response or low-frequency roll-off (via integral 80 Hz high-pass UniSteep® filter) to help control undesired ambient noise.
The microphone comes equipped with a power module, a cable clip, a dual-ear mount, two windscreens, two element covers, a moisture guard, a belt clip and a protective carrying case. The microphone is available in black and beige.
Wireless MicroSet® Description
The microphone is also available in a variety of wireless models, including the BP892cW. The BP892cW includes a 1.4 m (55") permanently attached miniature cable terminated with a locking 4-pin connector for use with Audio-Technica UniPak® body-pack transmitters. Models are also available in a variety of terminations for use with many other manufacturers’ wireless systems (see below). No power module or belt clip is included (or required) with the wireless models. The wireless models’ dimensions, polar pattern and included accessories are otherwise identical to those of the BP892.
The BP892cW is also available unterminated as the BP892c.
BP892cT5, BP892cT5-TH – Terminated for Lectrosonics® wireless systems using TA5F-type connector
BP892c, BP892c-TH – Unterminated
Model numbers ending in ”TH“ are beige.
Audio-Technica®is a registered trademark of Audio-Technica. Other product and company names mentioned herein may be trademarks and/or service marks of their respective owners.
Operation and Maintenance
The BP892 requires 11V to 52V phantom power for operation.
Output is low impedance (Lo-Z) balanced. The signal appears across Pins 2 and 3; Pin 1 is ground (shield). Output phase is “Pin 2 hot”— positive acoustic pressure produces positive voltage at Pin 2.
An integral 80 Hz high-pass UniSteep® filter provides easy switching from a flat frequency response to a low-end roll-off. The roll-off position reduces the microphone’s sensitivity to popping in close vocal use. It also reduces the pickup of low-frequency ambient noise (such as traffic, air-handling systems, etc.), room reverberation and mechanically coupled vibrations. To engage the UniSteep® filter, use the end tip of a paperclip or other small pointed instrument to slide the switch toward the “bent” line.
The flexible design of the BP892 MicroSet enables it to be worn on either the left or right ear. Position the lightweight contoured loop around the back of your ear, so that the boom extends from the bottom of your ear. Bend the loop as needed to achieve a secure, comfortable fit, so that the MicroSet is not dislodged by shaking your head. Remove the MicroSet and bend a gentle curve in the microphone's boom. Hook the MicroSet back around your ear, and adjust the boom as needed to follow the contour of your face, positioning the microphone near the corner of your mouth. The microphone has a large acoustical sweet spot; experiment with placement near the corner of your mouth for optimal performance.
A cable clip is provided for strain relief, allowing the microphone to remain securely in place without the weight of the cable pulling on the headset. To install the cable clip, slip the cable into the snap-on connector and attach the clip to clothing, leaving enough slack on the MicroSet side of the clip to allow for free, comfortable motion.
The included AT8464 Dual-Ear Microphone Mount allows you to convert your single ear-worn BP892 MicroSet® to a dual-ear-worn unit. The BP892 fits on either side of the Dual-Ear Microphone Mount, allowing the microphone to be worn to either the left or right of your mouth. The headband easily adjusts to fit both children and adults.
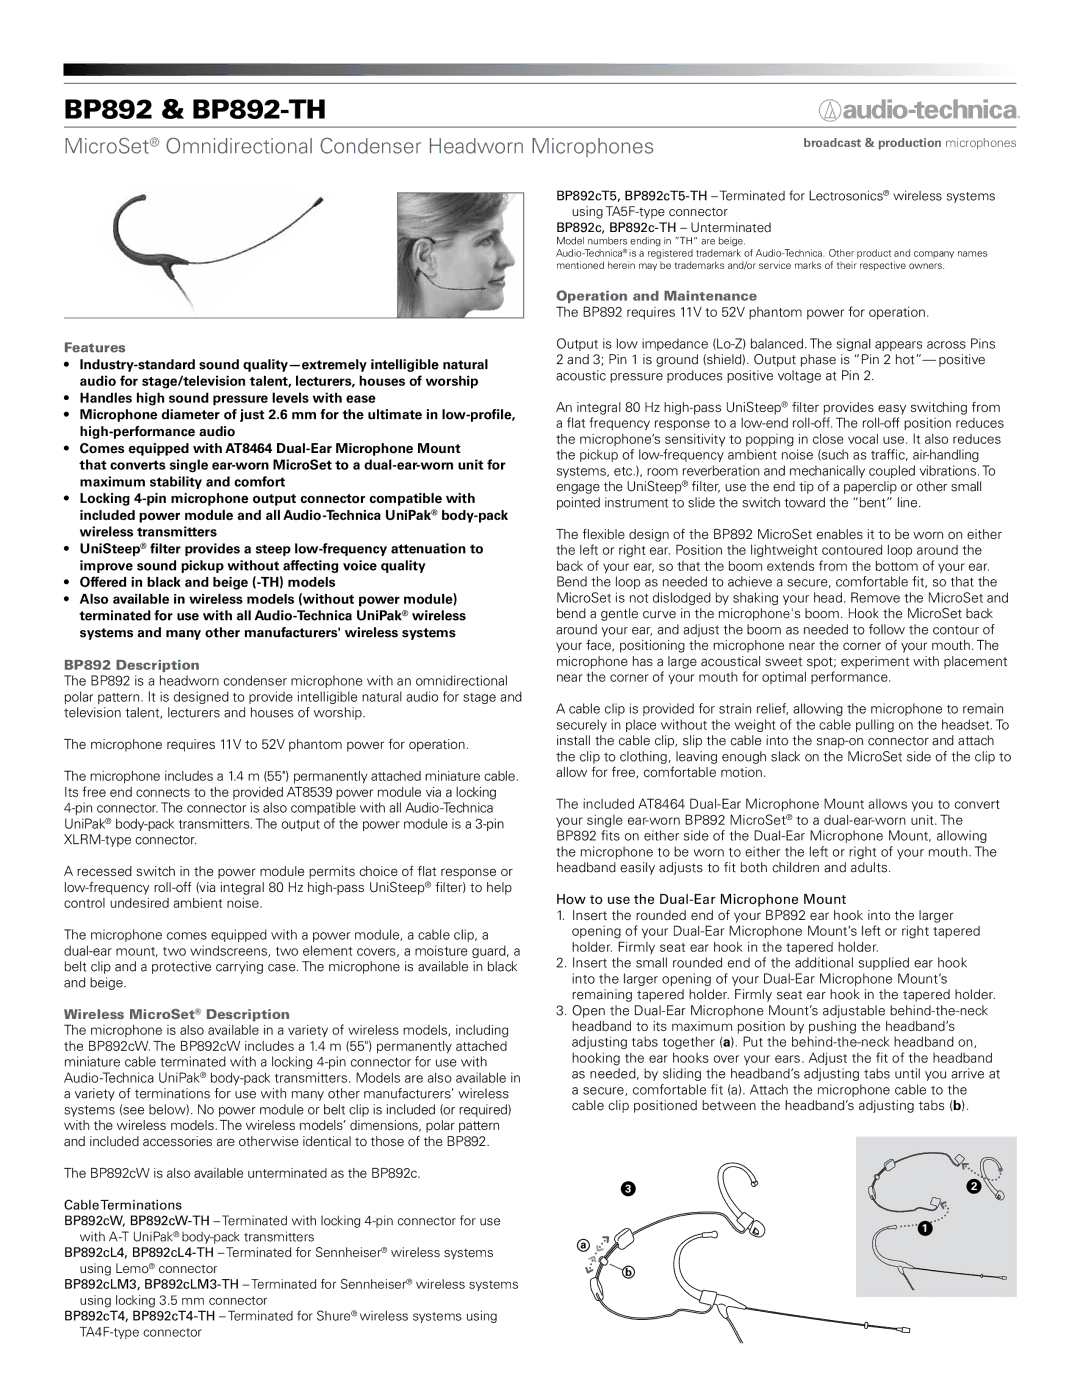
How to use the Dual-Ear Microphone Mount
1.Insert the rounded end of your BP892 ear hook into the larger opening of your Dual-Ear Microphone Mount’s left or right tapered holder. Firmly seat ear hook in the tapered holder.
2.Insert the small rounded end of the additional supplied ear hook into the larger opening of your Dual-Ear Microphone Mount’s remaining tapered holder. Firmly seat ear hook in the tapered holder.
3.Open the Dual-Ear Microphone Mount’s adjustable behind-the-neck headband to its maximum position by pushing the headband’s adjusting tabs together (a). Put the behind-the-neck headband on, hooking the ear hooks over your ears. Adjust the fit of the headband as needed, by sliding the headband’s adjusting tabs until you arrive at a secure, comfortable fit (a). Attach the microphone cable to the cable clip positioned between the headband’s adjusting tabs (b).