PRO-PDLVS

INSTALLATION GUIDE FOR:

VAN SLIDING DOOR

POWER LOCK SWITCH

Form No. 128-5044

PRE-INSTALLATION:

1. Check and be certain that when the sliding door is fully closed the distance between the door and the jam is no greater then 1/2". This will insure proper contact when the switch is installed.

NEW: Included with this kit are two 10º angled plates. These are intended for use in vans where the door meets the post at an angle, ( Some Chrysler, Ford, and Chevrolet Mini Vans). The plate(s) are to be installed on the spring contact side between the gasket and spring contact, in addition, any combination may be used. For example, 1 plate will accommodate a 10º angle, 2 plates will accommodate a 20º angle and the two plates placed opposing each other will allow you to accommodate a closed door gap wider than 1/2".

2.Check behind your intended mounting location to insure adequate clearance. Consideration must be made for both the spring loaded contacts which will be mounted in the Van's sliding door, and the striker plate which will be mounted in mating door jam. For reference, a minimum inside clearance of 2 1/2" is required for the spring contacts, and a minimum inside clearance of 1" is required for the striker plate. This allowance will facilitate wiring the switch and prevent shorts.

INSTALLATION:

Mount the door spring contact side first:

1.Using the gasket provided as a template, draw the center oval on the sliding door where you intend to mount the switch. Place the template provided over the marked location and center punch the two holes and two mounting screw holes.

2.Drill two 7/16" holes in the pre-marked oval area where the switch will pass through.

3.Drill two 1/8" inch holes in the pre-marked screw mount locations.

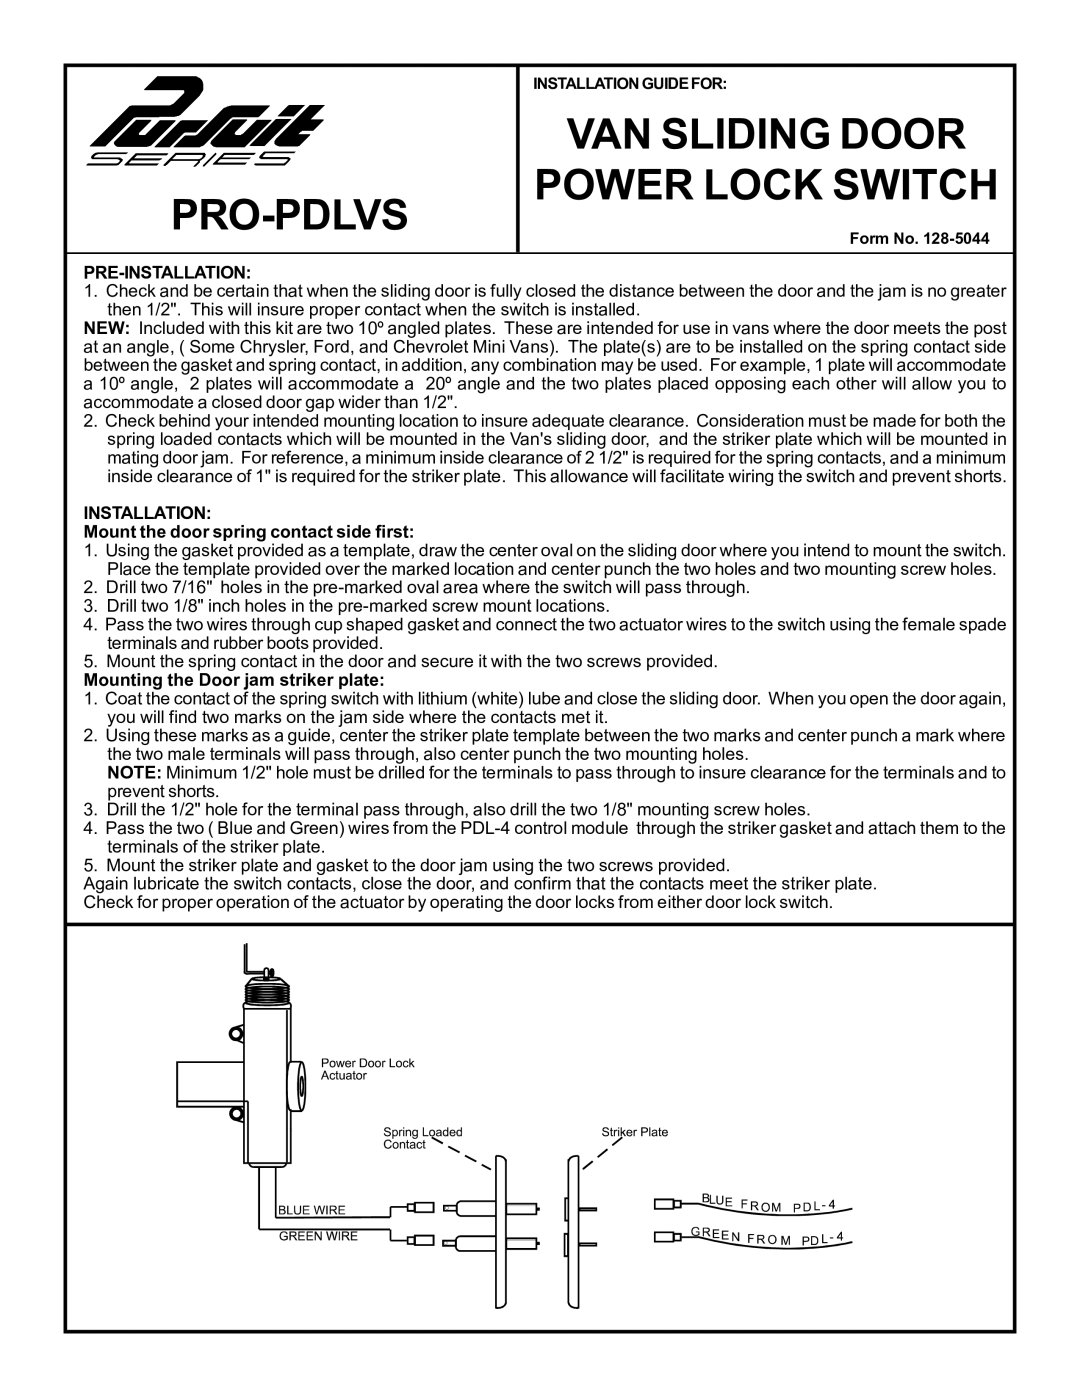
4.Pass the two wires through cup shaped gasket and connect the two actuator wires to the switch using the female spade terminals and rubber boots provided.

5.Mount the spring contact in the door and secure it with the two screws provided.

Mounting the Door jam striker plate:

1.Coat the contact of the spring switch with lithium (white) lube and close the sliding door. When you open the door again, you will find two marks on the jam side where the contacts met it.

2.Using these marks as a guide, center the striker plate template between the two marks and center punch a mark where the two male terminals will pass through, also center punch the two mounting holes.

NOTE: Minimum 1/2" hole must be drilled for the terminals to pass through to insure clearance for the terminals and to prevent shorts.

3.Drill the 1/2" hole for the terminal pass through, also drill the two 1/8" mounting screw holes.

4.Pass the two ( Blue and Green) wires from the PDL-4 control module through the striker gasket and attach them to the terminals of the striker plate.

5.Mount the striker plate and gasket to the door jam using the two screws provided.

Again lubricate the switch contacts, close the door, and confirm that the contacts meet the striker plate. Check for proper operation of the actuator by operating the door locks from either door lock switch.

Page 1
Image 1
Audiovox PRO-PDLVS manual Pro-Pdlvs, VAN Sliding Door Power Lock Switch, Pre-Installation

PRO-PDLVS specifications

The Audiovox PRO-PDLVS is a state-of-the-art digital antenna specifically designed for those who seek high-performance reception for their audio and video devices. This innovative product has been engineered to meet the demands of today’s fast-paced digital lifestyle, providing users with reliable service and exceptional quality.

One of the main features of the Audiovox PRO-PDLVS is its advanced signal amplification technology. This feature enables the antenna to receive a stronger signal, even in areas that are traditionally prone to weak reception, such as urban environments or remote rural locations. By utilizing a built-in low-noise amplifier, the PRO-PDLVS ensures that the user experiences clear audio and a crisp video feed.

Additionally, the PRO-PDLVS boasts a sleek and compact design that makes it easy to install and integrate into various settings. Whether mounted on a wall or placed on a shelf, this antenna complements your home or mobile entertainment system without being obtrusive. Its lightweight construction allows for convenient portability, making it ideal for both stationary and mobile use, supporting users who value flexibility.

Another remarkable characteristic of the Audiovox PRO-PDLVS is its wide frequency range. This antenna can effectively receive signals across multiple channels, providing access to a vast array of programming options—from local stations to higher frequency channels. This versatility makes it an ideal choice for diverse media consumption needs, catering not only to television viewers but also to those who enjoy streaming music and radio broadcasts.

The installation process of the PRO-PDLVS is straightforward, thanks to its user-friendly design. Most users can set it up in a matter of minutes, without requiring specialized tools or technical knowledge. Additionally, the package includes detailed instructions, further simplifying the installation experience.

In terms of durability, the Audiovox PRO-PDLVS is built to withstand various environmental conditions. Its sturdy construction ensures longevity, meaning that users can rely on this antenna for years of quality performance. Furthermore, it is designed to minimize interference from nearby electronic devices, ensuring that users enjoy a consistent and uninterrupted signal.

In conclusion, the Audiovox PRO-PDLVS represents a perfect blend of modern technology, robust features, and user-centric design. It is an excellent choice for anyone looking to enhance their audio and video experience, solidifying its position as a must-have accessory for both home entertainment systems and mobile applications.