ASSEMBLY INSTRUCTIONS
|
|
|
|
|
|
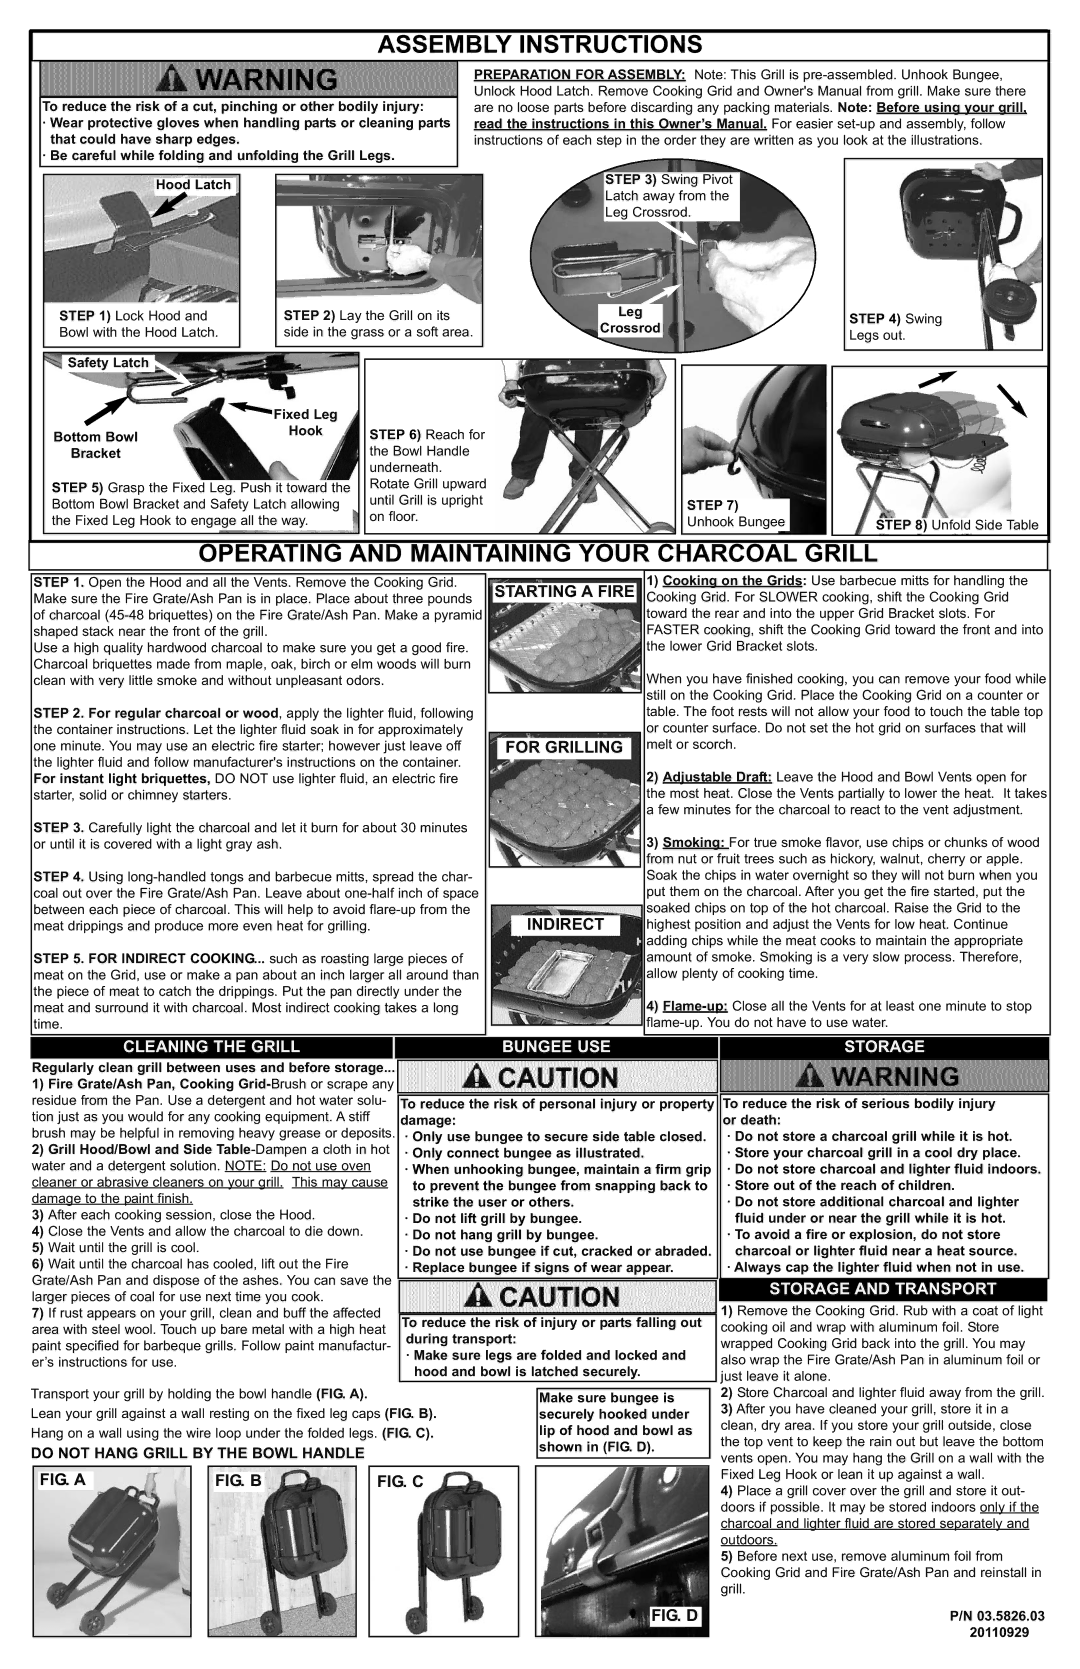
| PREPARATION FOR ASSEMBLY: Note: This Grill is |
| ||
|
|
|
|
|
|
| Unlock Hood Latch. Remove Cooking Grid and Owner's Manual from grill. Make sure there |
| ||
| To reduce the risk of a cut, pinching or other bodily injury: | are no loose parts before discarding any packing materials. Note: Before using your grill, |
| |||||||
| · Wear protective gloves when handling parts or cleaning parts | read the instructions in this Owner’s Manual. For easier |
| |||||||
|
| that could have sharp edges. | instructions of each step in the order they are written as you look at the illustrations. |
| ||||||
| · Be careful while folding and unfolding the Grill Legs. |
|
|
|
| |||||
|
| STEP 3) Swing Pivot |
| |||||||
|
|
|
|
|
|
|
|
| ||
|
|
|
|
|
|
|
|
| ||
|
|
|
|
|
|
|
|
| ||
|
|
| Hood Latch |
|
|
|
| |||
|
|
|
|
|
| Latch away from the |
| |||
|
|
|
|
|
|
|
|
| ||
|
|
|
|
|
|
|
| |||
|
|
|
|
|
|
|
| Leg Crossrod. |
| |
|
| STEP 1) Lock Hood and |
|
|
|
| STEP 2) Lay the Grill on its |
|
| Leg |
|
|
|
|
|
| ||||||||||||||
|
|
|
|
|
|
|
|
| STEP 4) Swing |
|
|
| ||||||||||||||||||
|
|
|
|
|
|
| Crossrod |
|
|
|
| |||||||||||||||||||
|
| Bowl with the Hood Latch. |
|
|
|
| side in the grass or a soft area. |
|
|
| Legs out. |
|
|
| ||||||||||||||||
|
|
|
|
|
|
|
|
|
|
|
|
|
|
|
|
|
| |||||||||||||
|
|
|
|
|
|
|
|
|
|
|
|
|
|
|
|
|
|
|
|
|
|
|
|
|
|
|
|
|
|
|
|
|
|
|
|
|
|
|
|
|
|
|
|
|
|
|
|
|
|
|
|
|
|
|
|
|
|
|
|
|
|
|
|
|
|
|
|
|
|
|
|
|
|
|
|
|
|
|
|
|
|
|
|
|
|
|
|
|
|
|
| |
|
|
|
|
|
|
|
|
|
|
|
|
|
|
|
|
|
|
|
|
|
|
|
|
|
|
|
|
|
| |
|
|
| Safety Latch |
|
|
|
|
|
|
|
|
|
|
|
|
|
|
|
|
|
|
|
|
|
|
|
|
| ||
|
|
|
|
|
|
|
|
|
|
|
|
|
|
|
|
|
|
|
|
|
|
|
|
|
|
|
|
|
|
|
|
|
|
|
|
|
|
| Fixed Leg |
|
|
|
|
|
|
|
|
|
|
|
|
|
|
|
|
|
|
| |||
|
|
|
|
|
|
|
|
|
| Hook |
|
|
| STEP 6) Reach for |
|
|
|
|
|
|
|
|
|
|
|
|
| |||
| Bottom Bowl |
|
|
|
|
|
|
|
|
|
|
|
|
|
|
|
|
|
|
|
|
| ||||||||
|
|
|
|
|
|
|
|
|
|
|
|
|
|
|
|
|
|
|
|
|
|
|
| |||||||
|
|
|
|
|
|
|
|
|
|
|
|
|
|
|
|
|
|
|
|
|
|
|
|
| ||||||
|
|
| Bracket |
|
|
|
|
|
|
|
|
|
| the Bowl Handle |
|
|
|
|
|
|
|
|
|
|
|
|
| |||
|
|
|
|
|
|
|
|
|
|
|
|
|
|
| underneath. |
|
|
|
|
|
|
|
|
|
|
|
|
| ||
|
|
|
|
|
|
|
|
|
|
|
|
|
|
|
|
|
|
|
|
|
|
|
|
|
|
|
| |||
|
|
|
|
|
|
|
|
|
|
|
|
|
|
| Rotate Grill upward |
|
|
|
|
|
|
|
|
|
|
|
|
| ||
| STEP 5) Grasp the Fixed Leg. Push it toward the |
|
|
|
|
|
|
|
|
|
|
|
|
|
|
|
| |||||||||||||
|
|
|
| until Grill is upright |
|
|
|
|
|
|
|
|
|
|
|
|
| |||||||||||||
| Bottom Bowl Bracket and Safety Latch allowing |
|
|
|
|
|
|
|
|
|
|
|
|
|
|
|
| |||||||||||||
|
|
|
|
|
|
| STEP 7) |
|
|
|
|
|
|
|
|
| ||||||||||||||
|
|
|
| on floor. |
|
|
|
|
|
|
|
|
|
|
|
| ||||||||||||||
| the Fixed Leg Hook to engage all the way. |
|
|
|
|
|
| Unhook Bungee |
|
|
|
|
| STEP 8) Unfold Side Table |
|
| ||||||||||||||
|
|
|
|
|
|
|
|
|
|
|
|
|
|
|
|
| ||||||||||||||
|
|
|
|
|
|
|
|
|
|
|
|
|
|
|
|
|
|
|
|
|
|
|
|
|
|
|
|
|
|
|
|
|
|
|
|
|
|
|
|
|
|
|
|
|
|
|
|
|
|
|
|
|
|
|
|
|
|
|
|
|
|
|
|
|
|
|
|
|
|
|
|
|
|
|
|
|
|
|
|
|
|
|
|
|
|
|
|
|
|
|
|
|
OPERATING AND MAINTAINING YOUR CHARCOAL GRILL
STEP 1. Open the Hood and all the Vents. Remove the Cooking Grid. Make sure the Fire Grate/Ash Pan is in place. Place about three pounds of charcoal
Use a high quality hardwood charcoal to make sure you get a good fire. Charcoal briquettes made from maple, oak, birch or elm woods will burn clean with very little smoke and without unpleasant odors.
STEP 2. For regular charcoal or wood, apply the lighter fluid, following the container instructions. Let the lighter fluid soak in for approximately one minute. You may use an electric fire starter; however just leave off the lighter fluid and follow manufacturer's instructions on the container. For instant light briquettes, DO NOT use lighter fluid, an electric fire starter, solid or chimney starters.
STEP 3. Carefully light the charcoal and let it burn for about 30 minutes or until it is covered with a light gray ash.
STEP 4. Using
STEP 5. FOR INDIRECT COOKING... such as roasting large pieces of meat on the Grid, use or make a pan about an inch larger all around than the piece of meat to catch the drippings. Put the pan directly under the meat and surround it with charcoal. Most indirect cooking takes a long time.
STARTING A FIRE
FOR GRILLING
INDIRECT
1)Cooking on the Grids: Use barbecue mitts for handling the Cooking Grid. For SLOWER cooking, shift the Cooking Grid toward the rear and into the upper Grid Bracket slots. For FASTER cooking, shift the Cooking Grid toward the front and into the lower Grid Bracket slots.
When you have finished cooking, you can remove your food while still on the Cooking Grid. Place the Cooking Grid on a counter or table. The foot rests will not allow your food to touch the table top or counter surface. Do not set the hot grid on surfaces that will melt or scorch.
2)Adjustable Draft: Leave the Hood and Bowl Vents open for the most heat. Close the Vents partially to lower the heat. It takes a few minutes for the charcoal to react to the vent adjustment.
3)Smoking: For true smoke flavor, use chips or chunks of wood from nut or fruit trees such as hickory, walnut, cherry or apple. Soak the chips in water overnight so they will not burn when you put them on the charcoal. After you get the fire started, put the soaked chips on top of the hot charcoal. Raise the Grid to the highest position and adjust the Vents for low heat. Continue adding chips while the meat cooks to maintain the appropriate amount of smoke. Smoking is a very slow process. Therefore, allow plenty of cooking time.
4)
CLEANING THE GRILL |
| BUNGEE USE |
| STORAGE |
|
|
|
|
|
Regularly clean grill between uses and before storage...
1)Fire Grate/Ash Pan, Cooking
2)Grill Hood/Bowl and Side
3)After each cooking session, close the Hood.
4)Close the Vents and allow the charcoal to die down.
5)Wait until the grill is cool.
6)Wait until the charcoal has cooled, lift out the Fire Grate/Ash Pan and dispose of the ashes. You can save the larger pieces of coal for use next time you cook.
7)If rust appears on your grill, clean and buff the affected area with steel wool. Touch up bare metal with a high heat paint specified for barbeque grills. Follow paint manufactur- er’s instructions for use.
To reduce the risk of personal injury or property damage:
·Only use bungee to secure side table closed.
·Only connect bungee as illustrated.
·When unhooking bungee, maintain a firm grip to prevent the bungee from snapping back to strike the user or others.
·Do not lift grill by bungee.
·Do not hang grill by bungee.
·Do not use bungee if cut, cracked or abraded.
·Replace bungee if signs of wear appear.
To reduce the risk of injury or parts falling out during transport:
·Make sure legs are folded and locked and hood and bowl is latched securely.
To reduce the risk of serious bodily injury or death:
·Do not store a charcoal grill while it is hot.
·Store your charcoal grill in a cool dry place.
·Do not store charcoal and lighter fluid indoors.
·Store out of the reach of children.
·Do not store additional charcoal and lighter fluid under or near the grill while it is hot.
·To avoid a fire or explosion, do not store charcoal or lighter fluid near a heat source.
·Always cap the lighter fluid when not in use.
STORAGE AND TRANSPORT
1) Remove the Cooking Grid. Rub with a coat of light |
cooking oil and wrap with aluminum foil. Store |
wrapped Cooking Grid back into the grill. You may |
also wrap the Fire Grate/Ash Pan in aluminum foil or |
just leave it alone. |
Transport your grill by holding the bowl handle (FIG. A). |
|
|
|
|
| Make sure bungee is | ||||||||
|
|
|
|
|
|
|
|
|
|
|
|
|
| |
Lean your grill against a wall resting on the fixed leg caps (FIG. B). |
|
| securely hooked under | |||||||||||
Hang on a wall using the wire loop under the folded legs. (FIG. C). |
|
| lip of hood and bowl as | |||||||||||
DO NOT HANG GRILL BY THE BOWL HANDLE |
|
|
|
|
| shown in (FIG. D). | ||||||||
|
|
|
|
|
| |||||||||
|
|
|
|
|
|
|
|
|
|
|
|
|
|
|
|
|
|
|
|
|
|
|
|
|
|
| |||
|
| FIG. A |
|
|
| FIG. B |
|
|
| FIG. C |
|
|
|
|
|
|
|
|
|
|
|
|
|
|
|
|
|
|
|
|
|
|
|
|
|
|
|
|
|
|
|
|
|
|
FIG. D
2) Store Charcoal and lighter fluid away from the grill. |
3) After you have cleaned your grill, store it in a |
clean, dry area. If you store your grill outside, close |
the top vent to keep the rain out but leave the bottom |
vents open. You may hang the Grill on a wall with the |
Fixed Leg Hook or lean it up against a wall. |
4) Place a grill cover over the grill and store it out- |
doors if possible. It may be stored indoors only if the |
charcoal and lighter fluid are stored separately and |
outdoors. |
5) Before next use, remove aluminum foil from |
Cooking Grid and Fire Grate/Ash Pan and reinstall in |
grill. |
P/N 03.5826.03 20110929