QUICK INSTALLATION GUIDE
Version 1.0
Aztech DSL600E(C)
Ethernet Modem
Minimum System Requirements
-Windows 98SE/ ME/ 2000/ XP
-MAC 9.x to 10.x
-64 MB RAM for Win 98 SE/ ME
-128 MB RAM for Win XP/ 2000
-64 MB or 128 MB RAM for Mac
-4 x CDROM Drive
-Ethernet Port (LAN Card)
Package Contents
1.1 x DSL600E(C) Ethernet Modem
2.Quick Installation Guide
3.User Manual (Found in CD)
4.Utility CD
5.1 x
6.1 x Telephone Cable (
7.1x Power Adaptor (9V)
8.2 x POTS Splitter
For Technical Support | Support Hotline Hours |
Please contact | |
Aztech Systems Ltd | (Except public holidays) |
support@aztech.com |
|
Tel: |
|
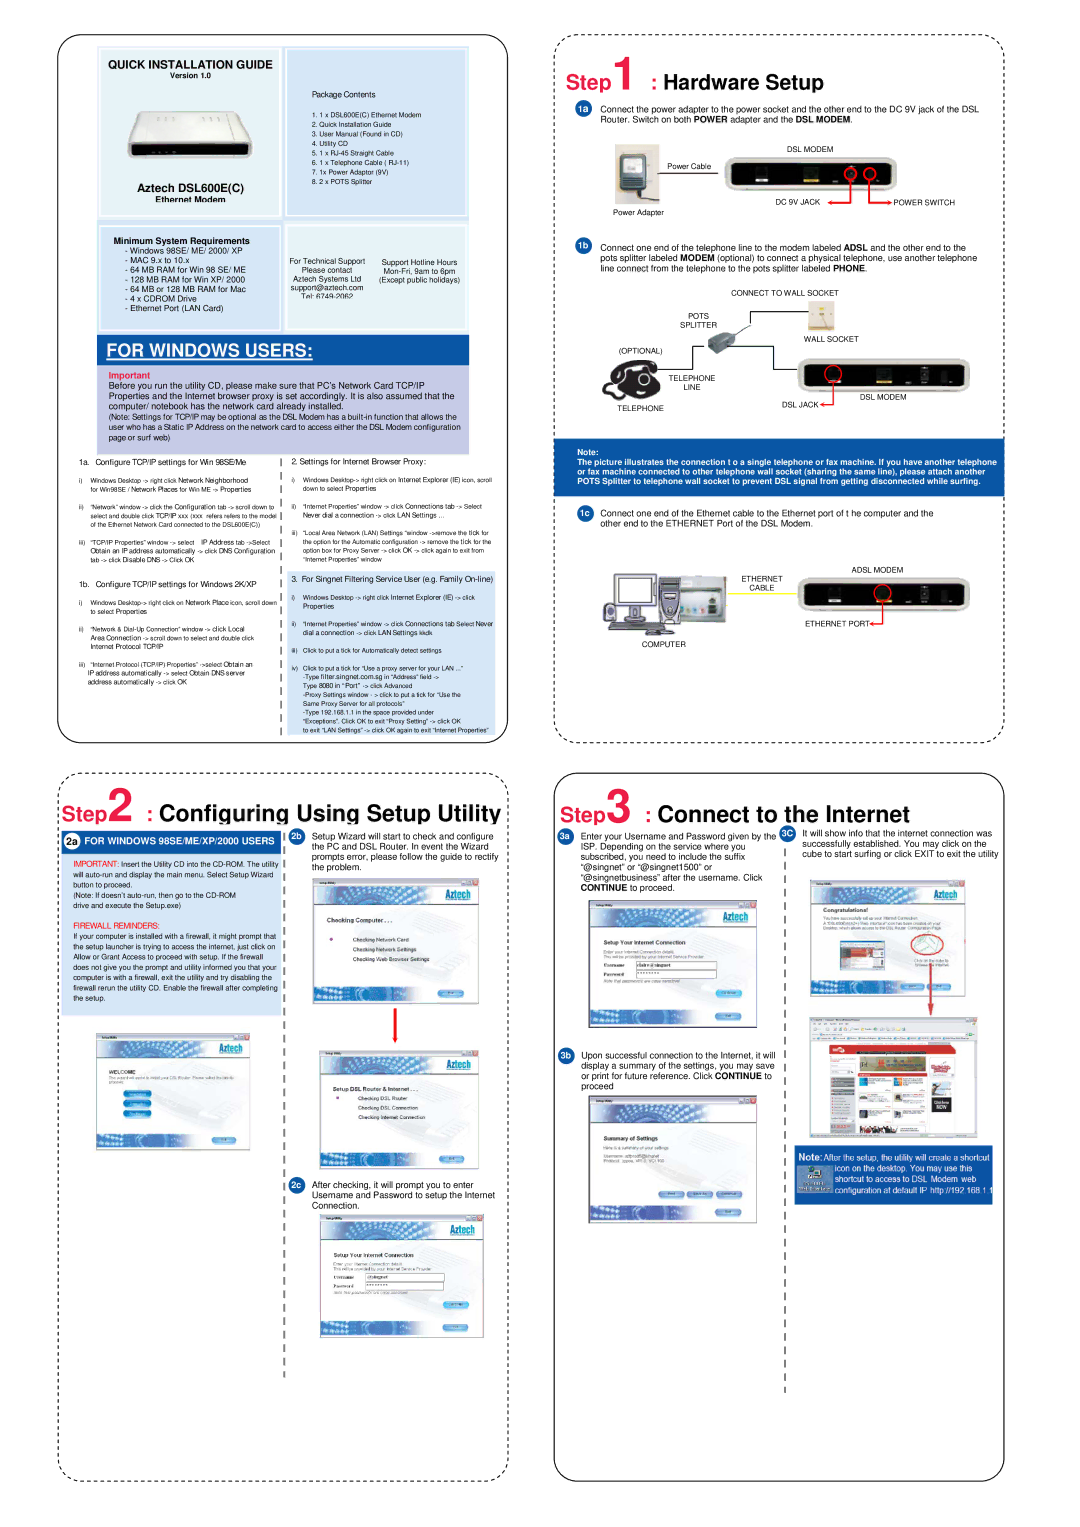
Step1 : Hardware Setup
1a Connect the power adapter to the power socket and the other end to the DC 9V jack of the DSL Router. Switch on both POWER adapter and the DSL MODEM.
DSL MODEM
| Power Cable |
| ||||
|
|
|
|
|
|
|
|
|
|
| DC 9V JACK | POWER SWITCH | |
Power Adapter |
|
|
|
|
| |
|
| |||||
| ||||||
1b Connect one end of the telephone line to the modem labeled ADSL and the other end to the pots splitter labeled MODEM (optional) to connect a physical telephone, use another telephone line connect from the telephone to the pots splitter labeled PHONE.
CONNECT TO WALL SOCKET
POTS
SPLITTER
FOR WINDOWS USERS:
Important
Before you run the utility CD, please make sure that PC’s Network Card TCP/IP Properties and the Internet browser proxy is set accordingly. It is also assumed that the computer/ notebook has the network card already installed.
(Note: Settings for TCP/IP may be optional as the DSL Modem has a
|
|
|
|
|
|
| WALL SOCKET |
| |
(OPTIONAL) |
|
|
|
|
|
|
| ||
|
|
|
|
|
|
|
| ||
|
| TELEPHONE | |||||||
|
| LINE | |||||||
|
|
|
|
|
|
| DSL MODEM | ||
|
|
|
|
|
| DSL JACK | |||
TELEPHONE | |||||||||
|
|
|
|
|
|
| |||
Note:
1a. Configure TCP/IP settings for Win 98SE/Me
i)Windows Desktop
ii)“Network” window
iii) “TCP/IP Properties” window
Obtain an IP address automatically
1b. Configure TCP/IP settings for Windows 2K/XP
i)Windows
ii)“Network &
Internet Protocol TCP/IP
iii)“Internet Protocol (TCP/IP) Properties”
IP address automatically
2. Settings for Internet Browser Proxy:
i)Windows
ii)“Internet Properties” window
iii)“Local Area Network (LAN) Settings “window
3. For Singnet Filtering Service User (e.g. Family On-line)
i)Windows Desktop
Properties
ii)“Internet Properties” window
iii)Click to put a tick for Automatically detect settings
iv)Click to put a tick for “Use a proxy server for your LAN ...”
Type 8080 in “Port”
to exit “LAN Settings”
The picture illustrates the connection t o a single telephone or fax machine. If you have another telephone or fax machine connected to other telephone wall socket (sharing the same line), please attach another POTS Splitter to telephone wall socket to prevent DSL signal from getting disconnected while surfing.
1c Connect one end of the Ethernet cable to the Ethernet port of t he computer and the other end to the ETHERNET Port of the DSL Modem.
ADSL MODEM
ETHERNET
CABLE
ETHERNET PORT
COMPUTER
Step2 : Configuring Using Setup Utility
2a FOR WINDOWS 98SE/ME/XP/2000 USERS | 2b | Setup Wizard will start to check and configure |
| the PC and DSL Router. In event the Wizard | |
|
| |
IMPORTANT: Insert the Utility CD into the |
| prompts error, please follow the guide to rectify |
| the problem. | |
will |
| |
|
| |
button to proceed. |
|
|
(Note: If doesn’t |
|
|
drive and execute the Setup.exe) |
|
|
FIREWALL REMINDERS: |
|
|
If your computer is installed with a firewall, it might prompt that |
|
|
the setup launcher is trying to access the internet, just click on |
|
|
Allow or Grant Access to proceed with setup. If the firewall |
|
|
does not give you the prompt and utility informed you that your |
|
|
computer is with a firewall, exit the utility and try disabling the |
|
|
firewall rerun the utility CD. Enable the firewall after completing |
|
|
the setup. |
|
|
|
|
|
2c After checking, it will prompt you to enter Username and Password to setup the Internet Connection.
Step3 : Connect to the Internet
3a Enter your Username and Password given by the 3C | It will show info that the internet connection was |
ISP. Depending on the service where you | successfully established. You may click on the |
subscribed, you need to include the suffix | cube to start surfing or click EXIT to exit the utility |
“@singnet” or “@singnet1500” or |
|
“@singnetbusiness” after the username. Click |
|
CONTINUE to proceed. |
|
3b Upon successful connection to the Internet, it will display a summary of the settings, you may save or print for future reference. Click CONTINUE to proceed