
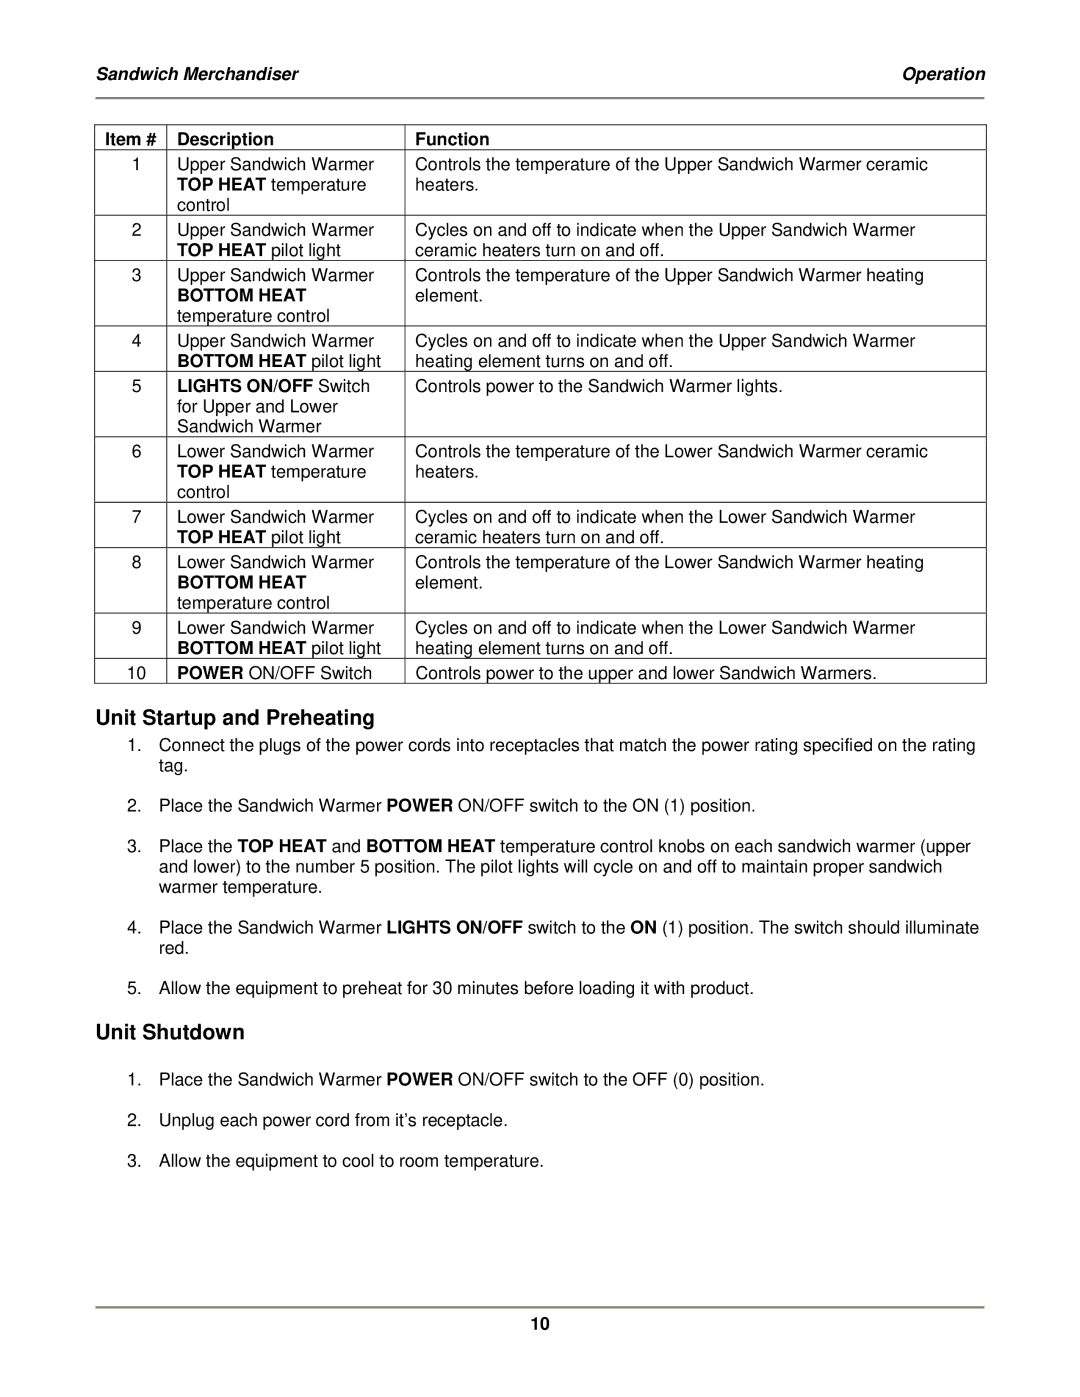
SM39, SM51, SM27-2L, SM27, SM63 specifications
Bakers Pride is a renowned name in the commercial baking industry, known for producing high-quality ovens that cater to the needs of professional bakeries, pizzerias, and restaurants. Among their impressive lineup, the Bakers Pride Oven series, including the SM75, SM39, SM63, SM27, and SM27-2L, stands out for exceptional performance, durability, and versatility.The SM75 is a robust and spacious option, featuring a double-deck design that allows for large batch baking. This oven is equipped with independently controlled temperature settings for each deck, ensuring optimal baking conditions regardless of the varying needs of your baked goods. The SM75 has a baking chamber constructed of heavy-duty steel, which helps retain heat and maintain even temperatures.
Moving to the SM39, this model is ideal for establishments with limited space but high demands for quality baking. The SM39 offers a single-deck design with a professional-grade stone hearth that provides superior heat retention and optimal crust crisping. The oven's top and bottom heat controls allow for precise baking results, making it an excellent choice for pizza and artisan bread.
The SM63 serves as a mid-range option, providing the capacity for larger batches than the SM39 while still being compact enough for smaller kitchens. Featuring both top and bottom heat controls, the SM63 is versatile enough to accommodate everything from pastries to pizza. Its heavy-duty stainless steel construction ensures durability and longevity in fast-paced environments.
For those focused on artisan baking, the SM27 and SM27-2L models are crafted with precision in mind. The SM27 is a single-deck oven that combines professional-grade baking performance with a manageable footprint. The SM27-2L offers a larger capacity without sacrificing performance or quality. Both models feature advanced airflow technology, which ensures even distribution of heat throughout the baking chamber, resulting in a perfectly baked product every time.
All models in the Bakers Pride Oven series are designed with user-friendly controls, allowing bakers to set and monitor temperatures with ease. The ovens come with an energy-efficient design, promoting sustainable practices without compromising on performance. Furthermore, these ovens are easy to clean, thanks to their smooth stainless steel surfaces and removable components.
In summary, the Bakers Pride Oven SM75, SM39, SM63, SM27, and SM27-2L represent the pinnacle of commercial baking technology. With their robust construction, advanced heat distribution systems, and flexibility, they are perfect for meeting the high standards of today’s culinary professionals. Whether you run a bakery, pizzeria, or restaurant, investing in a Bakers Pride oven can significantly elevate your baking game.