REVERSING THE DOORS

We recommend that you reverse doors before switching on for the first time.

Tools required: Small and medium size flat and cross-headed screwdrivers, a pair of pliers.

Spare Parts supplied in the plastic bag: The following parts, which are exclusively for left hand side fitted hinge operation are supplied in a plastic bag with the appliance:

(8)(13)

-Upper door top trim hinge covers – there are 2 different parts, one for each side of top trim.

-Upper door middle hinge bushing/door stopper assembly.

We suggest you keep all the parts supplied in the plastic bag and also parts, which have been removed when reversing doors, in a safe place for possible future, re-use.

IMPORTANT: We suggest you ask somebody to help you when moving the appliance around and to hold doors when removing / re-fitting hinges and doors to avoid any injury and damage to the product.

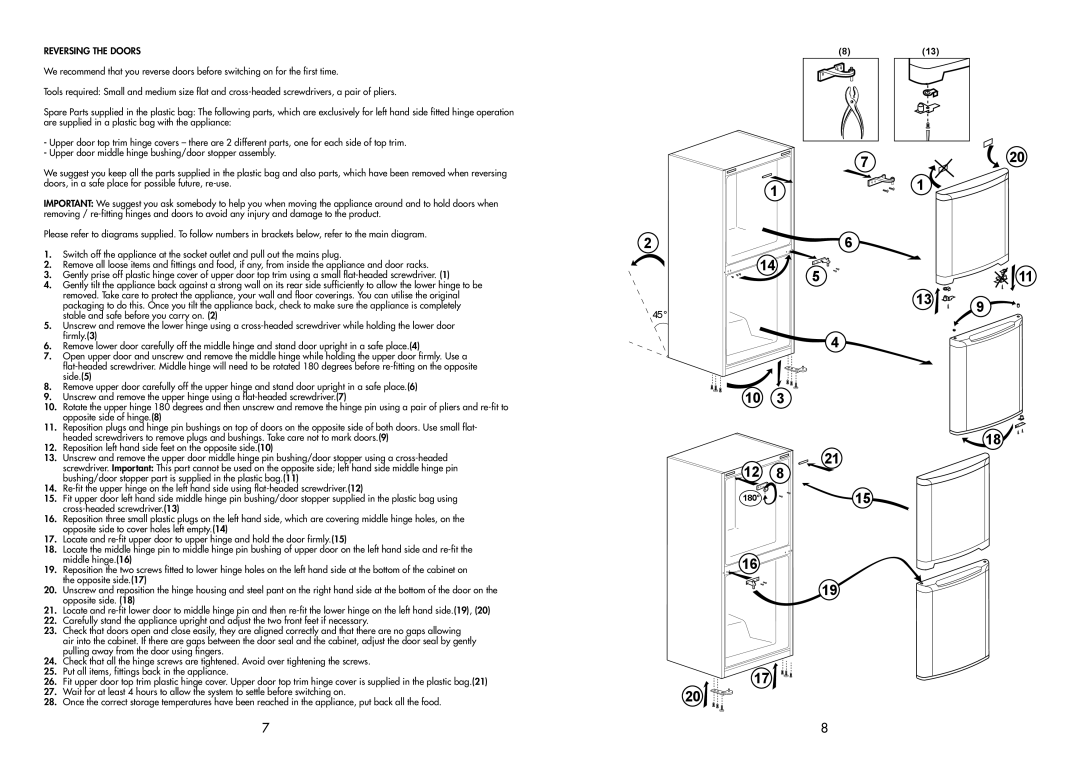
Please refer to diagrams supplied. To follow numbers in brackets below, refer to the main diagram.

7

1

2

6

20

1

1.

Switch off the appliance at the socket outlet and pull out the mains plug.

2.

Remove all loose items and fittings and food, if any, from inside the appliance and door racks.

3.

Gently prise off plastic hinge cover of upper door top trim using a small flat-headed screwdriver. (1)

4.

Gently tilt the appliance back against a strong wall on its rear side sufficiently to allow the lower hinge to be


removed. Take care to protect the appliance, your wall and floor coverings. You can utilise the original


packaging to do this. Once you tilt the appliance back, check to make sure the appliance is completely

5.

stable and safe before you carry on. (2)

Unscrew and remove the lower hinge using a cross-headed screwdriver while holding the lower door

14

45°

5


11

13

9


firmly.(3)

6.

Remove lower door carefully off the middle hinge and stand door upright in a safe place.(4)

7.

Open upper door and unscrew and remove the middle hinge while holding the upper door firmly. Use a


flat-headed screwdriver. Middle hinge will need to be rotated 180 degrees before re-fitting on the opposite


side.(5)

8.

Remove upper door carefully off the upper hinge and stand door upright in a safe place.(6)

9.

Unscrew and remove the upper hinge using a flat-headed screwdriver.(7)

10.

Rotate the upper hinge 180 degrees and then unscrew and remove the hinge pin using a pair of pliers and re-fit to

11.

opposite side of hinge.(8)

Reposition plugs and hinge pin bushings on top of doors on the opposite side of both doors. Use small flat-


headed screwdrivers to remove plugs and bushings. Take care not to mark doors.(9)

12.

Reposition left hand side feet on the opposite side.(10)

13.

Unscrew and remove the upper door middle hinge pin bushing/door stopper using a cross-headed


screwdriver. Important: This part cannot be used on the opposite side; left hand side middle hinge pin


bushing/door stopper part is supplied in the plastic bag.(11)

14.

Re-fit the upper hinge on the left hand side using flat-headed screwdriver.(12)

15.

Fit upper door left hand side middle hinge pin bushing/door stopper supplied in the plastic bag using

16.

cross-headed screwdriver.(13)

Reposition three small plastic plugs on the left hand side, which are covering middle hinge holes, on the


opposite side to cover holes left empty.(14)

17.

Locate and re-fit upper door to upper hinge and hold the door firmly.(15)

18.

Locate the middle hinge pin to middle hinge pin bushing of upper door on the left hand side and re-fit the

19.

middle hinge.(16)

Reposition the two screws fitted to lower hinge holes on the left hand side at the bottom of the cabinet on

20.

the opposite side.(17)

Unscrew and reposition the hinge housing and steel pant on the right hand side at the bottom of the door on the


opposite side. (18)

21.

Locate and re-fit lower door to middle hinge pin and then re-fit the lower hinge on the left hand side.(19), (20)

22.

Carefully stand the appliance upright and adjust the two front feet if necessary.

23.

Check that doors open and close easily, they are aligned correctly and that there are no gaps allowing


air into the cabinet. If there are gaps between the door seal and the cabinet, adjust the door seal by gently

24.

pulling away from the door using fingers.

Check that all the hinge screws are tightened. Avoid over tightening the screws.

25.

Put all items, fittings back in the appliance.

26.

Fit upper door top trim plastic hinge cover. Upper door top trim hinge cover is supplied in the plastic bag.(21)

27.

Wait for at least 4 hours to allow the system to settle before switching on.

28.

Once the correct storage temperatures have been reached in the appliance, put back all the food.


4

10

3

12

21

8

180°

15

16

19

17 20

18

7

8

Page 5
Image 5
Beko TDA 531-1 manual Reversing the Doors

TDA 531-1, TDA 531 specifications

The Beko TDA 531 and TDA 531-1 are two exemplary models in the realm of modern clothing care appliances, designed to cater to the demands of contemporary households. These steam irons blend innovative technology with user-friendly features to provide exceptional performance and convenience.

One of the standout characteristics of the Beko TDA 531 series is the powerful steam generation capability. Both models feature a robust steam output that ensures wrinkle-free clothes with minimal effort. This makes them ideal for tackling even the toughest creases, whether on delicate fabrics or heavy linens. The continuous steam function allows users to maintain a consistent level of steam, offering great results in a shorter amount of time.

The TDA 531 and TDA 531-1 are equipped with a lightweight and ergonomically designed structure, making them easy to handle and maneuver. This is particularly beneficial for extended ironing sessions, as it reduces user fatigue. Both models also feature a non-stick soleplate, which glides effortlessly over fabrics, preventing snags and ensuring smooth operation. The soleplate is designed for durability, providing long-lasting performance.

Another notable feature is the vertical steam function, which allows users to steam garments while they are hanging. This is a time-saving option for those who wish to freshen up clothing without the need to lay them flat. Additionally, the self-cleaning system in both models helps maintain the iron's performance over time by preventing the buildup of mineral deposits, ensuring longevity and reliability.

Safety is also a priority with the Beko TDA 531 and TDA 531-1. These models come equipped with an automatic shut-off feature that activates when the iron is left inactive for a specified period. This added layer of protection not only enhances safety but also provides peace of mind to users who may need to step away during ironing tasks.

In conclusion, the Beko TDA 531 and TDA 531-1 steam irons stand out in the market for their combination of powerful steam performance, ergonomic design, and safety features. Perfect for both everyday households and those with a keen eye for clothing care, these models truly exemplify Beko’s commitment to quality and innovation. Choosing either of these models guarantees efficient, effective, and enjoyable ironing experiences.