8. INSTALL THE HOOD

Rest the top back cavity of the hood on the wood mounting strip.

CAUTION

Hold the hood until it is completely secured to the wood mounting strip.

Secure the hood to wood mounting strip with (4) screws #8 x 3/4” (for 30” and 36” width hoods) or (6) screws (for 42” width and wider hoods) provided at locations shown. Drill (2) 3/16’’ size holes into the drywall for wall anchors through the existing holes in the inside hood back in the locations shown. Then, install the two wall anchors with the remaining #8 x 3/4” screws and the (2) washers provided.

For a non-ducted installation, go to step 11, Install the Rough-in Plate.

TOP OF HOOD (INSIDE VIEW)

MOUNTING SCREWS LOCATION

BACK OF HOOD (INSIDE VIEW)

WALL ANCHORS LOCATION

HD0178

9.SELECT BLOWER OPTION (EXTERIOR OR INTERIOR, DUCTED INSTALLATION)

INTERIOR BLOWER: Follow all subsequent steps of this manual.

EXTERIOR BLOWER: Refer to instructions packed with exterior blower and follow steps 11 and up of the present manual.

10.INSTALL TRANSITION TO ROUGH-IN PLATE (INTERIOR BLOWER, DUCTED INSTAL.)

Model 423, 424, 427 453, or 454

Attach transition (if required) to blower rough-in plate.

Use metal duct tape to make all joints secure and air-tight.

NOTE: Model P6 blower plate connects directly to 7’’ round ductwork without a transition.

HO0086

11.INSTALL THE ROUGH-IN PLATE TO THE HOOD (ALL INSTALLATIONS)

11.1ALL INSTALLATIONS:

Run power cable to installation location. Refer to the instructions included with the selected blower/rough-in kit (sold separately) for details on installing the rough-in plate. Install the rough-in plate so that the wiring box is located on the right side as you are facing the hood.

11.2DUCTED INSTALLATIONS ONLY:

For ducting through back of hood, remove existing plate from inside back of hood and attach it to inside top of hood to cover hole. Secure to threaded studs with same (4) nuts.

For ducting through top of hood, existing plate remains in place on inside back of hood.

Connect ducting to transition or rough-in plate as you are installing the rough-in plate. Use duct tape to make all joints secure and air-tight.

WIRING COVER

ROUGH-IN PLATE

ON TOP OF HOOD

LOCKNUTS

LOCKNUTS

PLATE ON BACK OF HOOD

HD0179

12.CONNECT THE WIRING (ALL INSTALLATIONS)

!WARNING

Risk of electrical shock. Electrical wiring must be done by qualified personnel in accordance with all applicable codes and standards. Before connecting wires, switch power off at service panel and lock service disconnecting means to prevent power to be switched on accidentally.

Remove wiring cover from rough-in plate and set aside.

Connect BLACK to BLACK, WHITE to WHITE and GREEN or bare wire under GREEN ground screw.

Reinstall wiring cover.

- 8 -

Page 8
Image 8
Best WP29M Install the Hood, Install the ROUGH-IN Plate to the Hood ALL Installations, Model 423, 424, 427 453, or

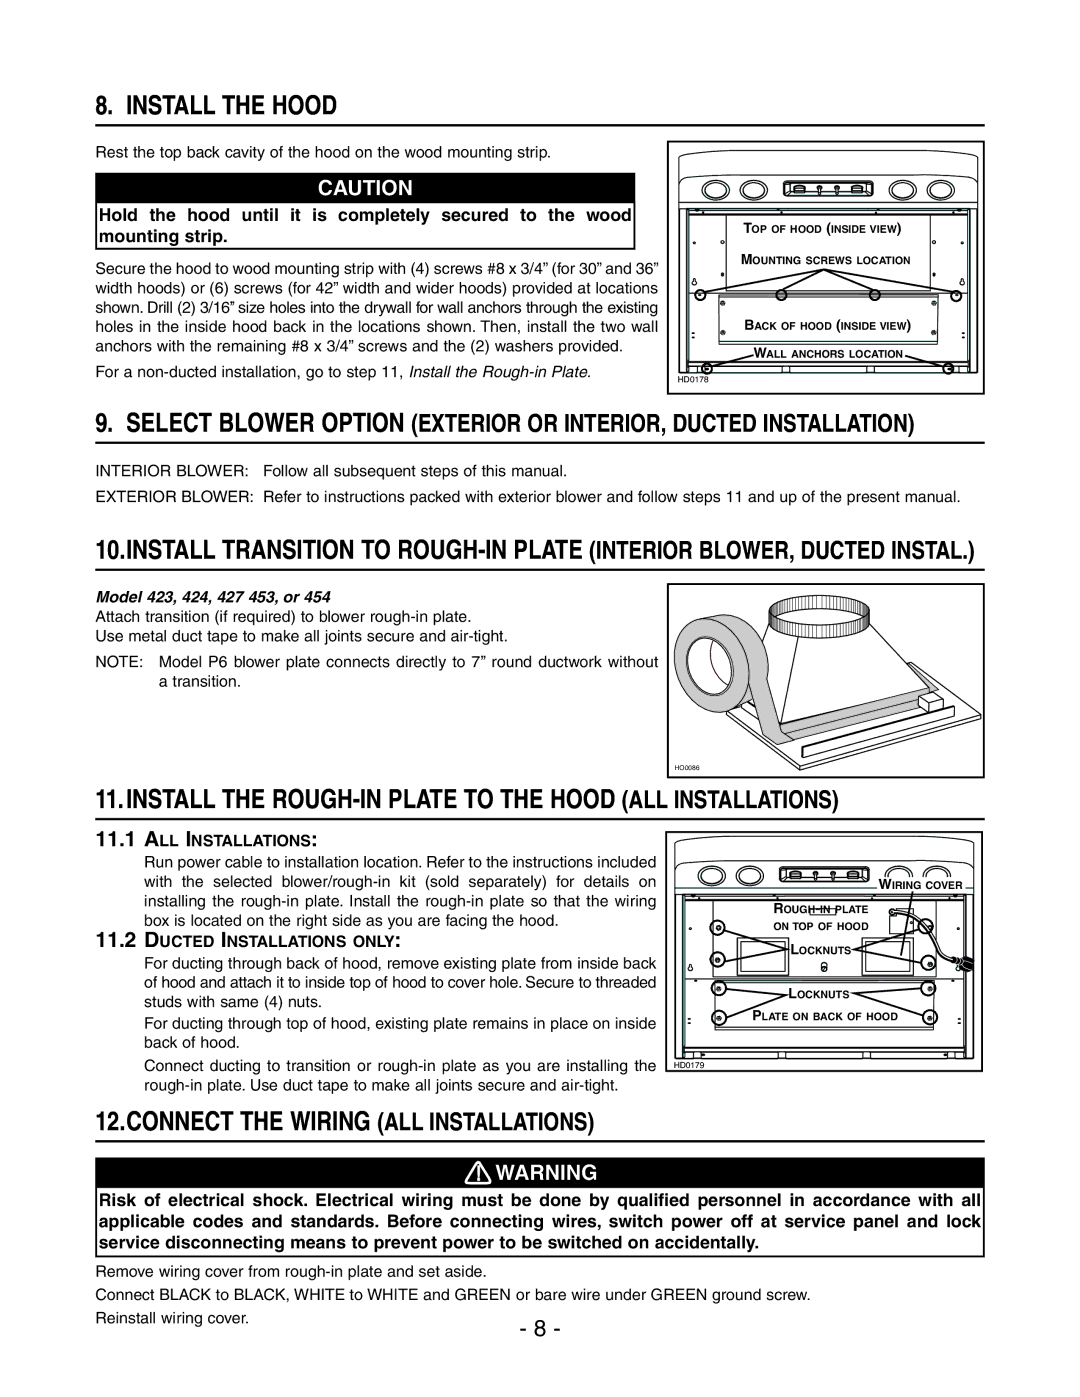
WP29M specifications

The Best WP29M is a standout product designed for a diverse range of applications, particularly known for its robust features, innovative technologies, and user-friendly characteristics. This versatile device integrates functionality with advanced engineering, making it appealing for both personal and professional usage.

At the heart of the Best WP29M lies its powerful engine. It is equipped with an efficient powertrain that delivers exceptional performance, ensuring smooth operation even under challenging conditions. The advanced propulsion technology not only enhances speed but also contributes to fuel efficiency, allowing users to maximize their productivity while minimizing operational costs.

One of the key highlights of the Best WP29M is its user interface, which has been designed with accessibility in mind. The intuitive control system enables users to operate the device with ease, regardless of their technical expertise. This ensures that even novice users can quickly become proficient, reducing the learning curve and increasing overall satisfaction.

In terms of durability, the Best WP29M is built to withstand the rigors of daily use. The materials used in construction are carefully selected for their sturdiness and resistance to wear and tear. This makes it a reliable choice for industries that demand heavy-duty equipment, ensuring longevity and reducing maintenance costs.

Additionally, the Best WP29M incorporates advanced safety features. These include robust braking systems, emergency shut-off mechanisms, and enhanced stability controls. With these safety measures in place, users can operate the device with confidence, knowing that they are protected against potential hazards.

Another technological marvel of the Best WP29M is its compatibility with smart technology applications. Users can connect the device to their smartphones or tablets via Bluetooth, allowing for real-time monitoring and diagnostics. This feature not only enhances usability but also empowers users to troubleshoot issues quickly, ensuring minimal downtime.

Environmentally conscious consumers will appreciate the Best WP29M's commitment to sustainability. The device is designed to minimize emissions and reduce energy consumption, aligning with contemporary environmental standards. This eco-friendly approach contributes to a greener future without compromising performance.

In conclusion, the Best WP29M is a remarkable device that encapsulates the essence of innovation and practicality. Its powerful performance, user-friendly interface, durability, safety features, smart technology integration, and environmental consciousness make it a top choice for those in need of reliable equipment. Whether for professional tasks or personal projects, the Best WP29M stands out as a leader in its category.