165

5 3 5 2 - 3 6 2 - 0 0 8


4

2

5

3

1

4

2

a c . l l e s s i b . w w w

.cordons-range


des autour d’alimentation cordon le Enroulez

.5

.inférieur


cordon-range le dans situé accessoires-porte


crochet le dans épousseter à brosse la Insérez

.4

modèles) (Certains


.supérieure poignée la de l'arrière


de près situé accessoires-porte crochet le dans


Pet Tool Contour contour le pour l'outil Insérez

.3

).l'arrière de vu (lorsque


réservoir du gauche la à accessoires-porte


crochet le dans rallonge-tube le Insérez

.2

.fixée solidement pas n’est


tuyau du rallonge la si efficacement pas


fonctionnera ne L'aspirateur : Remarque


.tuyau du crochet le dans


tuyau le Emboîtez .tuyau du rallonge la de base


la dans rallonge la de l'extrémité glisser Faites

.1

accessoires les et l’aspirateur

de tuyau le fixer Pour

.tournevis d’un l’aide à fermement


vis la Serrez .l'aspirateur de corps au manche


le fixez et trou le dans fournie vis la Insérez

.4

.fixé bien soit manche le que


ce jusqu’à fermement pousser à continuez


écarts, des a y S’il .l’aspirateur de corps


le sur fixé bien est manche le que Vérifiez

.3

.l’aspirateur de corps du dessus


le sur situées rainures les dans fermement


l’insérer à manière de manche du base la


glisser faites l’appareil, de arrière face la sur


et, verticale position en l’aspirateur Tenez

.2

.poignée la sur collé vis de paquet


le retirez et l’aspirateur de poignée la Trouvez

.1

l’aspirateur sur manche le fixer Pour

.cruciforme pointe

àtournevis un est aspirateur votre assembler pour besoin aurez vous dont outil seul Le

ssemblageA

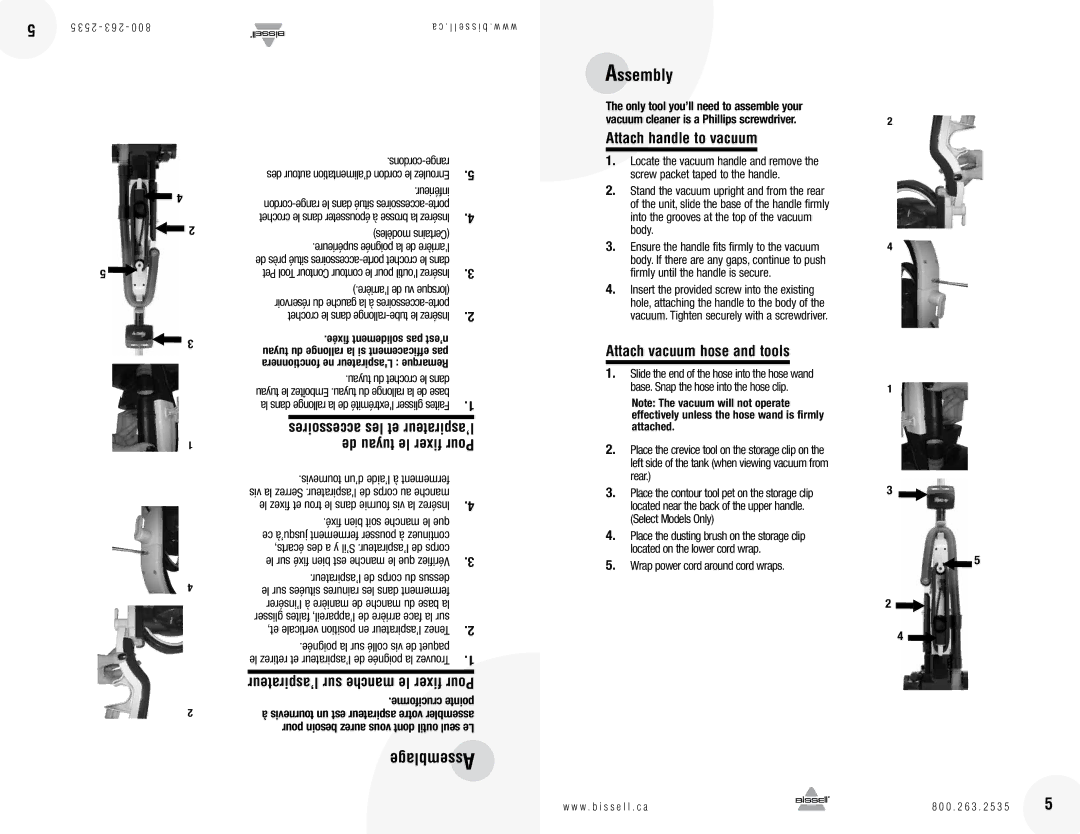
Assembly

The only tool you’ll need to assemble your vacuum cleaner is a Phillips screwdriver.

Attach handle to vacuum

1.Locate the vacuum handle and remove the screw packet taped to the handle.

2.Stand the vacuum upright and from the rear of the unit, slide the base of the handle firmly into the grooves at the top of the vacuum body.

3.Ensure the handle fits firmly to the vacuum body. If there are any gaps, continue to push firmly until the handle is secure.

4.Insert the provided screw into the existing hole, attaching the handle to the body of the vacuum. Tighten securely with a screwdriver.

Attach vacuum hose and tools

1.Slide the end of the hose into the hose wand base. Snap the hose into the hose clip.

Note: The vacuum will not operate effectively unless the hose wand is firmly attached.

2.Place the crevice tool on the storage clip on the left side of the tank (when viewing vacuum from rear.)

3.Place the contour tool pet on the storage clip located near the back of the upper handle. (Select Models Only)

4.Place the dusting brush on the storage clip located on the lower cord wrap.

5.Wrap power cord around cord wraps.

w w w . b i s s e l l . c a

2

4

1

3

5

2

4

8 0 0 . 2 6 3 . 2 5 3 5

165

Page 5
Image 5
Bissell 13H8 warranty SsemblageA Assembly, 165, Attach handle to vacuum, Attach vacuum hose and tools

13H8 specifications

The Bissell 13H8 is a powerful and versatile carpet cleaner designed to restore the look and feel of your carpets, leaving them looking fresh and new. With its innovative design and advanced cleaning technologies, this machine is an essential tool for maintaining a clean home environment.

One of the standout features of the Bissell 13H8 is its Heatwave Technology, which helps to maintain the water temperature throughout the cleaning process. By ensuring that the water remains hot, this technology enhances the cleaning power, effectively loosening and removing tough stains and embedded dirt from carpets.

The Bissell 13H8 is equipped with a dual tank system that separates clean water and dirty water. This design allows for continuous cleaning without the worry of mixing clean and dirty water, providing a more effective and hygienic cleaning experience. The clean water tank has a generous capacity, reducing the frequency of refills during larger cleaning sessions.

Another significant feature is its powerful suction capability, which not only removes dirt and stains from carpets but also extracts excess moisture, speeding up the drying time. This is particularly important for preventing mold and mildew growth in carpets after cleaning. The Bissell 13H8 is also designed with specialized brushes that agitate carpet fibers to ensure a deep clean, enhancing the effectiveness of the cleaning solution.

For added convenience, this carpet cleaner comes with a variety of handy attachments, including a tough stain tool and a crevice tool, making it easy to tackle difficult spots, upholstery, and even stairs. These tools allow users to clean hard-to-reach areas efficiently and precisely.

Ease of use is another key characteristic of the Bissell 13H8. Its lightweight design means it can be maneuvered comfortably around the home, and the simple control panel makes operation straightforward, even for those new to carpet cleaning.

Overall, the Bissell 13H8 stands out with its combination of advanced cleaning technologies, user-friendly features, and versatile attachments. Whether you're dealing with pet stains, high-traffic areas, or routine maintenance, the Bissell 13H8 offers a reliable solution for keeping carpets looking their best. Its efficient design and robust cleaning capacity make it a popular choice among homeowners seeking to maintain the cleanliness and longevity of their carpets.