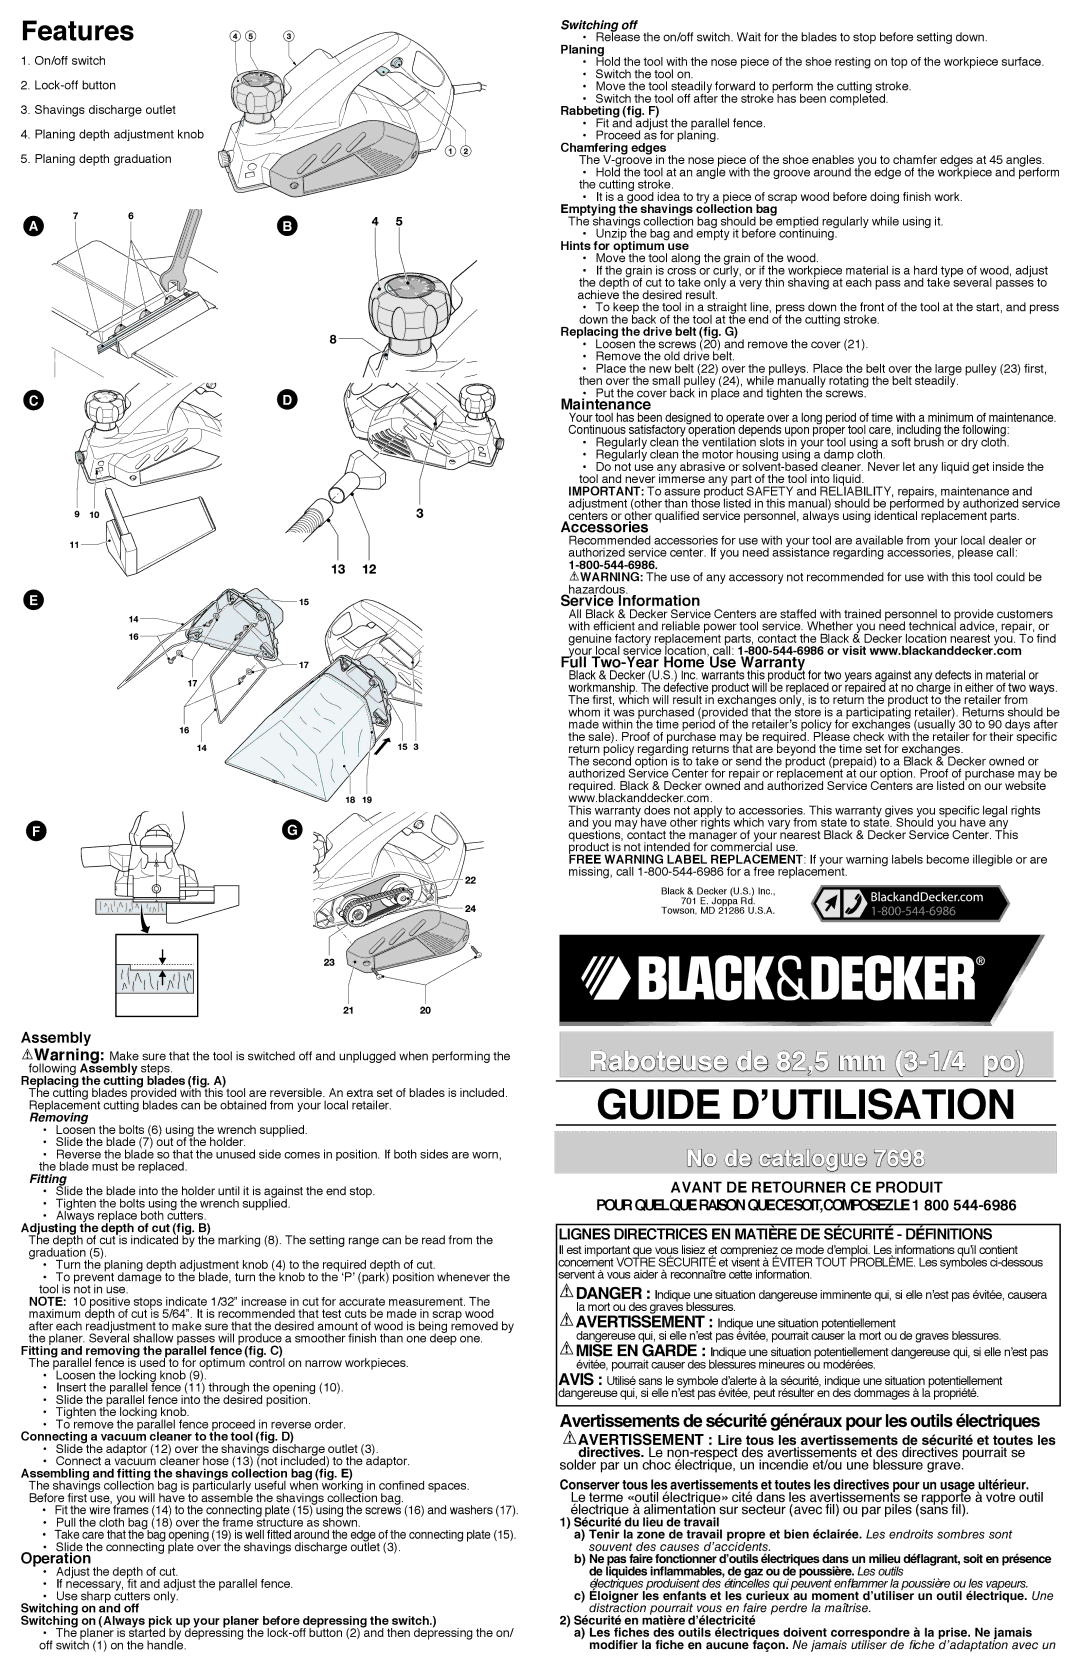
Features |
| • Release the on/off switch. Wait for the blades to stop before setting down. |
|
| Switching off |
1. On/off switch |
| Planing |
| • Hold the tool with the nose piece of the shoe resting on top of the workpiece surface. | |
2. |
| • Switch the tool on. |
| • Move the tool steadily forward to perform the cutting stroke. | |
3. Shavings discharge outlet |
| • Switch the tool off after the stroke has been completed. |
| Rabbeting (fig. F) | |
4. Planing depth adjustment knob |
| • Fit and adjust the parallel fence. |
| • Proceed as for planing. | |
5. Planing depth graduation |
| Chamfering edges |
| The | |
|
| • Hold the tool at an angle with the groove around the edge of the workpiece and perform |
|
| the cutting stroke. |
|
| • It is a good idea to try a piece of scrap wood before doing finish work. |
|
| Emptying the shavings collection bag |
A | B | The shavings collection bag should be emptied regularly while using it. |
• Unzip the bag and empty it before continuing. | ||
|
| Hints for optimum use |
|
| • Move the tool along the grain of the wood. |
|
| • If the grain is cross or curly, or if the workpiece material is a hard type of wood, adjust |
|
| the depth of cut to take only a very thin shaving at each pass and take several passes to |
|
| achieve the desired result. |
|
| • To keep the tool in a straight line, press down the front of the tool at the start, and press |
|
| down the back of the tool at the end of the cutting stroke. |
|
| Replacing the drive belt (fig. G) |
|
| • Loosen the screws (20) and remove the cover (21). |
|
| • Remove the old drive belt. |
|
| • Place the new belt (22) over the pulleys. Place the belt over the large pulley (23) first, |
|
| then over the small pulley (24), while manually rotating the belt steadily. |
C | D | • Put the cover back in place and tighten the screws. |
Maintenance | ||
|
| Your tool has been designed to operate over a long period of time with a minimum of maintenance. |
|
| Continuous satisfactory operation depends upon proper tool care, including the following: |
|
| • Regularly clean the ventilation slots in your tool using a soft brush or dry cloth. |
|
| • Regularly clean the motor housing using a damp cloth. |
|
| • Do not use any abrasive or |
|
| tool and never immerse any part of the tool into liquid. |
|
| IMPORTANT: To assure product SAFETY and RELIABILITY, repairs, maintenance and |
|
| adjustment (other than those listed in this manual) should be performed by authorized service |
|
| centers or other qualified service personnel, always using identical replacement parts. |
|
| Accessories |
|
| Recommended accessories for use with your tool are available from your local dealer or |
|
| authorized service center. If you need assistance regarding accessories, please call: |
|
| |
|
| WARNING: The use of any accessory not recommended for use with this tool could be |
E |
| hazardous. |
| Service Information | |
|
| All Black & Decker Service Centers are staffed with trained personnel to provide customers |
|
| with efficient and reliable power tool service. Whether you need technical advice, repair, or |
|
| genuine factory replacement parts, contact the Black & Decker location nearest you. To find |
|
| your local service location, call: |
|
| Full |
|
| Black & Decker (U.S.) Inc. warrants this product for two years against any defects in material or |
|
| workmanship. The defective product will be replaced or repaired at no charge in either of two ways. |
|
| The first, which will result in exchanges only, is to return the product to the retailer from |
|
| whom it was purchased (provided that the store is a participating retailer). Returns should be |
|
| made within the time period of the retailer’s policy for exchanges (usually 30 to 90 days after |
|
| the sale). Proof of purchase may be required. Please check with the retailer for their specific |
|
| return policy regarding returns that are beyond the time set for exchanges. |
|
| The second option is to take or send the product (prepaid) to a Black & Decker owned or |
|
| authorized Service Center for repair or replacement at our option. Proof of purchase may be |
|
| required. Black & Decker owned and authorized Service Centers are listed on our website |
|
| www.blackanddecker.com. |
|
| This warranty does not apply to accessories. This warranty gives you specific legal rights |
F | G | and you may have other rights which vary from state to state. Should you have any |
questions, contact the manager of your nearest Black & Decker Service Center. This | ||
|
| product is not intended for commercial use. |
|
| free warning label replacement: If your warning labels become illegible or are |
|
| missing, call |
|
| Black & Decker (U.S.) Inc., |
|
| 701 E. Joppa Rd. |
|
| Towson, MD 21286 U.S.A. |
Assembly
![]() Warning: Make sure that the tool is switched off and unplugged when performing the following Assembly steps.
Warning: Make sure that the tool is switched off and unplugged when performing the following Assembly steps.
Replacing the cutting blades (fig. A)
The cutting blades provided with this tool are reversible. An extra set of blades is included. Replacement cutting blades can be obtained from your local retailer.
Removing
• Loosen the bolts (6) using the wrench supplied.
• Slide the blade (7) out of the holder.
• Reverse the blade so that the unused side comes in position. If both sides are worn, the blade must be replaced.
Fitting
• Slide the blade into the holder until it is against the end stop.
• Tighten the bolts using the wrench supplied.
• Always replace both cutters.
Adjusting the depth of cut (fig. B)
The depth of cut is indicated by the marking (8). The setting range can be read from the graduation (5).
• Turn the planing depth adjustment knob (4) to the required depth of cut.
• To prevent damage to the blade, turn the knob to the ‘P’ (park) position whenever the tool is not in use.
NOTE: 10 positive stops indicate 1/32” increase in cut for accurate measurement. The maximum depth of cut is 5/64”. It is recommended that test cuts be made in scrap wood after each readjustment to make sure that the desired amount of wood is being removed by the planer. Several shallow passes will produce a smoother finish than one deep one.
Fitting and removing the parallel fence (fig. C)
The parallel fence is used to for optimum control on narrow workpieces.
• Loosen the locking knob (9).
• Insert the parallel fence (11) through the opening (10).
• Slide the parallel fence into the desired position.
• Tighten the locking knob.
• To remove the parallel fence proceed in reverse order.
Connecting a vacuum cleaner to the tool (fig. D)
• Slide the adaptor (12) over the shavings discharge outlet (3).
• Connect a vacuum cleaner hose (13) (not included) to the adaptor.
Assembling and fitting the shavings collection bag (fig. E)
The shavings collection bag is particularly useful when working in confined spaces. Before first use, you will have to assemble the shavings collection bag.
• Fit the wire frames (14) to the connecting plate (15) using the screws (16) and washers (17).
• Pull the cloth bag (18) over the frame structure as shown.
• Take care that the bag opening (19) is well fitted around the edge of the connecting plate (15).
• Slide the connecting plate over the shavings discharge outlet (3).
Operation
• Adjust the depth of cut.
• If necessary, fit and adjust the parallel fence.
• Use sharp cutters only.
Switching on and off
Switching on (Always pick up your planer before depressing the switch.)
• The planer is started by depressing the
Raboteuse de 82,5 mm
GUIDE D’UTILISATION
No de catalogue 7698
AVANT DE RETOURNER CE PRODUIT
POURQUELQUERAISONQUECESOIT,COMPOSEZLE 1 800
Il est important que vous lisiez et compreniez ce mode d’emploi. Les informations qu’il contient concernent VOTRE SÉCURITÉ et visent à ÉVITER TOUT PROBLÈME. Les symboles
![]() DANGER : Indique une situation dangereuse imminente qui, si elle n’est pas évitée, causera la mort ou des graves blessures.
DANGER : Indique une situation dangereuse imminente qui, si elle n’est pas évitée, causera la mort ou des graves blessures.
AVERTISSEMENT : Indique une situation potentiellement
dangereuse qui, si elle n’est pas évitée, pourrait causer la mort ou de graves blessures.
![]() MISE EN GARDE : Indique une situation potentiellement dangereuse qui, si elle n’est pas évitée, pourrait causer des blessures mineures ou modérées.
MISE EN GARDE : Indique une situation potentiellement dangereuse qui, si elle n’est pas évitée, pourrait causer des blessures mineures ou modérées.
AVIS : Utilisé sans le symbole d’alerte à la sécurité, indique une situation potentiellement dangereuse qui, si elle n’est pas évitée, peut résulter en des dommages à la propriété.
Avertissements de sécurité généraux pour les outils électriques
AVERTISSEMENT : Lire tous les avertissements de sécurité et toutes les directives. Le
solder par un choc électrique, un incendie et/ou une blessure grave.
Conserver tous les avertissements et toutes les directives pour un usage ultérieur. Le terme «outil électrique» cité dans les avertissements se rapporte à votre outil électrique à alimentation sur secteur (avec fil) ou par piles (sans fil).
1)Sécurité du lieu de travail
a)Tenir la zone de travail propre et bien éclairée. Les endroits sombres sont souvent des causes d’accidents.
b)Ne pas faire fonctionner d’outils électriques dans un milieu déflagrant, soit en présence de liquides inflammables, de gaz ou de poussière. Les outils
électriques produisent des étincelles qui peuvent enflammer la poussière ou les vapeurs.
c)Éloigner les enfants et les curieux au moment d’utiliser un outil électrique. Une distraction pourrait vous en faire perdre la maîtrise.
2)Sécurité en matière d’électricité
a)Les fiches des outils électriques doivent correspondre à la prise. Ne jamais modifier la fiche en aucune façon. Ne jamais utiliser de fiche d’adaptation avec un