AS685Pub1000002024 5/24/05 10:19 AM Page 4

Product may vary slightly from what is illustrated.

How to Use

This appliance is for household use only.

Important: For warranty verification, do not remove line cord sticker.

GETTING STARTED

Remove any labels, stickers or tags attached to the body or soleplate of the iron. Note: Use ordinary tap water for ironing. Do not use water processed through a home softening system.

Important: For optimum performance, let the iron stand for 90 seconds before beginning to iron

TO FILL THE WATER TANK

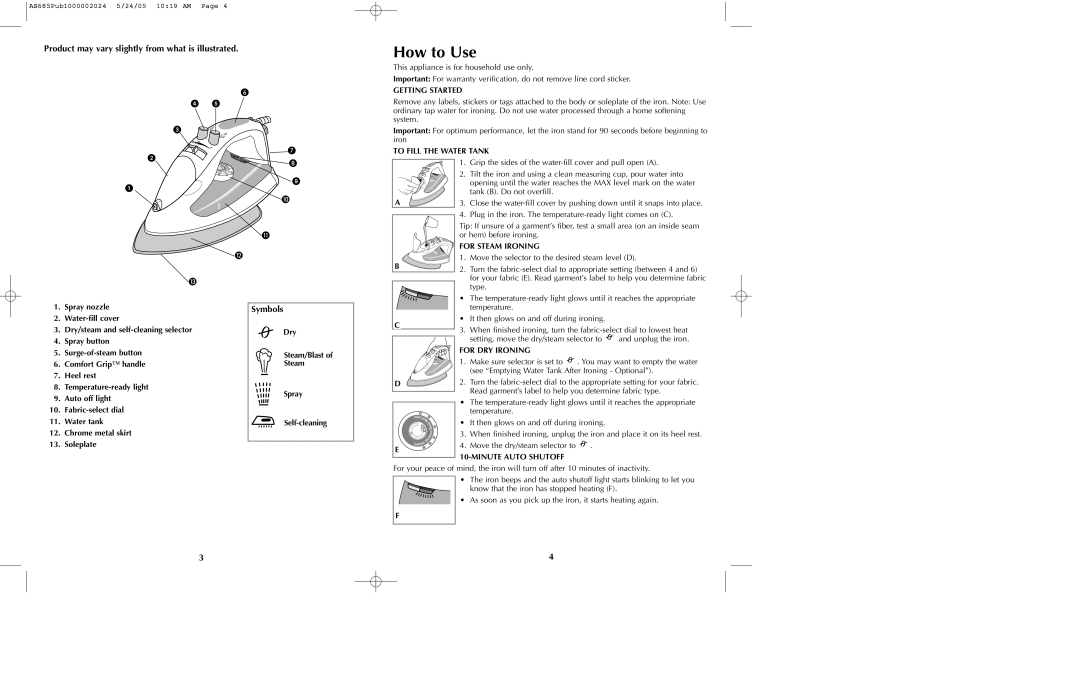
1.Spray nozzle

2.Water-fill cover

3.Dry/steam and self-cleaning selector

4.Spray button

5.Surge-of-steam button

6.Comfort Grip™ handle

7.Heel rest

8.Temperature-ready light

9.Auto off light

10.Fabric-select dial

11.Water tank

12.Chrome metal skirt

13.Soleplate

Symbols

Dry

Steam/Blast of

Steam

Spray

Self-cleaning

A

B

C

D

E

1.Grip the sides of the water-fill cover and pull open (A).

2.Tilt the iron and using a clean measuring cup, pour water into opening until the water reaches the MAX level mark on the water tank (B). Do not overfill.

3.Close the water-fill cover by pushing down until it snaps into place.

4.Plug in the iron. The temperature-ready light comes on (C).

Tip: If unsure of a garment’s fiber, test a small area (on an inside seam or hem) before ironing.

FOR STEAM IRONING

1.Move the selector to the desired steam level (D).

2.Turn the fabric-select dial to appropriate setting (between 4 and 6) for your fabric (E). Read garment’s label to help you determine fabric type.

The temperature-ready light glows until it reaches the appropriate temperature.

It then glows on and off during ironing.

3.When finished ironing, turn the fabric-select dial to lowest heat

setting, move the dry/steam selector to and unplug the iron.

FOR DRY IRONING

1.Make sure selector is set to . You may want to empty the water (see “Emptying Water Tank After Ironing - Optional”).

2.Turn the fabric-select dial to the appropriate setting for your fabric. Read garment’s label to help you determine fabric type.

The temperature-ready light glows until it reaches the appropriate temperature.

It then glows on and off during ironing.

3.When finished ironing, unplug the iron and place it on its heel rest.

4.Move the dry/steam selector to .

10-MINUTE AUTO SHUTOFF

For your peace of mind, the iron will turn off after 10 minutes of inactivity.

• The iron beeps and the auto shutoff light starts blinking to let you know that the iron has stopped heating (F).

• As soon as you pick up the iron, it starts heating again.

F

3

4

Page 3
Image 3
Black & Decker AS685, AS675 manual How to Use, Product may vary slightly from what is illustrated, Symbols

AS685, AS675 specifications

Black & Decker is a renowned name in the home improvement and power tools industry, consistently delivering innovative products that combine performance and reliability. Among its impressive lineup, the Black & Decker AS675 and AS685 models stand out as versatile and efficient cordless drill/driver options. These tools are designed with the user in mind, featuring an array of specifications that cater to both everyday home projects and professional applications.

The Black & Decker AS675 is equipped with a lightweight and compact design, making it easy to handle and maneuver in tight spaces. It features a 6.0-Volt lithium-ion battery that provides a reliable power source for extended use. One of the standout characteristics of the AS675 is its 3/8-inch keyless chuck, allowing for quick and effortless bit changes without the need for additional tools. This feature is particularly beneficial for users who frequently switch between tasks.

In terms of performance, the AS675 offers a variable speed motor, which enables users to adjust the speed according to their needs, whether driving screws or drilling holes. Additionally, it is equipped with a forward/reverse switch, providing greater control when working with different materials. The integrated LED work light is another useful addition, illuminating dark workspaces to enhance visibility and precision.

On the other hand, the Black & Decker AS685 builds on this design with added features for improved functionality. It comes with an 8.0-Volt lithium-ion battery, delivering even more power for demanding applications. The tool offers a more ergonomic grip, which reduces user fatigue during prolonged use, making it a perfect choice for both DIY enthusiasts and professionals.

Similar to the AS675, the AS685 boasts a keyless chuck and variable speed control, but it takes performance a step further with additional torque settings that allow users to fine-tune the power output for different tasks. The enhanced LED light on the AS685 is also brighter, ensuring optimal visibility even in poorly lit areas.

Both models reflect Black & Decker's commitment to incorporating consumer-friendly features while ensuring durability and efficiency. With their combination of advanced technology, superior battery life, and user-centered design, the Black & Decker AS675 and AS685 are ideal choices for tackling household tasks and projects with ease and confidence. Whether you are assembling furniture, hanging shelves, or engaging in more extensive work, these cordless drill/drivers are equipped to meet your needs effectively.