Size: 19.685" x 17.5" |
|
| C |
.use in not when appliance the unplug Always | .11 |
.pour to lid the Remove | .10 |
.up lift and position unlock |
|
to counterclockwise slightly turn handle, the grasp jar, the remove To | .9 |
.base the from |
|
jar blender the remove to attempting before stopped completely have |
|
blades sure Make .button (P/0) PULSE/OFF the press finished, When | .8 |
.running is blender the while lid the remove not Do Important: | |
.only use household for is product This .INSTRUCTIONS THESE SAVE
.cover
.opening the through ingredients drop |
|
and running, is blender the while ingredients add to cap lid the Open | .7 |
.ice the up break helps This .time a at seconds |
|
5 than more no for button (P) PUlSE the Press .process blending the |
|
begin to times several button (P) PUlSE the press milkshakes and |
|
drinks power smoothies, as such mixtures, thick blending When | .6 |
.task desired your suits best that speed the Select | .5 |
.place in blender keep to lid | |
the on hand one keep beans, coffee and nuts cheese, ice, as such foods, | |
hard using When .unattended blender leave not do use, in When Note: | |
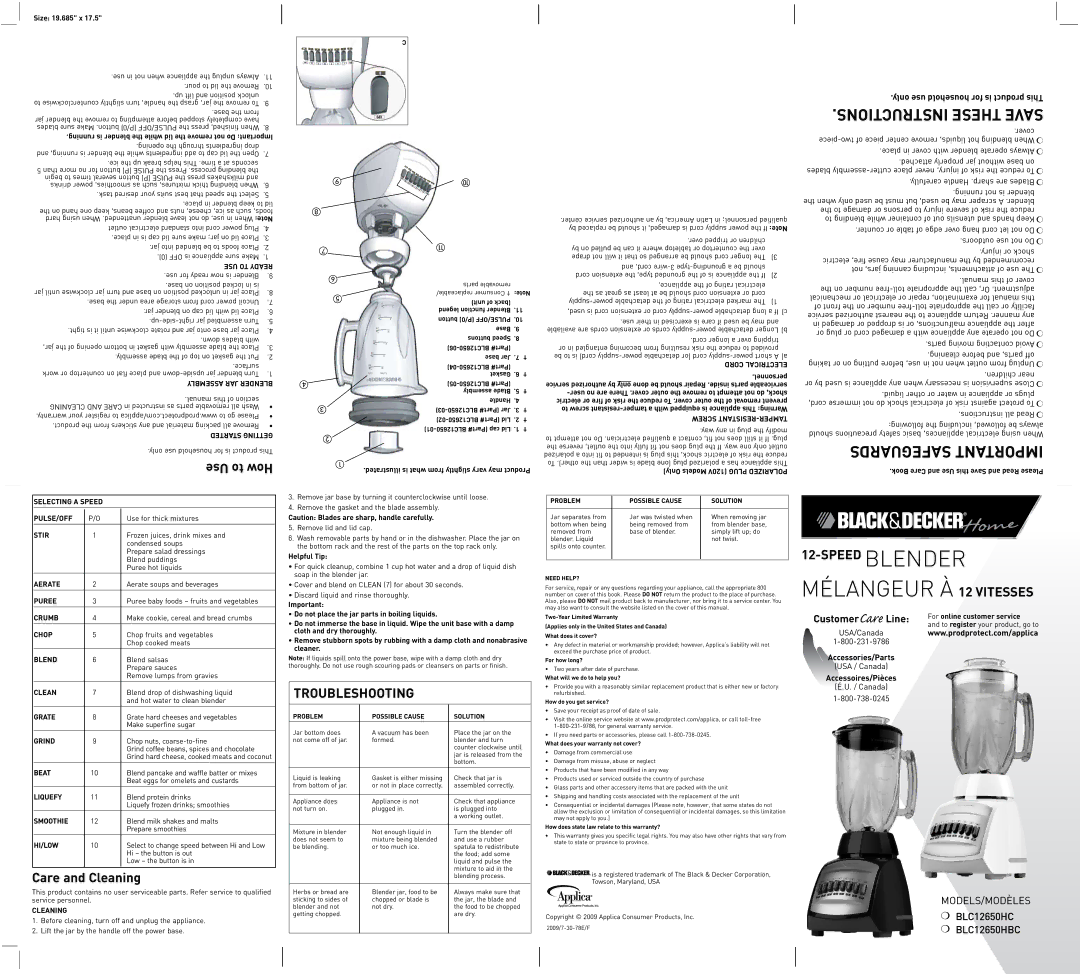
outlet electrical standard into cord power Plug | .4 |
.place in is cap lid sure make jar; on lid Place | .3 |
.jar into blended be to foods Place | .2 |
.(0) OFF is appliance sure Make | .1 |
USE TO READY | |
.use for ready now is Blender | .9 |
.base on position locked in is |
|
jar until clockwise jar turn and base on position unlocked in jar Place | .8 |
.base the under area storage from cord power Uncoil | .7 |
.jar blender on cap lid with lid Place | .6 |
.5 | |
.tight is it until clockwise rotate and jar onto base jar Place | .4 |
.down blades with |
|
jar, the of opening bottom in gasket with assembly blade the Place | .3 |
.assembly blade the of top on gasket the Put | .2 |
.surface |
|
work or countertop on flat place and | .1 |
ASSEMBLY JAR BLENDER | |
.manual this of section |
|
CLEANING AND CARE in instructed as parts removable all Wash | • |
.warranty your register to com/applica.prodprotect.www to go Please | • |
.product the from stickers any and material packing all Remove | • |
STARTED GETTING | |
.only use household for is product This | |


|
|
|
|
|
|
| |
|
|
|
|
|
| |
|
| parts removable |
|
|
|
|
|
| |
|
| replaceable/ Consumer † | Note: | |
| unit) of (back |
|
| |
|
|
|
| |
|
| legend function Blender | .11 |
|
|
| button (P/0) PULSE/OFF | .10 |
|
|
| Base | .9 |
|
|
| buttons Speed | .8 |
|
|
|
|
| |
|
| base Jar | .7 | † |
|
| .6 | † | |
OZS | CUPS | Gasket | ||
|
|
|
| |
|
| assembly Blade | .5 | † |
|
| Handle | .4 |
|
|
| .3 | † | |
|
| .2 | † | |
|
| .1 | † | |
|
|
|
|
|
.center service authorized an by America, Latin in personnel; qualified | |||
by replaced be should it damaged, is cord supply power the If Note: | |||
|
| .over tripped or children |
|
by on pulled be can it where tabletop or countertop the over |
| ||
drape not will it that so arranged be should cord longer The | 3) | ||
| and cord, |
| |
cord extension the type, grounded the of is appliance the If | 2) | ||
|
| appliance, the of rating electrical |
|
the as great as least at be should cord extension or cord |
| ||
1) | |||
used, is cord extension or cord | |||
| .use their in exercised is care if used be may and | ||
available are cords extension or cords | |||
|
| .cord longer a over tripping | |
or in entangled becoming from resulting risk the reduce to provided | |||
be to is cord) | |||
|
| CORD ELECTRICAL | |
|
| .personnel | |
|
| ||
service authorized by only done be should Repair .inside parts serviceable | |||
electric or fire of risk the reduce To .cover outer the of removal prevent | |||
to screw | |||
|
| SCREW | |
|
| .way any in plug the modify | |
to attempt not Do .electrician qualified a contact fit, not does still it If .plug | |||
the reverse outlet, the into fully fit not does plug the If .way one only outlet | |||
polarized a into fit to intended is plug this shock, electric of risk the reduce | |||
.place in cover with blender operate Always ❍
.attached properly jar without base on blades
.carefully Handle .sharp are Blades ❍
.running not is blender the when only used be must but used, be may scraper A .blender the to damage or persons to injury severe of risk the reduce to blending while container of out utensils and hands Keep ❍
.counter or table of edge over hang cord let not Do ❍ .outdoors use not Do ❍
.injury or shock electric fire, cause may manufacturer the by recommended not jars, canning including attachments, of use The ❍
.manual this of cover the on number
.parts moving contacting Avoid ❍
.cleaning before and parts, off taking or on putting before use, in not when outlet from Unplug ❍
.children near or by used is appliance any when necessary is supervision Close ❍
.liquid other or water in appliance or plugs cord, immerse not do shock electrical of risk against protect To ❍
.instructions all Read ❍
following: the including followed, be always should precautions safety basic appliances, electrical using When
SAFEGUARDS IMPORTANT
Use to How | | .illustrated is what from slightly vary may Product |
|
To .other) the than wider is blade (one plug polarized a has appliance This |
Only) Models (120V PLUG POLARIZED |
.Book Care and Use this Save and Read Please
SELECTING A SPEED
| PULSE/OFF | P/O | Use for thick mixtures |
|
|
|
|
|
|
| STIR | 1 | Frozen juices, drink mixes and |
|
|
|
| condensed soups |
|
|
|
| Prepare salad dressings |
|
|
|
| Blend puddings |
|
|
|
| Puree hot liquids |
|
|
|
|
|
|
| AERATE | 2 | Aerate soups and beverages |
|
|
|
|
|
|
| PUREE | 3 | Puree baby foods – fruits and vegetables |
|
|
|
|
|
|
| CRUMB | 4 | Make cookie, cereal and bread crumbs |
|
|
|
|
|
|
| CHOP | 5 | Chop fruits and vegetables |
|
|
|
| Chop cooked meats |
|
|
|
|
|
|
| BLEND | 6 | Blend salsas |
|
|
|
| Prepare sauces |
|
|
|
| Remove lumps from gravies |
|
|
|
|
|
|
| CLEAN | 7 | Blend drop of dishwashing liquid |
|
|
|
| and hot water to clean blender |
|
| GRATE | 8 | Grate hard cheeses and vegetables |
|
|
|
| Make superfine sugar |
|
| GRIND | 9 | Chop nuts, |
|
|
|
| Grind coffee beans, spices and chocolate |
|
|
|
| Grind hard cheese, cooked meats and coconut |
|
| BEAT | 10 | Blend pancake and waffle batter or mixes |
|
|
|
| Beat eggs for omelets and custards |
|
| LIQUEFY | 11 | Blend protein drinks |
|
|
|
| Liquefy frozen drinks; smoothies |
|
| SMOOTHIE | 12 | Blend milk shakes and malts |
|
|
|
| Prepare smoothies |
|
| HI/LOW | 10 | Select to change speed between Hi and Low |
|
|
|
| Hi – the button is out |
|
|
|
| Low – the button is in |
|
|
|
|
|
|
3.Remove jar base by turning it counterclockwise until loose.
4.Remove the gasket and the blade assembly.
Caution: Blades are sharp, handle carefully.
5.Remove lid and lid cap.
6.Wash removable parts by hand or in the dishwasher. Place the jar on the bottom rack and the rest of the parts on the top rack only.
Helpful Tip:
•For quick cleanup, combine 1 cup hot water and a drop of liquid dish soap in the blender jar.
•Cover and blend on CLEAN (7) for about 30 seconds.
•Discard liquid and rinse thoroughly.
Important:
•Do not place the jar parts in boiling liquids.
•Do not immerse the base in liquid. Wipe the unit base with a damp cloth and dry thoroughly.
•Remove stubborn spots by rubbing with a damp cloth and nonabrasive cleaner.
Note: If liquids spill onto the power base, wipe with a damp cloth and dry thoroughly. Do not use rough scouring pads or cleansers on parts or finish.
TROUBLESHOOTING
PROBLEM | POSSIBLE CAUSE | SOLUTION | |
|
|
|
|
Jar bottom does | A vacuum has been | Place the jar on the | |
not come off of jar. | formed. | blender and turn | |
|
| counter clockwise until | |
|
| jar is released from the | |
|
| bottom. | |
|
|
|
|
Liquid is leaking | Gasket is either missing | Check that jar is | |
from bottom of jar. | or not in place correctly. | assembled correctly. | |
|
|
|
|
Appliance does | Appliance is not | Check that appliance | |
not turn on. | plugged in. | is plugged into | |
|
| a working outlet. | |
|
|
|
|
Mixture in blender | Not enough liquid in | Turn the blender off | |
does not seem to | mixture being blended | and use a rubber | |
be blending. | or too much ice. | spatula to redistribute | |
|
| the food; add some | |
|
| liquid and pulse the | |
|
| mixture to aid in the | |
PROBLEM |
| POSSIBLE CAUSE |
| SOLUTION |
|
| |||
|
|
|
|
|
Jar separates from |
| Jar was twisted when |
| When removing jar |
bottom when being |
| being removed from |
| from blender base, |
removed from |
| base of blender. |
| simply lift up; do |
blender. Liquid |
|
|
| not twist. |
spills onto counter. |
|
|
|
|
|
|
|
|
|
NEED HELP?
For service, repair or any questions regarding your appliance, call the appropriate 800 number on cover of this book. Please DO NOT return the product to the place of purchase. Also, please DO NOT mail product back to manufacturer, nor bring it to a service center. You may also want to consult the website listed on the cover of this manual.
(Applies only in the United States and Canada) What does it cover?
•Any defect in material or workmanship provided; however, Applica’s liability will not exceed the purchase price of product.
For how long?
•Two years after date of purchase. What will we do to help you?
•Provide you with a reasonably similar replacement product that is either new or factory refurbished.
How do you get service?
•Save your receipt as proof of date of sale.
•Visit the online service website at www.prodprotect.com/applica, or call
•If you need parts or accessories, please call
What does your warranty not cover?
•Damage from commercial use
•Damage from misuse, abuse or neglect
•Products that have been modified in any way
•Products used or serviced outside the country of purchase
•Glass parts and other accessory items that are packed with the unit
•Shipping and handling costs associated with the replacement of the unit
•Consequential or incidental damages (Please note, however, that some states do not allow the exclusion or limitation of consequential or incidental damages, so this limitation may not apply to you.)
How does state law relate to this warranty?
•This warranty gives you specific legal rights. You may also have other rights that vary from state to state or province to province.
MÉLANGEUR À 12 vitesses
CustomerCare Line: | For online customer service |
and to register your product, go to | |
USA/Canada | www.prodprotect.com/applica |
| |
Accessories/Parts |
|
(USA / Canada) |
|
Accessoires/Pièces |
|
(É.U. / Canada) |
|
|
Care and Cleaning
This product contains no user serviceable parts. Refer service to qualified service personnel.
CLEANING
1.Before cleaning, turn off and unplug the appliance.
2.Lift the jar by the handle off the power base.
|
| blending process. |
|
|
|
Herbs or bread are | Blender jar, food to be | Always make sure that |
sticking to sides of | chopped or blade is | the jar, the blade and |
blender and not | not dry. | the food to be chopped |
getting chopped. |
| are dry. |
![]()
![]()
![]()
![]()
![]()
![]()
![]() is a registered trademark of The Black & Decker Corporation,
is a registered trademark of The Black & Decker Corporation,
Towson, Maryland, USA
| ModelS/ModÈleS |
Copyright © 2009 Applica Consumer Products, Inc. | ❍ BLC12650HC |
❍ BLC12650HBC | |
|