Note: If you are connecting this appliance to the receptacle of another †SpaceMaker™ appliance such as the toaster oven or coffeemaker, make sure you can easily unplug the appliance following use.

DETERMINE CABINET TYPE

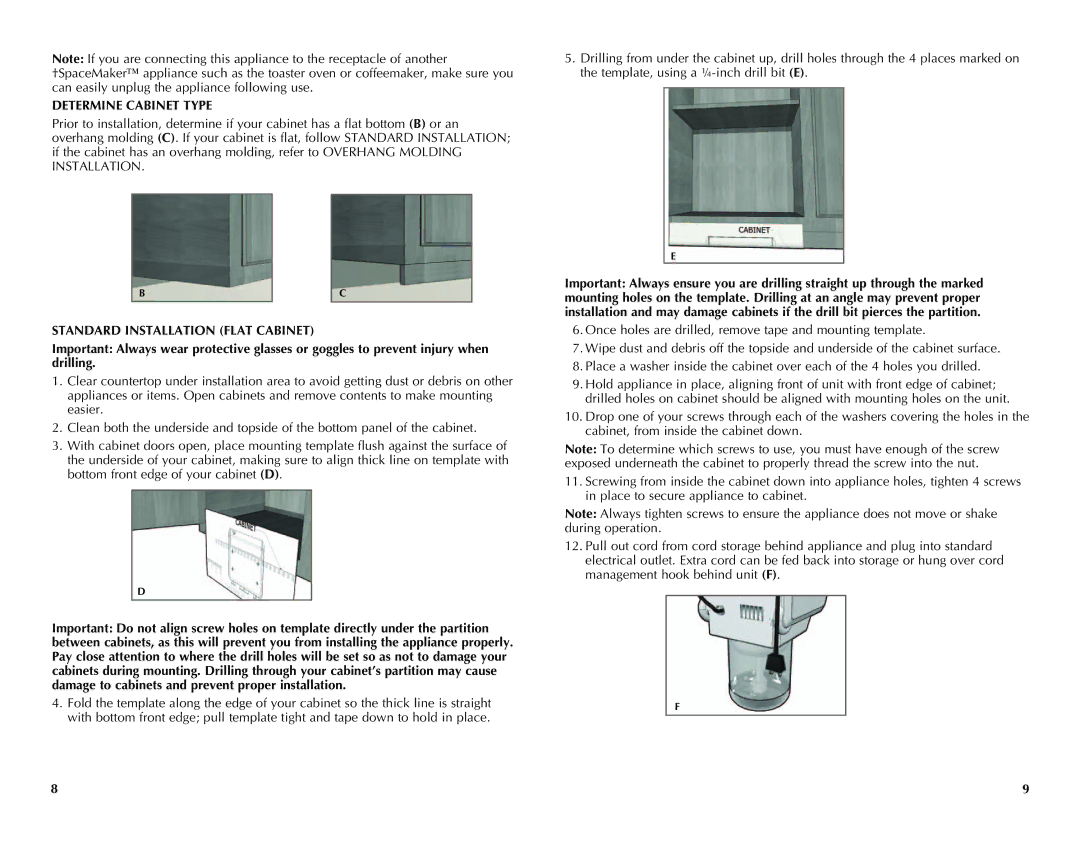
Prior to installation, determine if your cabinet has a flat bottom (B) or an overhang molding (C). If your cabinet is flat, follow STANDARD INSTALLATION; if the cabinet has an overhang molding, refer to OVERHANG MOLDING INSTALLATION.

B


C

STANDARD INSTALLATION (FLAT CABINET)

Important: Always wear protective glasses or goggles to prevent injury when drilling.

1.Clear countertop under installation area to avoid getting dust or debris on other appliances or items. Open cabinets and remove contents to make mounting easier.

2.Clean both the underside and topside of the bottom panel of the cabinet.

3.With cabinet doors open, place mounting template flush against the surface of the underside of your cabinet, making sure to align thick line on template with bottom front edge of your cabinet (D).

D

Important: Do not align screw holes on template directly under the partition between cabinets, as this will prevent you from installing the appliance properly. Pay close attention to where the drill holes will be set so as not to damage your cabinets during mounting. Drilling through your cabinet’s partition may cause damage to cabinets and prevent proper installation.

4.Fold the template along the edge of your cabinet so the thick line is straight with bottom front edge; pull template tight and tape down to hold in place.

5.Drilling from under the cabinet up, drill holes through the 4 places marked on the template, using a ¼-inch drill bit (E).

E

Important: Always ensure you are drilling straight up through the marked mounting holes on the template. Drilling at an angle may prevent proper installation and may damage cabinets if the drill bit pierces the partition.

6.Once holes are drilled, remove tape and mounting template.

7.Wipe dust and debris off the topside and underside of the cabinet surface.

8.Place a washer inside the cabinet over each of the 4 holes you drilled.

9.Hold appliance in place, aligning front of unit with front edge of cabinet; drilled holes on cabinet should be aligned with mounting holes on the unit.

10.Drop one of your screws through each of the washers covering the holes in the cabinet, from inside the cabinet down.

Note: To determine which screws to use, you must have enough of the screw exposed underneath the cabinet to properly thread the screw into the nut.

11.Screwing from inside the cabinet down into appliance holes, tighten 4 screws in place to secure appliance to cabinet.

Note: Always tighten screws to ensure the appliance does not move or shake during operation.

12.Pull out cord from cord storage behind appliance and plug into standard electrical outlet. Extra cord can be fed back into storage or hung over cord management hook behind unit (F).

F

Page 5
Image 5
Black & Decker CG700 manual Determine Cabinet Type, Standard Installation Flat Cabinet

CG700 specifications

The Black & Decker CG700 is a versatile and reliable electric grill designed for those who appreciate convenience without compromising on taste. This compact grill features a sleek design that fits seamlessly into any kitchen or outdoor space, making it an excellent addition for both casual cooks and culinary enthusiasts.

One of the main features of the CG700 is its powerful 1,500-watt heating element, which allows for rapid preheating and consistent cooking temperatures. This ensures that food is cooked evenly, retaining its natural flavors and juices. The grill is equipped with a non-stick cooking surface, which not only makes it easy to clean but also helps to minimize the use of additional oils and fats, promoting healthier cooking.

The CG700 boasts a spacious grilling area, enabling users to prepare multiple servings at once, whether it be burgers for a gathering or a feast of vegetables for family dinners. The grill plates can accommodate a variety of foods, including meats, seafood, and vegetables, providing flexibility for a wide range of culinary creations.

Safety and convenience are prioritized in the design of the CG700. It features a built-in temperature control system that allows users to adjust settings based on the food being cooked. Additionally, the grill has an automatic shut-off feature, which enhances safety by preventing overheating. The cool-touch handles ensure that users can operate the grill safely without the risk of burns, even during busy cooking sessions.

Furthermore, the CG700 benefits from a drip tray that collects excess grease and drippings, ensuring a cleaner cooking environment and making post-cooking clean-up easier than ever. This thoughtful design element works in tandem with the grill’s overall compact build, allowing it to be easily stored away when not in use.

With its combination of powerful performance, user-friendly features, and safety technologies, the Black & Decker CG700 electric grill stands out as an excellent choice for home cooks looking to elevate their grilling game. Its versatility makes it suitable for a range of diets and cooking styles, ensuring that everyone can enjoy delicious grilled meals year-round. Whether you're grilling indoors during the winter months or enjoying a summer cookout, the CG700 is an ideal companion for delicious and easy meal preparation.