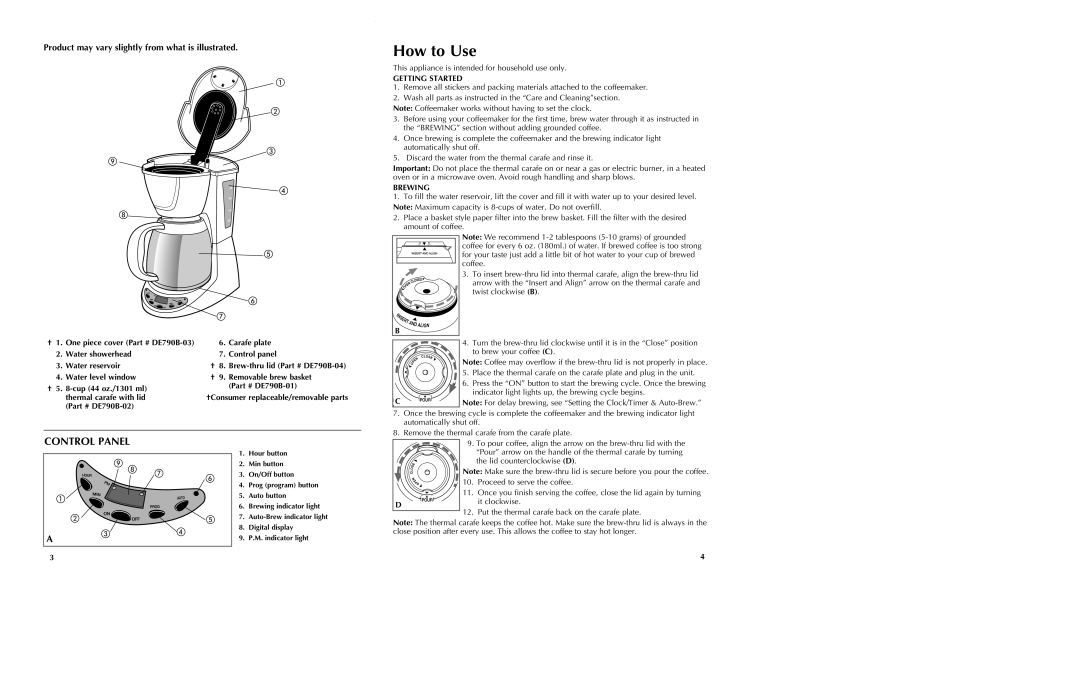
Product may vary slightly from what is illustrated.

How to Use

This appliance is intended for household use only.

GETTING STARTED

1.Remove all stickers and packing materials attached to the coffeemaker.

2.Wash all parts as instructed in the “Care and Cleaning”section.

Note: Coffeemaker works without having to set the clock.

3.Before using your coffeemaker for the first time, brew water through it as instructed in the “BREWING” section without adding grounded coffee.

4.Once brewing is complete the coffeemaker and the brewing indicator light automatically shut off.

5.Discard the water from the thermal carafe and rinse it.

Important: Do not place the thermal carafe on or near a gas or electric burner, in a heated oven or in a microwave oven. Avoid rough handling and sharp blows.

BREWING

1.To fill the water reservoir, lift the cover and fill it with water up to your desired level. Note: Maximum capacity is 8-cups of water. Do not overfill.

2.Place a basket style paper filter into the brew basket. Fill the filter with the desired amount of coffee.

Note: We recommend 1-2 tablespoons (5-10 grams) of grounded coffee for every 6 oz. (180ml.) of water. If brewed coffee is too strong for your taste just add a little bit of hot water to your cup of brewed coffee.

1. One piece cover (Part # DE790B-03)

2.Water showerhead

3.Water reservoir

4.Water level window

5. 8-cup (44 oz./1301 ml)

thermal carafe with lid (Part # DE790B-02)

6.Carafe plate

7.Control panel

8. Brew-thru lid (Part # DE790B-04)

9. Removable brew basket

(Part # DE790B-01)

†Consumer replaceable/removable parts

B

C

3.To insert brew-thru lid into thermal carafe, align the brew-thru lid arrow with the “Insert and Align” arrow on the thermal carafe and twist clockwise (B).

4.Turn the brew-thru lid clockwise until it is in the “Close” position to brew your coffee (C).

Note: Coffee may overflow if the brew-thru lid is not properly in place.

5.Place the thermal carafe on the carafe plate and plug in the unit.

6.Press the “ON” button to start the brewing cycle. Once the brewing indicator light lights up, the brewing cycle begins.

Note: For delay brewing, see “Setting the Clock/Timer & Auto-Brew.”

7.Once the brewing cycle is complete the coffeemaker and the brewing indicator light automatically shut off.

8.Remove the thermal carafe from the carafe plate.

CONTROL PANEL

1.

Hour button

2.

Min button

3.

On/Off button

4.

Prog (program) button

5.

Auto button

6.

Brewing indicator light

7.

Auto-Brew indicator light

D

9.To pour coffee, align the arrow on the brew-thru lid with the “Pour” arrow on the handle of the thermal carafe by turning the lid counterclockwise (D).

Note: Make sure the brew-thru lid is secure before you pour the coffee.

10.Proceed to serve the coffee.

11.Once you finish serving the coffee, close the lid again by turning it clockwise.

12.Put the thermal carafe back on the carafe plate.

A

8.

Digital display

9.

P.M. indicator light

Note: The thermal carafe keeps the coffee hot. Make sure the brew-thru lid is always in the close position after every use. This allows the coffee to stay hot longer.

3

4

Page 3
Image 3
Black & Decker DE790B manual How to Use, Control Panel, Product may vary slightly from what is illustrated, Getting Started

DE790B, DE790 specifications

The Black & Decker DE790 and DE790B cordless drill/driver models are designed to meet the needs of both professionals and DIY enthusiasts seeking a reliable and efficient power tool. These models are known for their durability, versatility, and a range of features that make them stand out in the crowded tool market.

One of the main features of the DE790 and DE790B is their powerful motor, which provides ample torque for a variety of applications. With variable speed settings, users can easily adjust the speed according to the task at hand, allowing for greater control when drilling into different materials. The two-speed gearbox enhances this versatility, enabling both high-speed drilling for quick tasks and low-speed torque for more demanding jobs.

Battery technology is another crucial aspect of these models, employing lithium-ion batteries that offer longer run times and quicker charging. This allows users to work for extended periods without interruptions due to low battery levels. Moreover, the DE790 and DE790B come equipped with a battery indicator that informs users of the remaining power, ensuring that they can complete their tasks without running out of charge unexpectedly.

The ergonomic design of these drills enhances user comfort, featuring a compact and lightweight build that reduces hand fatigue during prolonged use. The soft-grip handle is designed to provide a secure and comfortable hold, allowing users to maintain control, even in challenging positions.

Another noteworthy characteristic is the integrated LED work light, which illuminates the workspace for increased visibility in dimly lit areas. This feature is particularly beneficial for users who frequently work in tight or shadowy environments.

Both models include a keyless chuck, enabling quick and easy bit changes without the need for additional tools. This feature saves time and improves efficiency, as users can switch between various drill bits and accessories seamlessly.

Durability is a hallmark of Black & Decker tools, and the DE790 and DE790B are no exceptions. Built to withstand the rigors of job sites, these drills are constructed with high-quality materials that offer resistance to wear and tear.

In conclusion, the Black & Decker DE790 and DE790B cordless drill/driver models provide an impressive combination of power, versatility, and user-friendly features. Whether tackling home improvement projects or professional tasks, these tools deliver reliability and performance that users can depend on.