| | C |
| A | |
| B | |
D | | |
8 | 9 | |
| |
E | | F |
| 10 | |
| | 11 |
G | | H |
12 | | |
14 | | |
13 | | |
I | 15 | |
| 16 |
 SAFETY WARNINGS AND INSTRUCTIONS
CHARGING
1.This manual contains important safety and operating instructions.
2.Before using battery charger, read all instructions and cautionary markings on (1) battery charger, (2) battery pack, and (3) product using battery pack.
3. CAUTION: To reduce the risk of injury, charge only Black & Decker Battery Packs. Other types of batteries may burst causing personal injury and damage.
4.Do not expose charger to rain or snow.
5.Use of an attachment not recommended or sold by Black & Decker may result in a risk of fire, electric shock, or injury to persons.
6.To reduce risk of damage to electric plug and cord, pull by plug rather than cord when disconnecting charger.
7.Make sure cord is located so that it will not be stepped on, tripped over, or otherwise subjected to damage or stress.
8.An extension cord should not be used unless absolutely necessary. Use of improper extension cord could result in a risk of fire, electric shock or electrocution.
a.Two-wire cords can be used with 2-wire or 3-wire extension cords. Only round jacketed extension cords should be used, and we recommend that they be listed by
Underwriters Laboratories (U.L.). If the extension is to be used outside, the cord must be suitable for outdoor use. Any cord marked for outdoor use can also be used for indoor work. The letters "W" or "WA" on the cord jacket indicate that the cord is suitable for outdoor use.
b.An extension cord must have adequate wire size (AWG or American Wire Gauge) for safety, and to prevent loss of power and overheating. The smaller the gauge number of the wire, the greater the capacity of the cable; that is, 16 gauge has more capacity than 18 gauge. When using more than one extension to make up the total length, be sure each extension contains at least the minimum wire size.
CHART FOR MINIMUM WIRE SIZE (AWG) OF EXTENSION CORDS
NAMEPLATE RATING AMPS – 0 – 10.0
Total Extension Cord Length (ft) 0-25 26-50 51-100 101-150 (0-7,6m) (7,6-15,2m) (15,2-30,4m) (30,4-45,7m)
9.Use only the supplied charger when charging your unit. The use of any other charger could damage the battery pack or create a hazardous condition.
10.Use only one charger when charging.
11.Do not attempt to open the charger or the unit. There are no customer serviceable parts inside. Return to any authorized Black & Decker service center.
12.DO NOT incinerate battery packs even if they are severely damaged or completely worn out.
13.Do not incinerate the batteries. They can explode in a fire. A small leakage of liquid from the battery cells may occur under extreme usage, charging or temperature conditions. This does not indicate a failure. However, if the outer seal is broken and this leakage gets on your skin:
a.Wash quickly with soap and water.
b.Neutralize with a mild acid such as lemon juice or vinegar.
c.If the battery liquid gets in your eyes, flush them with clean water for a minimum of 10 minutes and seek immediate medical attention. MEDICAL NOTE: The liquid is a 25-35% solution of potassium hydroxide.
IMPORTANT CHARGING SAFETY INSTRUCTIONS
CHARGING PROCEDURE
THE BATTERY PACK IS NOT FULLY CHARGED AT THE FACTORY. CHARGE BATTERY PACK FOR AT LEAST 9 HOURS BEFORE USE.
The charger is designed to use standard household 120 volt 60 Hz power.
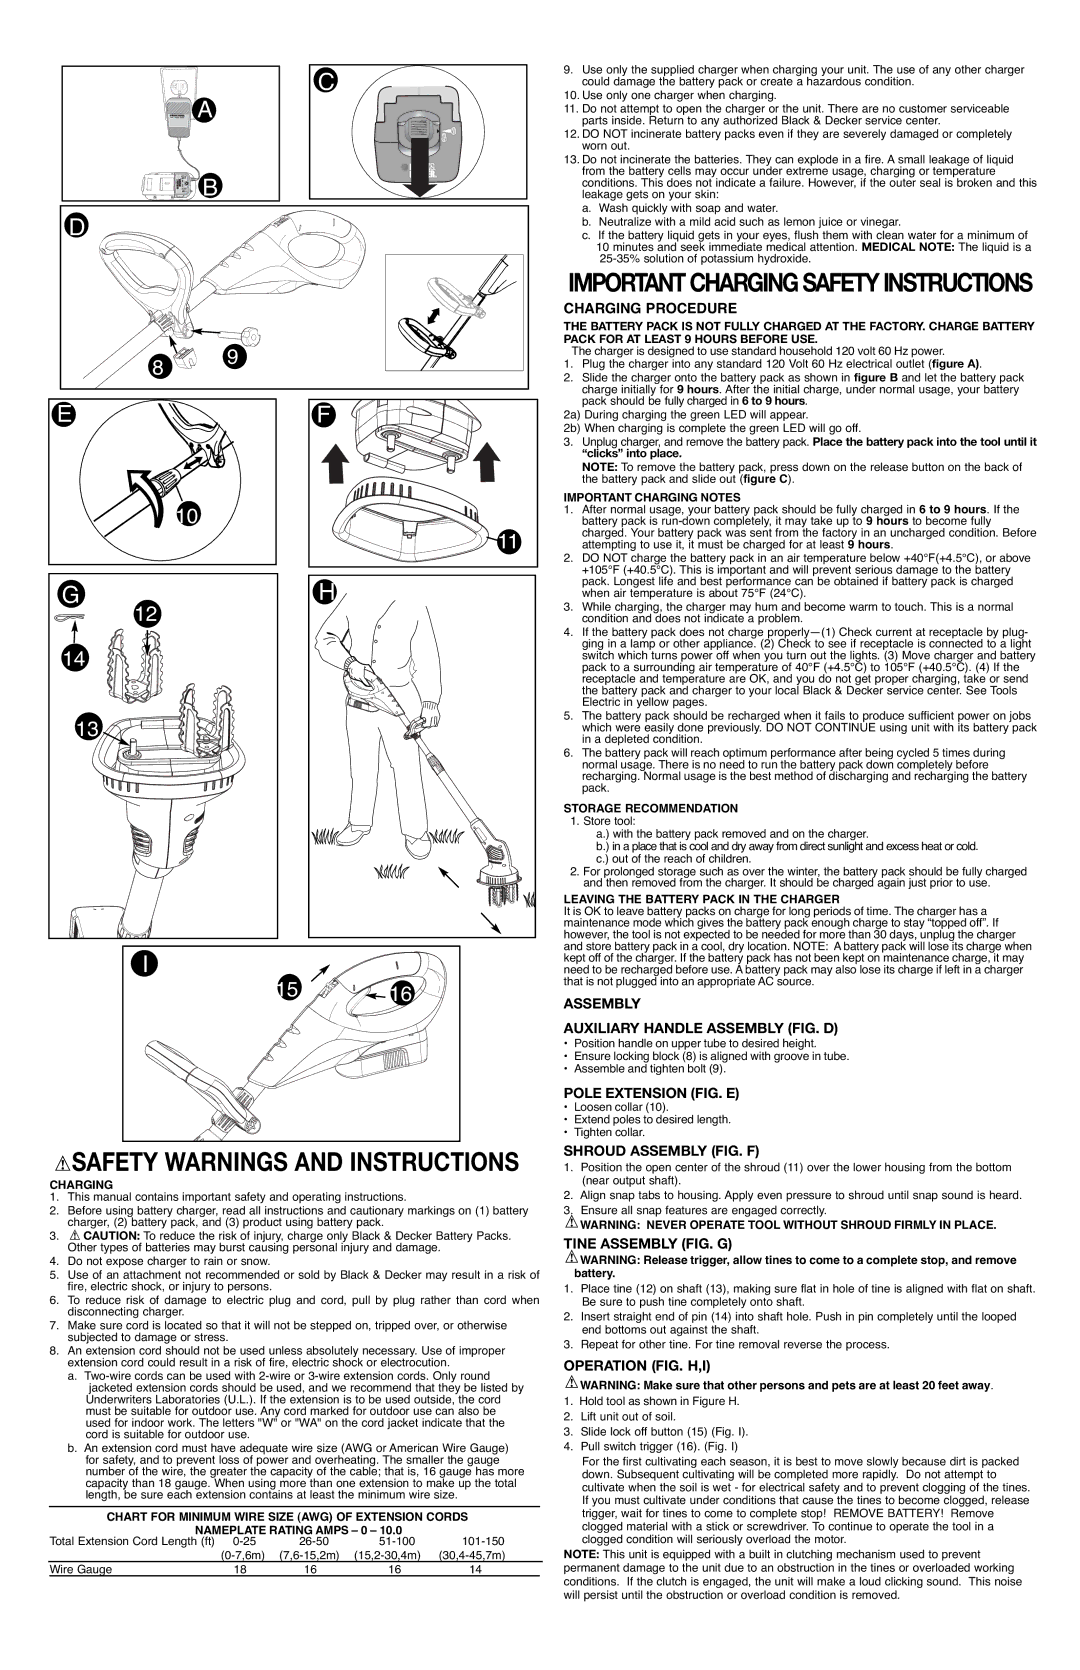
1.Plug the charger into any standard 120 Volt 60 Hz electrical outlet (figure A).
2.Slide the charger onto the battery pack as shown in figure B and let the battery pack charge initially for 9 hours. After the initial charge, under normal usage, your battery pack should be fully charged in 6 to 9 hours.
2a) During charging the green LED will appear.
2b) When charging is complete the green LED will go off.
3.Unplug charger, and remove the battery pack. Place the battery pack into the tool until it “clicks” into place.
NOTE: To remove the battery pack, press down on the release button on the back of the battery pack and slide out (figure C).
IMPORTANT CHARGING NOTES
1.After normal usage, your battery pack should be fully charged in 6 to 9 hours. If the battery pack is run-down completely, it may take up to 9 hours to become fully charged. Your battery pack was sent from the factory in an uncharged condition. Before attempting to use it, it must be charged for at least 9 hours.
2.DO NOT charge the battery pack in an air temperature below +40°F(+4.5°C), or above +105°F (+40.5°C). This is important and will prevent serious damage to the battery pack. Longest life and best performance can be obtained if battery pack is charged when air temperature is about 75°F (24°C).
3.While charging, the charger may hum and become warm to touch. This is a normal condition and does not indicate a problem.
4.If the battery pack does not charge properly—(1) Check current at receptacle by plug- ging in a lamp or other appliance. (2) Check to see if receptacle is connected to a light switch which turns power off when you turn out the lights. (3) Move charger and battery pack to a surrounding air temperature of 40°F (+4.5°C) to 105°F (+40.5°C). (4) If the receptacle and temperature are OK, and you do not get proper charging, take or send the battery pack and charger to your local Black & Decker service center. See Tools Electric in yellow pages.
5.The battery pack should be recharged when it fails to produce sufficient power on jobs which were easily done previously. DO NOT CONTINUE using unit with its battery pack in a depleted condition.
6.The battery pack will reach optimum performance after being cycled 5 times during normal usage. There is no need to run the battery pack down completely before recharging. Normal usage is the best method of discharging and recharging the battery pack.
STORAGE RECOMMENDATION
1. Store tool:
a.) with the battery pack removed and on the charger.
b.) in a place that is cool and dry away from direct sunlight and excess heat or cold. c.) out of the reach of children.
2.For prolonged storage such as over the winter, the battery pack should be fully charged and then removed from the charger. It should be charged again just prior to use.
LEAVING THE BATTERY PACK IN THE CHARGER
It is OK to leave battery packs on charge for long periods of time. The charger has a maintenance mode which gives the battery pack enough charge to stay “topped off”. If however, the tool is not expected to be needed for more than 30 days, unplug the charger and store battery pack in a cool, dry location. NOTE: A battery pack will lose its charge when kept off of the charger. If the battery pack has not been kept on maintenance charge, it may need to be recharged before use. A battery pack may also lose its charge if left in a charger that is not plugged into an appropriate AC source.
ASSEMBLY
AUXILIARY HANDLE ASSEMBLY (FIG. D)
•Position handle on upper tube to desired height.
•Ensure locking block (8) is aligned with groove in tube.
•Assemble and tighten bolt (9).
POLE EXTENSION (FIG. E)
•Loosen collar (10).
•Extend poles to desired length.
•Tighten collar.
SHROUD ASSEMBLY (FIG. F)
1.Position the open center of the shroud (11) over the lower housing from the bottom (near output shaft).
2.Align snap tabs to housing. Apply even pressure to shroud until snap sound is heard.
3.Ensure all snap features are engaged correctly.
 WARNING: NEVER OPERATE TOOL WITHOUT SHROUD FIRMLY IN PLACE.
TINE ASSEMBLY (FIG. G)
 WARNING: Release trigger, allow tines to come to a complete stop, and remove battery.
1.Place tine (12) on shaft (13), making sure flat in hole of tine is aligned with flat on shaft. Be sure to push tine completely onto shaft.
2.Insert straight end of pin (14) into shaft hole. Push in pin completely until the looped end bottoms out against the shaft.
3.Repeat for other tine. For tine removal reverse the process.
OPERATION (FIG. H,I)
 WARNING: Make sure that other persons and pets are at least 20 feet away.
1.Hold tool as shown in Figure H.
2.Lift unit out of soil.
3.Slide lock off button (15) (Fig. I).
4.Pull switch trigger (16). (Fig. I)
For the first cultivating each season, it is best to move slowly because dirt is packed down. Subsequent cultivating will be completed more rapidly. Do not attempt to cultivate when the soil is wet - for electrical safety and to prevent clogging of the tines. If you must cultivate under conditions that cause the tines to become clogged, release trigger, wait for tines to come to complete stop! REMOVE BATTERY! Remove clogged material with a stick or screwdriver. To continue to operate the tool in a clogged condition will seriously overload the motor.
NOTE: This unit is equipped with a built in clutching mechanism used to prevent permanent damage to the unit due to an obstruction in the tines or overloaded working conditions. If the clutch is engaged, the unit will make a loud clicking sound. This noise will persist until the obstruction or overload condition is removed.