Assembly
Warning! Before assembly, remove the battery from the tool.
Fitting and removing the battery (fig. B)
uTo fit the battery (14), line it up with the receptacle on the tool. Slide the battery into the receptacle and push until the battery snaps into place.
uTo remove the battery, push the release button (17) while at the same time pulling the battery out of the receptacle.
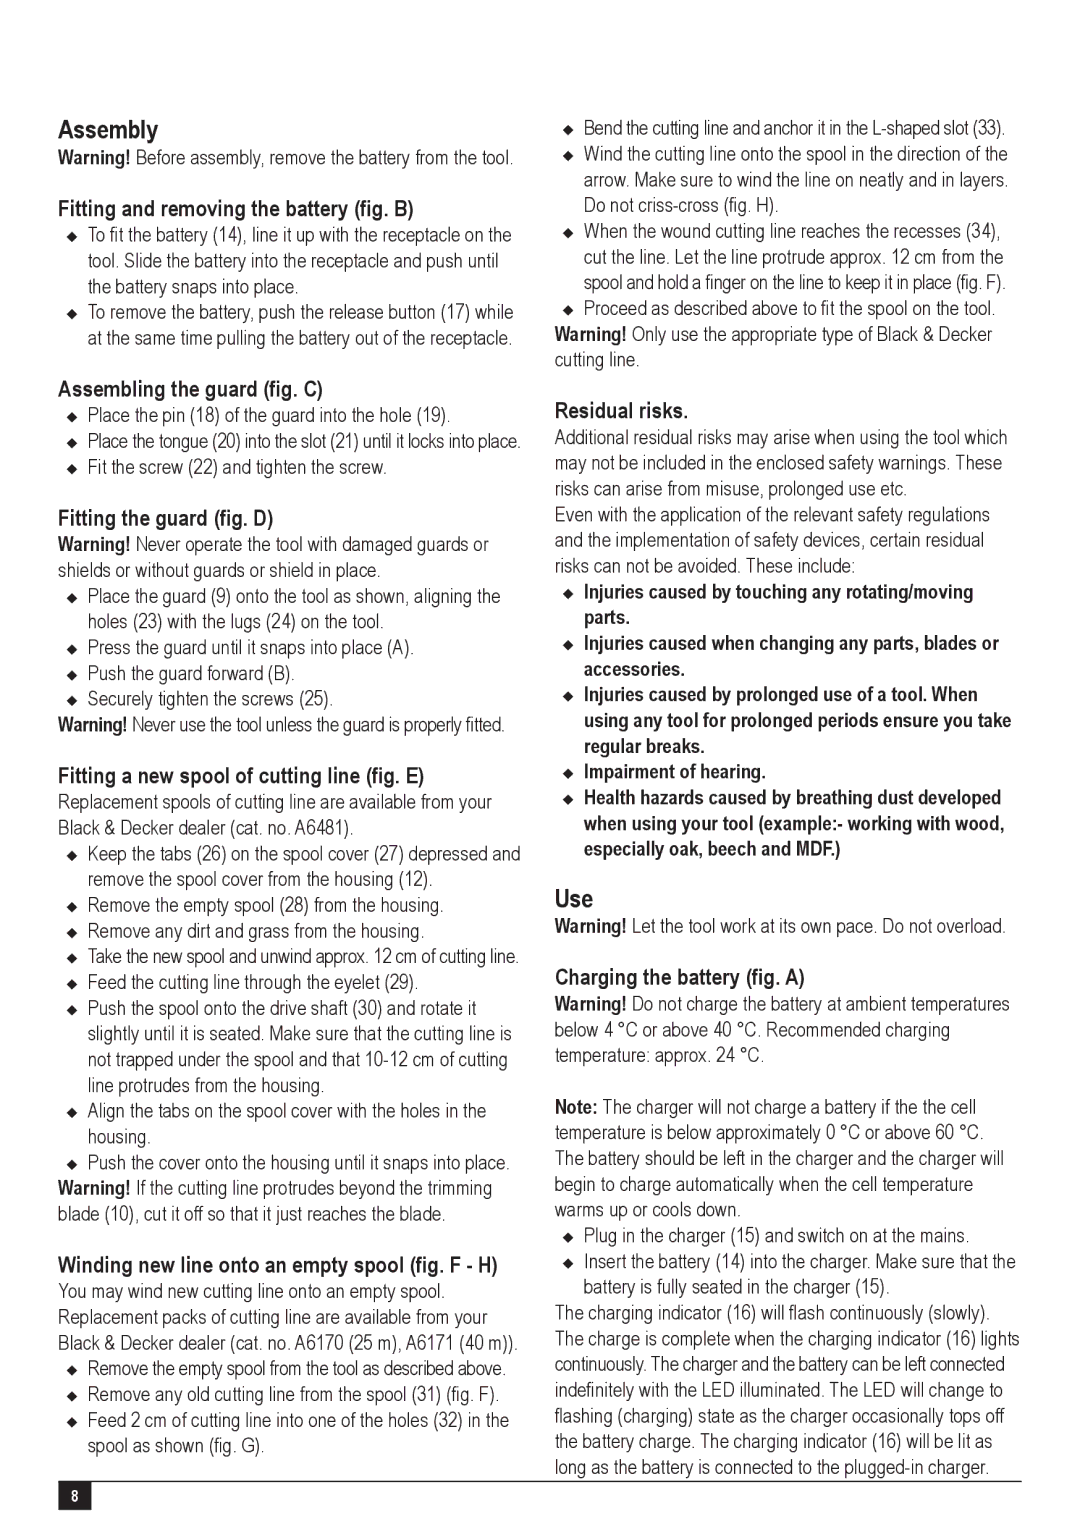
Assembling the guard (fig. C)
uPlace the pin (18) of the guard into the hole (19).
uPlace the tongue (20) into the slot (21) until it locks into place.
uFit the screw (22) and tighten the screw.
Fitting the guard (fig. D)
Warning! Never operate the tool with damaged guards or shields or without guards or shield in place.
uPlace the guard (9) onto the tool as shown, aligning the holes (23) with the lugs (24) on the tool.
uPress the guard until it snaps into place (A).
uPush the guard forward (B).
uSecurely tighten the screws (25).
Warning! Never use the tool unless the guard is properly fitted.
Fitting a new spool of cutting line (fig. E)
Replacement spools of cutting line are available from your Black & Decker dealer (cat. no. A6481).
uKeep the tabs (26) on the spool cover (27) depressed and remove the spool cover from the housing (12).
uRemove the empty spool (28) from the housing.
uRemove any dirt and grass from the housing.
uTake the new spool and unwind approx. 12 cm of cutting line.
uFeed the cutting line through the eyelet (29).
uPush the spool onto the drive shaft (30) and rotate it slightly until it is seated. Make sure that the cutting line is not trapped under the spool and that
uAlign the tabs on the spool cover with the holes in the housing.
uPush the cover onto the housing until it snaps into place. Warning! If the cutting line protrudes beyond the trimming blade (10), cut it off so that it just reaches the blade.
Winding new line onto an empty spool (fig. F - H)
You may wind new cutting line onto an empty spool. Replacement packs of cutting line are available from your Black & Decker dealer (cat. no. A6170 (25 m), A6171 (40 m)).
uRemove the empty spool from the tool as described above.
uRemove any old cutting line from the spool (31) (fig. F).
uFeed 2 cm of cutting line into one of the holes (32) in the spool as shown (fig. G).
uBend the cutting line and anchor it in the
uWind the cutting line onto the spool in the direction of the arrow. Make sure to wind the line on neatly and in layers. Do not
uWhen the wound cutting line reaches the recesses (34), cut the line. Let the line protrude approx. 12 cm from the spool and hold a finger on the line to keep it in place (fig. F).
uProceed as described above to fit the spool on the tool. Warning! Only use the appropriate type of Black & Decker cutting line.
Residual risks.
Additional residual risks may arise when using the tool which may not be included in the enclosed safety warnings. These risks can arise from misuse, prolonged use etc.
Even with the application of the relevant safety regulations and the implementation of safety devices, certain residual risks can not be avoided. These include:
uInjuries caused by touching any rotating/moving parts.
uInjuries caused when changing any parts, blades or accessories.
uInjuries caused by prolonged use of a tool. When using any tool for prolonged periods ensure you take regular breaks.
uImpairment of hearing.
uHealth hazards caused by breathing dust developed when using your tool (example:- working with wood, especially oak, beech and MDF.)
Use
Warning! Let the tool work at its own pace. Do not overload.
Charging the battery (fig. A)
Warning! Do not charge the battery at ambient temperatures below 4 °C or above 40 °C. Recommended charging temperature: approx. 24 °C.
Note: The charger will not charge a battery if the the cell temperature is below approximately 0 °C or above 60 °C. The battery should be left in the charger and the charger will begin to charge automatically when the cell temperature warms up or cools down.
uPlug in the charger (15) and switch on at the mains.
uInsert the battery (14) into the charger. Make sure that the battery is fully seated in the charger (15).
The charging indicator (16) will flash continuously (slowly). The charge is complete when the charging indicator (16) lights continuously. The charger and the battery can be left connected indefinitely with the LED illuminated. The LED will change to flashing (charging) state as the charger occasionally tops off the battery charge. The charging indicator (16) will be lit as long as the battery is connected to the
8