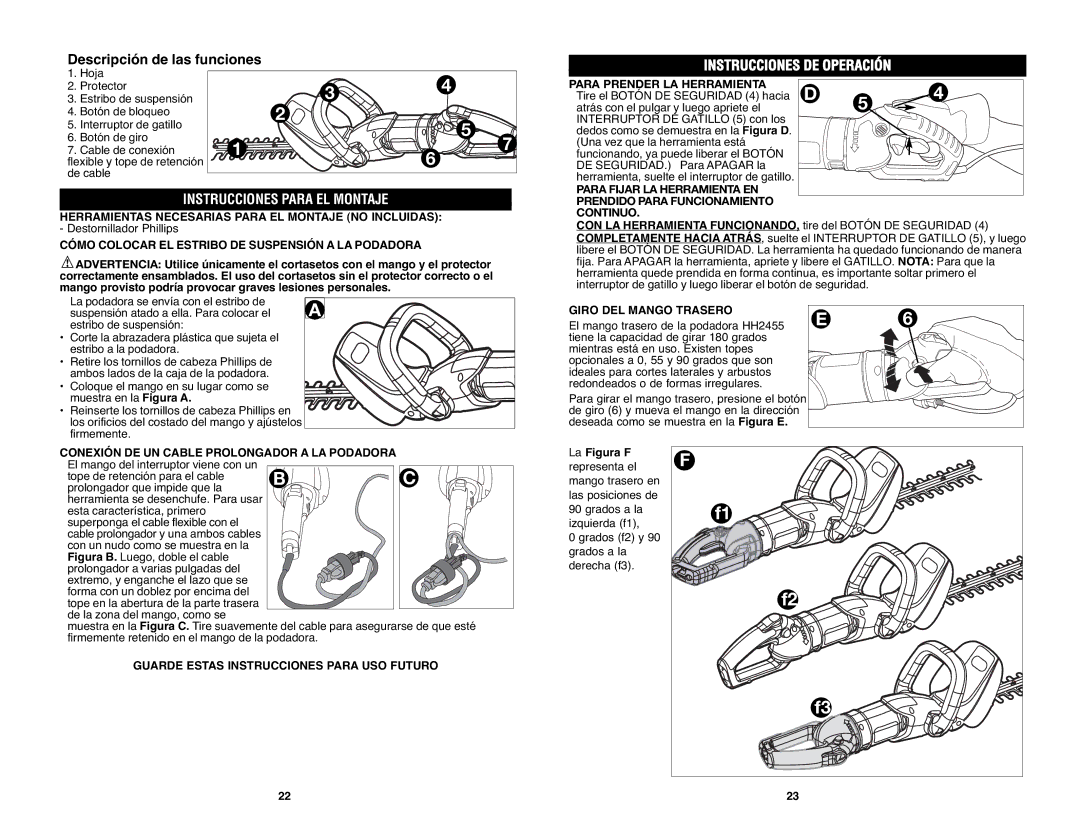
Descripción de las funciones

1.

Hoja


4

2.

Protector


3

3.

Estribo de suspensión


4. Botón de bloqueo


2


5.

Interruptor de gatillo


5

6.

Botón de giro


1


7

7.

Cable de conexión


flexible y tope de retención


6

de cable


INSTRUCCIONES PARA EL MONTAJE

HERRAMIENTAS NECESARIAS PARA EL MONTAJE (NO INCLUIDAS):

- Destornillador Phillips

CÓMO COLOCAR EL ESTRIBO DE SUSPENSIÓN A LA PODADORA

ADVERTENCIA: Utilice únicamente el cortasetos con el mango y el protector correctamente ensamblados. El uso del cortasetos sin el protector correcto o el mango provisto podría provocar graves lesiones personales.

INSTRUCCIONES DE OPERACIÓN

PARA PRENDER LA HERRAMIENTA

D


4

Tire el BOTÓN DE SEGURIDAD (4) hacia

5

atrás con el pulgar y luego apriete el


INTERRUPTOR DE GATILLO (5) con los


dedos como se demuestra en la Figura D.


(Una vez que la herramienta está


funcionando, ya puede liberar el BOTÓN


DE SEGURIDAD.) Para APAGAR la


herramienta, suelte el interruptor de gatillo.


PARA FIJAR LA HERRAMIENTA EN

PRENDIDO PARA FUNCIONAMIENTO

CONTINUO.

CON LA HERRAMIENTA FUNCIONANDO, tire del BOTÓN DE SEGURIDAD (4) COMPLETAMENTE HACIA ATRÁS, suelte el INTERRUPTOR DE GATILLO (5), y luego libere el BOTÓN DE SEGURIDAD. La herramienta ha quedado funcionando de manera fija. Para APAGAR la herramienta, apriete y libere el GATILLO. NOTA: Para que la herramienta quede prendida en forma continua, es importante soltar primero el interruptor de gatillo y luego liberar el botón de seguridad.

La podadora se envía con el estribo de

suspensión atado a ella. Para colocar el A estribo de suspensión:

• Corte la abrazadera plástica que sujeta el estribo a la podadora.

• Retire los tornillos de cabeza Phillips de ambos lados de la caja de la podadora.

• Coloque el mango en su lugar como se muestra en la Figura A.

• Reinserte los tornillos de cabeza Phillips en los orificios del costado del mango y ajústelos firmemente.

GIRO DEL MANGO TRASERO

El mango trasero de la podadora HH2455 tiene la capacidad de girar 180 grados mientras está en uso. Existen topes opcionales a 0, 55 y 90 grados que son ideales para cortes laterales y arbustos redondeados o de formas irregulares.

Para girar el mango trasero, presione el botón de giro (6) y mueva el mango en la dirección deseada como se muestra en la Figura E.

E

6

CONEXIÓN DE UN CABLE PROLONGADOR A LA PODADORA


El mango del interruptor viene con un

B

C

tope de retención para el cable

prolongador que impide que la


herramienta se desenchufe. Para usar


esta característica, primero


superponga el cable flexible con el


cable prolongador y una ambos cables


con un nudo como se muestra en la


Figura B. Luego, doble el cable


prolongador a varias pulgadas del


extremo, y enganche el lazo que se


forma con un doblez por encima del


tope en la abertura de la parte trasera


de la zona del mango, como se

muestra en la Figura C. Tire suavemente del cable para asegurarse de que esté firmemente retenido en el mango de la podadora.

GUARDE ESTAS INSTRUCCIONES PARA USO FUTURO

22

La Figura F

representa el mango trasero en las posiciones de 90 grados a la izquierda (f1),

0 grados (f2) y 90 grados a la derecha (f3).

F

f1

f2

f3

23

Page 12
Image 12
Black & Decker HH2455R Descripción de las funciones, Instrucciones Para EL Montaje, Instrucciones DE Operación

HH2455R, HH2455 specifications

The Black & Decker HH2455 and HH2455R are versatile handheld vacuum cleaners designed to provide efficient cleaning solutions for a variety of surfaces and spaces. Both models are known for their powerful suction capabilities and user-friendly features, making them ideal for tackling messes in homes, cars, or workplaces.

One of the standout features of the HH2455 and HH2455R is their powerful lithium-ion battery, which offers extended run time and quick recharging. This ensures that users can clean larger areas without the hassle of frequent interruptions for battery swaps or long charging times. The lightweight and portable design of these vacuums allows users to easily navigate around furniture and tight spaces, making them perfect for quick clean-ups.

Both models come equipped with a rotating slim nozzle, which enhances their ability to access and clean hard-to-reach areas such as corners, under furniture, and other confined spaces. Additionally, the HH2455 and HH2455R feature a washable dust bowl that holds a significant amount of dirt and debris, reducing the need for frequent emptying and ensuring a more continuous cleaning experience.

The HH2455R variant boasts further enhancements, including a premium, more ergonomic grip and an upgraded filtration system that captures finer dust particles, improving air quality in the process. This makes it an excellent choice for allergy sufferers or anyone seeking a cleaner indoor environment.

Moreover, both models are designed with ease of use in mind, featuring intuitive controls and a lightweight structure that makes handling them during cleaning sessions a breeze. They also provide convenient storage options with a built-in wall mount charging system, allowing users to keep their vacuums charged and readily accessible.

The design aesthetic of the HH2455 and HH2455R is modern and sleek, making them not just functional but also attractive additions to any cleaning toolkit. Overall, Black & Decker's HH2455 and HH2455R handheld vacuums offer a remarkable combination of efficiency, convenience, and aesthetics, making them popular choices for homeowners and professionals alike.