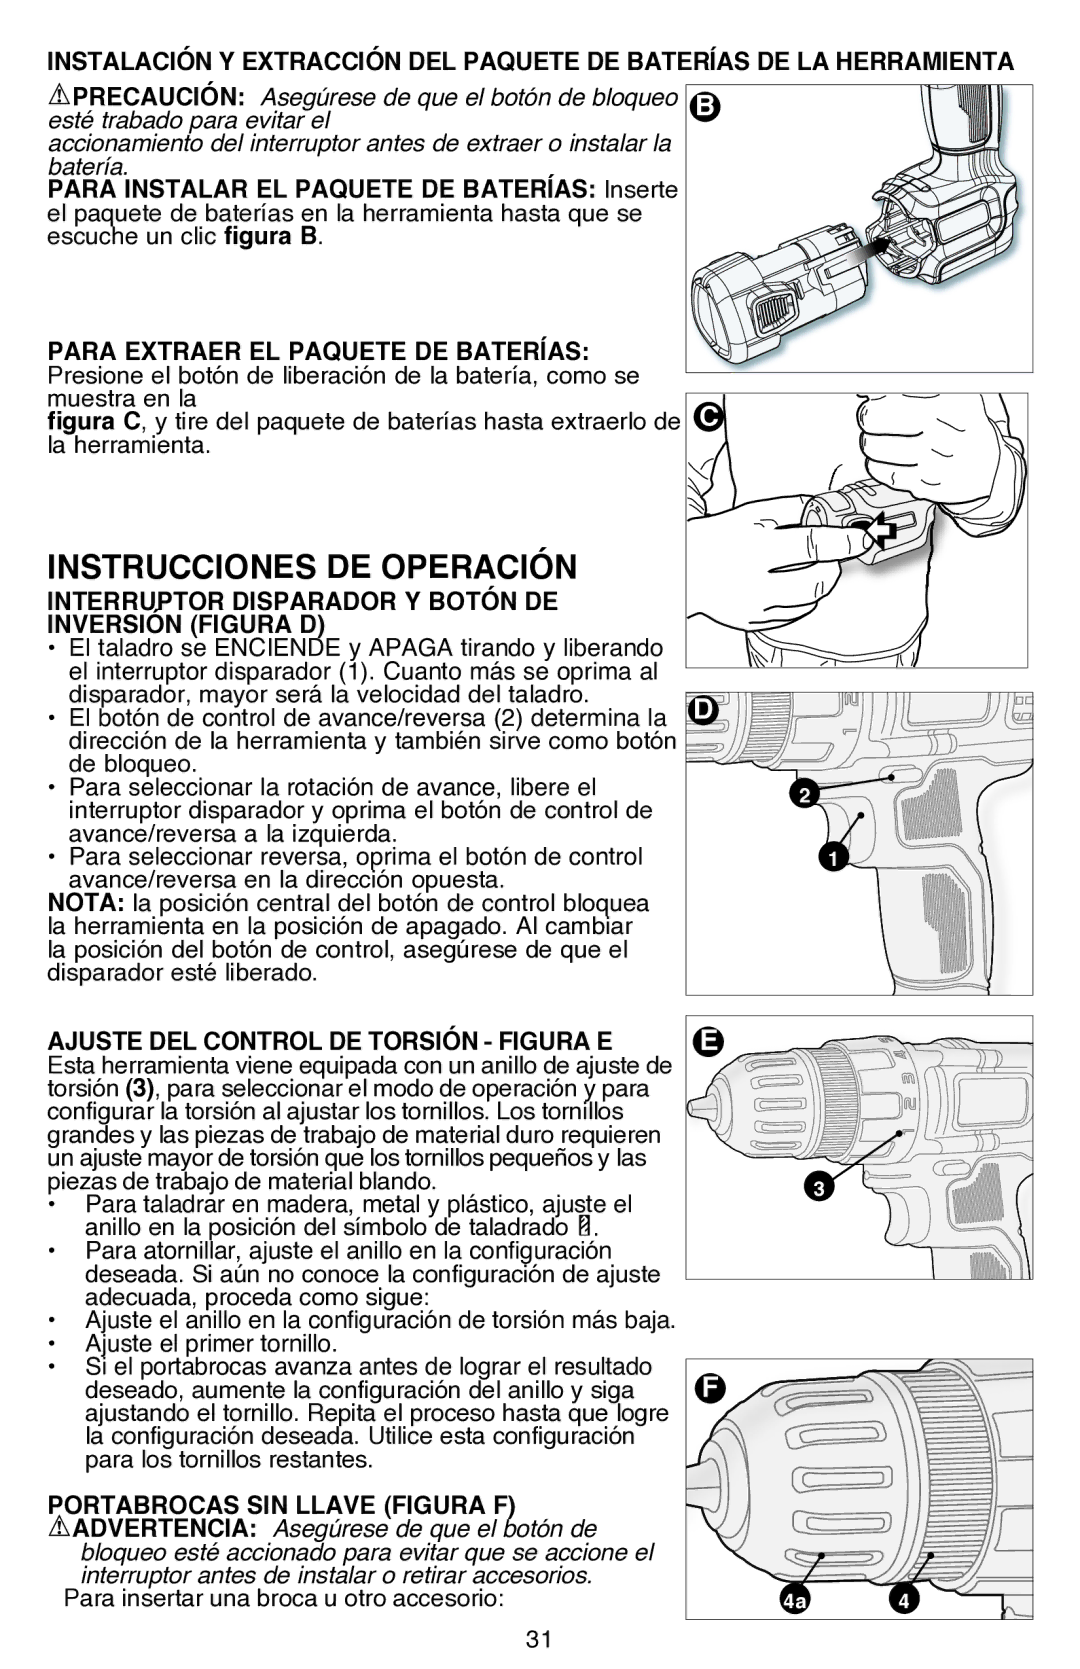
Instalación y extracción del paquete de baterías de la herramienta PRECAUCIÓN: Asegúrese de que el botón de bloqueo B

esté trabado para evitar el

accionamiento del interruptor antes de extraer o instalar la batería.

Para instalar el paquete de baterías: Inserte el paquete de baterías en la herramienta hasta que se escuche un clic figura B.

Para extraer el paquete de baterías: Presione el botón de liberación de la batería, como se

muestra en laC figura C, y tire del paquete de baterías hasta extraerlo de la herramienta.

INSTRUCCIONES DE OPERACIÓN


INTERRUPTOR DISPARADOR Y BOTÓN DE


INVERSIÓN (FIGURA D)


• El taladro se ENCIENDE y APAGA tirando y liberando


el interruptor disparador (1). Cuanto más se oprima al


disparador, mayor será la velocidad del taladro.

D


El botón de control de avance/reversa (2) determina la


dirección de la herramienta y también sirve como botón


de bloqueo.

2


Para seleccionar la rotación de avance, libere el


interruptor disparador y oprima el botón de control de


avance/reversa a la izquierda.


1

Para seleccionar reversa, oprima el botón de control


avance/reversa en la dirección opuesta.


NOTA: la posición central del botón de control bloquea


la herramienta en la posición de apagado. Al cambiar


la posición del botón de control, asegúrese de que el


disparador esté liberado.


Ajuste del control de torsión - Figura E

E


Esta herramienta viene equipada con un anillo de ajuste de


torsión (3), para seleccionar el modo de operación y para


configurar la torsión al ajustar los tornillos. Los tornillos


grandes y las piezas de trabajo de material duro requieren


un ajuste mayor de torsión que los tornillos pequeños y las


3

piezas de trabajo de material blando.


• Para taladrar en madera, metal y plástico, ajuste el


anillo en la posición del símbolo de taladrado .


• Para atornillar, ajuste el anillo en la configuración


deseada. Si aún no conoce la configuración de ajuste


adecuada, proceda como sigue:


• Ajuste el anillo en la configuración de torsión más baja.


• Ajuste el primer tornillo.


• Si el portabrocas avanza antes de lograr el resultado

F


deseado, aumente la configuración del anillo y siga


ajustando el tornillo. Repita el proceso hasta que logre


la configuración deseada. Utilice esta configuración


para los tornillos restantes.


Portabrocas sin llave (Figura F)


ADVERTENCIA: Asegúrese de que el botón de


bloqueo esté accionado para evitar que se accione el


interruptor antes de instalar o retirar accesorios.

4a

4


Para insertar una broca u otro accesorio:

31

Page 31
Image 31
Black & Decker LDX112CR Interruptor Disparador Y Botón DE Inversión Figura D, Ajuste del control de torsión Figura E

LDX112CR, LDX112C, LDX112C-2R specifications

Black & Decker has long been synonymous with quality and reliability in the power tool market, and the LDX112C, LDX112C-2R, and LDX112CR models are no exception. These cordless drills are designed for both DIY enthusiasts and professionals, providing exceptional performance and versatility for a variety of tasks.

One of the standout features of these models is their 20V Lithium-Ion battery, which provides ample power for extended use while maintaining a lightweight design. The battery ensures longer run times and faster charging, allowing users to complete projects without frequent interruptions. The LDX112C-2R and LDX112CR come with two batteries, making it easy to switch out for continuous operation.

The LDX112C and its variants boast a compact and ergonomic design, making them comfortable to hold and easy to maneuver in tight spaces. This design factor greatly reduces user fatigue, especially during prolonged use. Weighing in at just a few pounds, these drills are light enough for overhead work, making them excellent for various applications, whether it's drilling holes in drywall or assembling furniture.

Equipped with an adjustable clutch, the LDX112C series allows users to control the torque settings for specific tasks, preventing overdriving screws or damaging materials. The 11-position clutch provides the versatility that novice and seasoned users alike can appreciate. Additionally, these drills feature a two-speed transmission that allows for variable speeds, providing improved control for different drilling and fastening applications.

Another notable aspect is the integrated LED work light, which illuminates dark work areas, enabling users to work more effectively in low-light conditions. The 3/8-inch keyless chuck ensures that bit changes are quick and hassle-free, allowing for smooth transitions between different attachments without the need for additional tools.

In terms of technology, the LDX112C series leverages advanced lithium-ion technology, which not only enhances battery life but also supports consistent power throughout the charge cycle. This means users can expect reliable performance from start to finish.

In conclusion, the Black & Decker LDX112C, LDX112C-2R, and LDX112CR drills represent an excellent investment for anyone seeking a dependable cordless drilling solution. With their robust features, user-friendly design, and impressive battery life, these tools can tackle a variety of projects with ease, establishing them as essential additions to any toolkit. Whether you're drilling, fastening, or working on home improvement projects, these drills deliver the power and versatility needed to get the job done efficiently.