Manuals
/
Black & Decker
/
Lawn and Garden
/
Trimmer
Black & Decker
LHT2436B operation, Trimming Instructions, Installing / Removing Battery Pack
Models:
LHT2436B
LHT2436R
LHT2436
1
8
44
44
Download
44 pages
48.31 Kb
5
6
7
8
9
10
11
12
Troubleshooting
Install
Maintenance
dEteccion de problemas
Accessories
Battery tool use and care
Charging Procedure
Safety
Solution possible
Page 8
Image 8
Page 7
Page 9
Page 8
Image 8
Page 7
Page 9
Contents
Please read before returning this product for any reason
Model Number LHT2436
SAFETY GUIDELINES - DEFINITIONS
Table of Contents
general power tool safety warnings
Save these instructions
5 Battery tool use and care
hedge trimmer safety warnings
components
remove cut material or hold material to be cut when blades
Check the hedge for foreign objects, e.g. wire fences
important safety instructions for battery chargers
Read all Instructions
Important safety warnings for battery packs
SAVE THESE INSTRUCTIONS
Charging Procedure
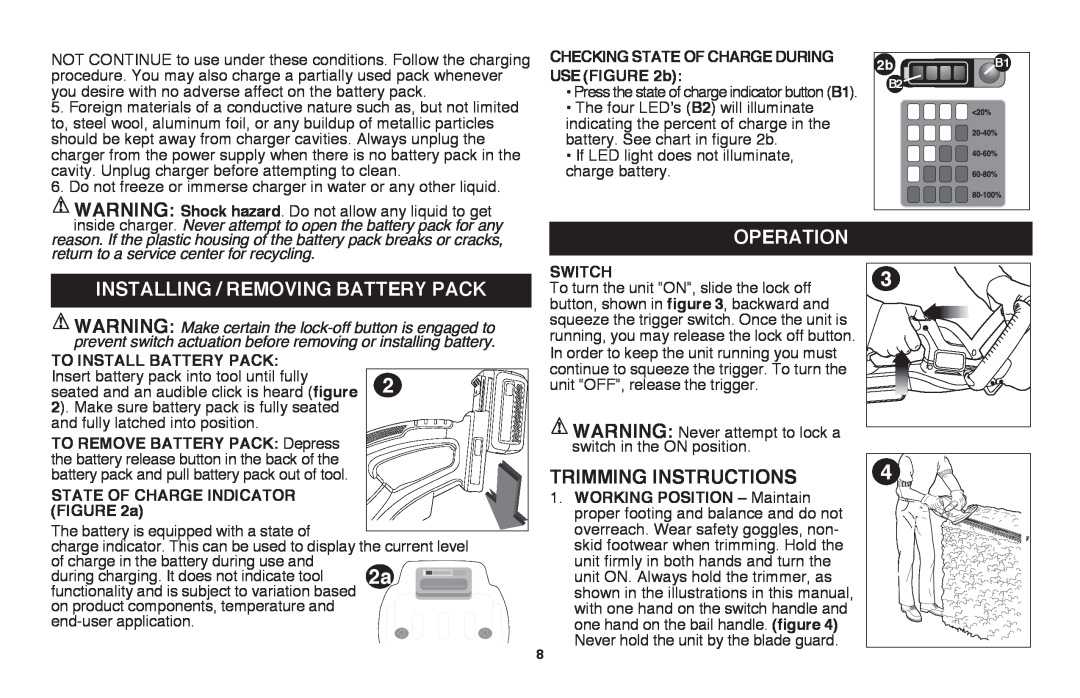
TRIMMING INSTRUCTIONS
Installing / Removing Battery Pack
operation
Maintenance
The cutting blades are made from high quality, hardened steel and
ACCESSORIES
Service Information
Full Three-Year Home Use Warranty
The RBRC Seal
Troubleshooting
Problem
Possible Solution
Possible Cause
MODE D’EMPLOI
Merci d’avoir choisi Black & Decker Consulter le site Web www
Numéro de catalogue LHT2436
Conserver ce manuel pour un usage ultérieur
TABLE DES MATIÈRES
lignes directrices en matière de sécurité - définitions
directives pour un usage ultérieur
AVERTISSEMENTS DE SÉCURITÉ généraux pour les outils électriques
Conserver tous les avertissements et toutes les
Avertissements de sécurité pour le taille-haie
Directives de sÉcuritÉ importantes pour les chargeurs de piles
COMPOSANTES
Lire toutes les directives
conserver ces mesures
Directives de sÉcuritÉ importantes pour les blocs-piles
Pile en mauvais état
Procédure de charge
Fonctions de diagnostic du chargeur
Insertion et retrait du bloc-piles de l’outil
Installation du bloc-piles
Pile laissée dans le chargeur
Remarques importantes pour le chargement
2bB1
MISE EN GARDE Ne pas se
Fonctionnement
ENTRETIEN
MISE EN GARDE LA LAME CONTINUE
AVERTISSEMENT
Le sceau SRPRCMC
ACCESSOIRES
Information sur les réparations
Garantie complète de trois ans pour une utilisation domestique
dEpannage
Solution possible
Problème
Cause possible
CORTASETOS CON BATERÍA DE IONES DE LITIO DE
MANUAL DE INSTRUCCIONES
para registrar su nuevo producto
LEA EL MANUAL antes de devolver este producto por cualquier motivo
Advertencias generales de seguridad para herramientas eléctricas
PAUTAS DE SEGURIDAD/DEFINICIONES
ÍNDICE
2 Seguridad eléctrica
Advertencias de seguridad para cortasetos
INSTRUCCIONES DE SEGURIDAD IMPORTANTES PARA CARGADORES DE BATERÍAS
COMPONENTES
Lea todas las instrucciones
CONSERVE ESTAS INSTRUCCIONES
Instrucciones de seguridad importantes para los paquetes de baterías
Batería en mal estado
l Procedimiento de carga
Diagnóstico del cargador
Instalación y extracción del paquete de baterías de la herramienta
Instrucciones de operación
Verificación del estado de carga durante el uso FIGURA 2b
INTERRUPTOR
INSTRUCCIONES DE PODADO
mantenimiento
Accesorios
El sello RBRC
Información de mantenimiento
Garantía completa de TRES años para uso en el hogar
dEteccion de problemas
Problema
Causa posible
Solución posible
ESTA GARANTIA NO APLICA CUANDO
· GARANTÍA BLACK & DECKER · BLACK & DECKER WARRANTY
SOLAMENTE PARA PROPOSITOS DE MEXICO
Súper Manzana 69 MZ.01 Lote 30 Av. Torcasita Col. Puerto Juárez
Cat No. LHT2436
Form No
JUNE
Copyright 2012 Black & Decker
Top
Page
Image
Contents