| | | | | | | | |
| | G | 7 | | | SAFETY GUIDELINES - DEFINITIONS | | |
| | | | It is important for you to read and understand this manual. The information it contains relates to protecting YOUR SAFETY and PREVENTING |
| | | | | | PROBLEMS. The symbols below are used to help you recognize this information. |
| | | | | | DANGER: Indicates an imminently hazardous situation which, if not avoided, will result in death or serious injury. |
| | | | | | WARNING: Indicates a potentially hazardous situation which, if not avoided, could result in death or serious injury. |
| | | | | | CAUTION: Indicates a potentially hazardous situation which, if not avoided, may result in minor or moderate injury. |
| | | | | | NOTICE: Used without the safety alert symbol indicates potentially hazardous situation which, if not avoided, may result in property damage. |
| | | | | | | SAVE THESE INSTRUCTIONS - Read all Instructions |
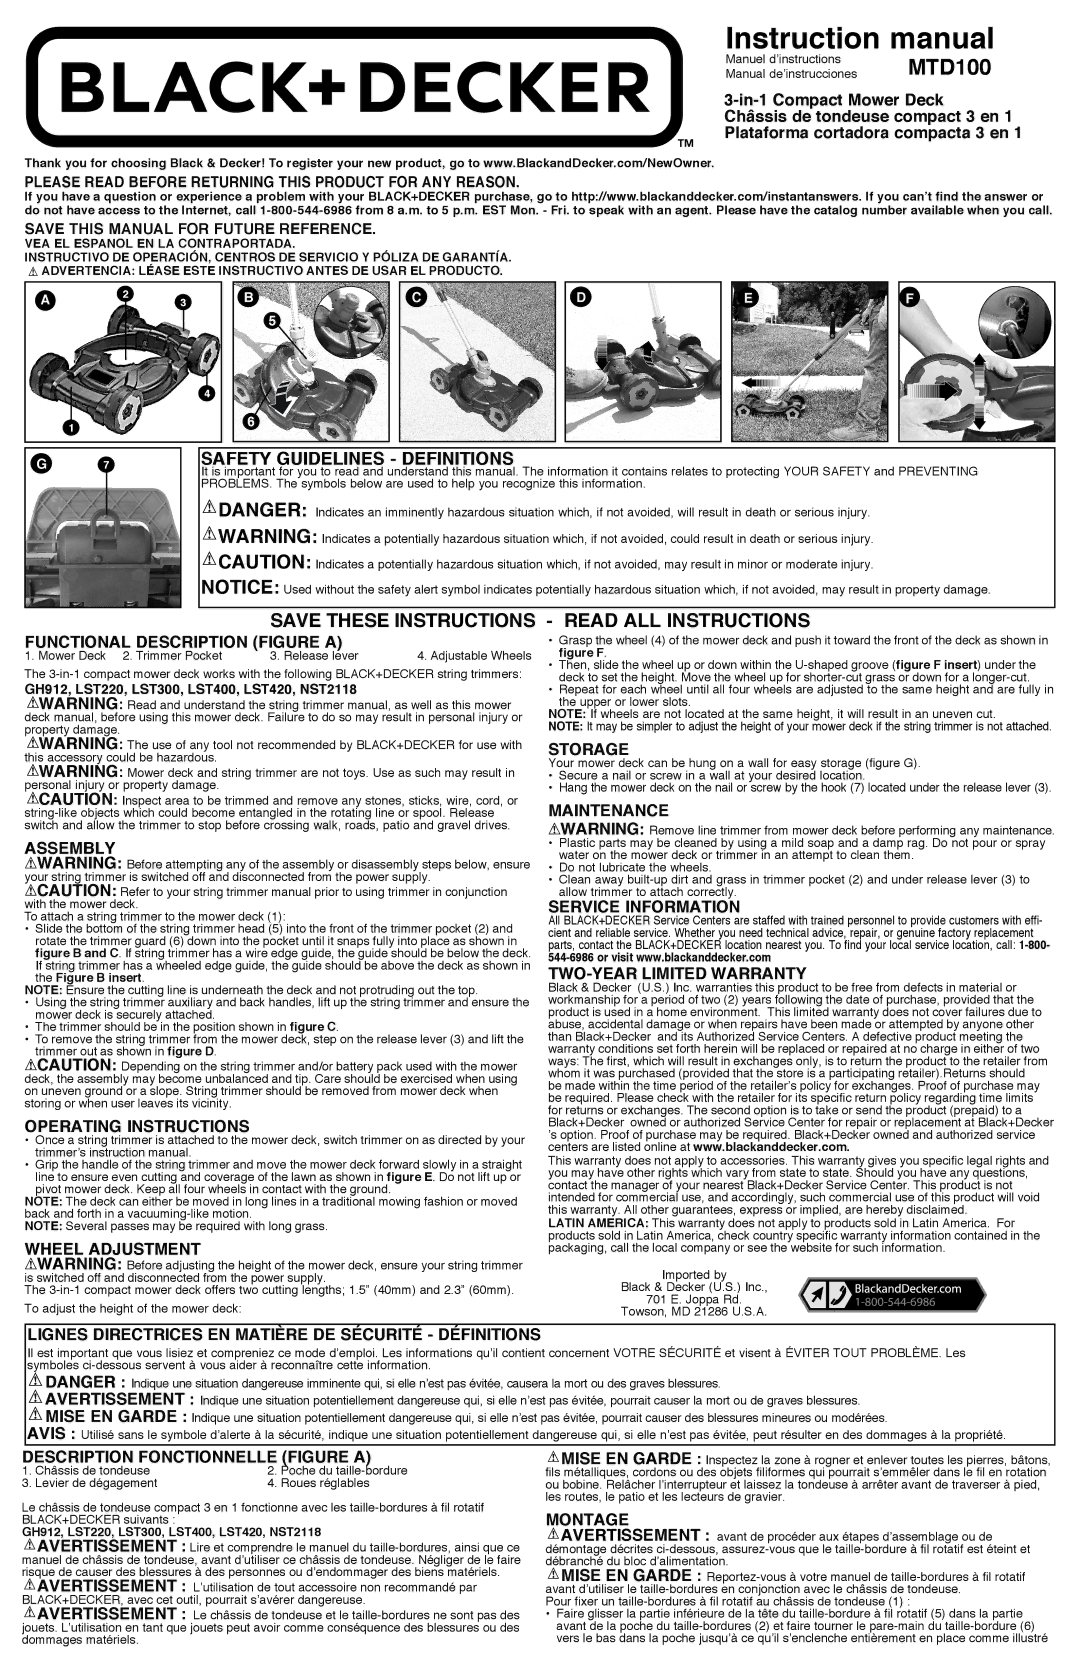
| FUNCTIONAL DESCRIPTION (figure A) | 4. Adjustable Wheels | • Grasp the wheel (4) of the mower deck and push it toward the front of the deck as shown in |
| 1. Mower Deck | 2. Trimmer Pocket | 3. Release lever | • | figure F. |
| The 3-in-1 compact mower deck works with the following BLACK+DECKER string trimmers: | Then, slide the wheel up or down within the U-shaped groove (figure F insert) under the |
| • | deck to set the height. Move the wheel up for shorter-cut grass or down for a longer-cut. |
| GH912, LST220, LST300, LST400, LST420, NST2118 | | Repeat for each wheel until all four wheels are adjusted to the same height and are fully in |
| | WARNING: Read and understand the string trimmer manual, as well as this mower | | the upper or lower slots. |
| deck manual, before using this mower deck. Failure to do so may result in personal injury or | NOTE: If wheels are not located at the same height, it will result in an uneven cut. |
| property damage. | | | | | | NOTE: It may be simpler to adjust the height of your mower deck if the string trimmer is not attached. |
| | WARNING: The use of any tool not recommended by BLACK+DECKER for use with | Storage |
| this accessory could be hazardous. | | | Your mower deck can be hung on a wall for easy storage (figure G). |
| | WARNING: Mower deck and string trimmer are not toys. Use as such may result in | • | Secure a nail or screw in a wall at your desired location. |
| personal injury or property damage. | | | • | Hang the mower deck on the nail or screw by the hook (7) located under the release lever (3). |
| | CAUTION: | Inspect area to be trimmed and remove any stones, sticks, wire, cord, or | Maintenance |
| string-like objects which could become entangled in the rotating line or spool. Release |
| switch and allow the trimmer to stop before crossing walk, roads, patio and gravel drives. | | WARNING: Remove line trimmer from mower deck before performing any maintenance. |
| ASSEMBLY | | | | | | • Plastic parts may be cleaned by using a mild soap and a damp rag. Do not pour or spray |
| | | | | | • | water on the mower deck or trimmer in an attempt to clean them. |
| | WARNING: Before attempting any of the assembly or disassembly steps below, ensure | Do not lubricate the wheels. |
| your string trimmer is switched off and disconnected from the power supply. | • | Clean away built-up dirt and grass in trimmer pocket (2) and under release lever (3) to |
| | CAUTION: Refer to your string trimmer manual prior to using trimmer in conjunction | | allow trimmer to attach correctly. |
| with the mower deck. | | | Service Information |
| To attach a string trimmer to the mower deck (1): | | All BLACK+DECKER Service Centers are staffed with trained personnel to provide customers with effi- |
| • | Slide the bottom of the string trimmer head (5) into the front of the trimmer pocket (2) and | cient and reliable service. Whether you need technical advice, repair, or genuine factory replacement |
| | rotate the trimmer guard (6) down into the pocket until it snaps fully into place as shown in | parts, contact the BLACK+DECKER location nearest you. To find your local service location, call: 1-800- |
| | figure B and C. If string trimmer has a wire edge guide, the guide should be below the deck. | 544-6986 or visit www.blackanddecker.com |
| | If string trimmer has a wheeled edge guide, the guide should be above the deck as shown in | Two-YEAR LIMITED Warranty |
| | the Figure B insert. | | |
| NOTE: Ensure the cutting line is underneath the deck and not protruding out the top. | Black & Decker (U.S.) Inc. warranties this product to be free from defects in material or |
| • | Using the string trimmer auxiliary and back handles, lift up the string trimmer and ensure the | workmanship for a period of two (2) years following the date of purchase, provided that the |
| | mower deck is securely attached. | | | product is used in a home environment. This limited warranty does not cover failures due to |
| • The trimmer should be in the position shown in figure C. | | abuse, accidental damage or when repairs have been made or attempted by anyone other |
| • | To remove the string trimmer from the mower deck, step on the release lever (3) and lift the | than Black+Decker and its Authorized Service Centers. A defective product meeting the |
| | trimmer out as shown in figure D. | | | warranty conditions set forth herein will be replaced or repaired at no charge in either of two |
| | CAUTION: Depending on the string trimmer and/or battery pack used with the mower | ways: The first, which will result in exchanges only, is to return the product to the retailer from |
| deck, the assembly may become unbalanced and tip. Care should be exercised when using | whom it was purchased (provided that the store is a participating retailer).Returns should |
| be made within the time period of the retailer’s policy for exchanges. Proof of purchase may |
| on uneven ground or a slope. String trimmer should be removed from mower deck when |
| be required. Please check with the retailer for its specific return policy regarding time limits |
| storing or when user leaves its vicinity. | | |
| | | for returns or exchanges. The second option is to take or send the product (prepaid) to a |
| OPERATING INSTRUCTIONS | | | Black+Decker owned or authorized Service Center for repair or replacement at Black+Decker |
| • | Once a string trimmer is attached to the mower deck, switch trimmer on as directed by your | ’s option. Proof of purchase may be required. Black+Decker owned and authorized service |
| centers are listed online at www.blackanddecker.com. |
| | trimmer’s instruction manual. | | |
| • | | | This warranty does not apply to accessories. This warranty gives you specific legal rights and |
| Grip the handle of the string trimmer and move the mower deck forward slowly in a straight |
| | line to ensure even cutting and coverage of the lawn as shown in figure E. Do not lift up or | you may have other rights which vary from state to state. Should you have any questions, |
| | pivot mower deck. Keep all four wheels in contact with the ground. | | contact the manager of your nearest Black+Decker Service Center. This product is not |
| NOTE: The deck can either be moved in long lines in a traditional mowing fashion or moved | intended for commercial use, and accordingly, such commercial use of this product will void |
| back and forth in a vacuuming-like motion. | | | this warranty. All other guarantees, express or implied, are hereby disclaimed. |
| NOTE: Several passes may be required with long grass. | | LATIN AMERICA: This warranty does not apply to products sold in Latin America. For |
| wheel Adjustment | | | products sold in Latin America, check country specific warranty information contained in the |
| | | packaging, call the local company or see the website for such information. |
| | WARNING: Before adjusting the height of the mower deck, ensure your string trimmer | | Imported by |
| is switched off and disconnected from the power supply. | | |
| The 3-in-1 compact mower deck offers two cutting lengths; 1.5” (40mm) and 2.3” (60mm). | | Black & Decker (U.S.) Inc., |
| To adjust the height of the mower deck: | | | | 701 E. Joppa Rd. |
| | | | Towson, MD 21286 U.S.A. |