Pivoting the Trimmer Head |
|
The trimmer head pivots 180 degrees and can be locked into 5 | |
different positions within that range. To avoid being pinched, wear | |
gloves and hold unit as shown below. | |
Before connecting the battery to the unit, be sure the trimmer head is | |
locked into position. |
|
Topivot the trimmer head: | 11 |
1. Press in on the locking latch (7) |
|
and raise the trimmer head as |
|
shown in figure 11. |
|
2. Lock the trimmer head into any of | |
the 5 positions. Check to make |
|
sure that the trimmer head is |
|
locked into position by trying to |
|
move the motor housing. If it is not | |
locked, rotate it to the closest lock | |
positio . |
|
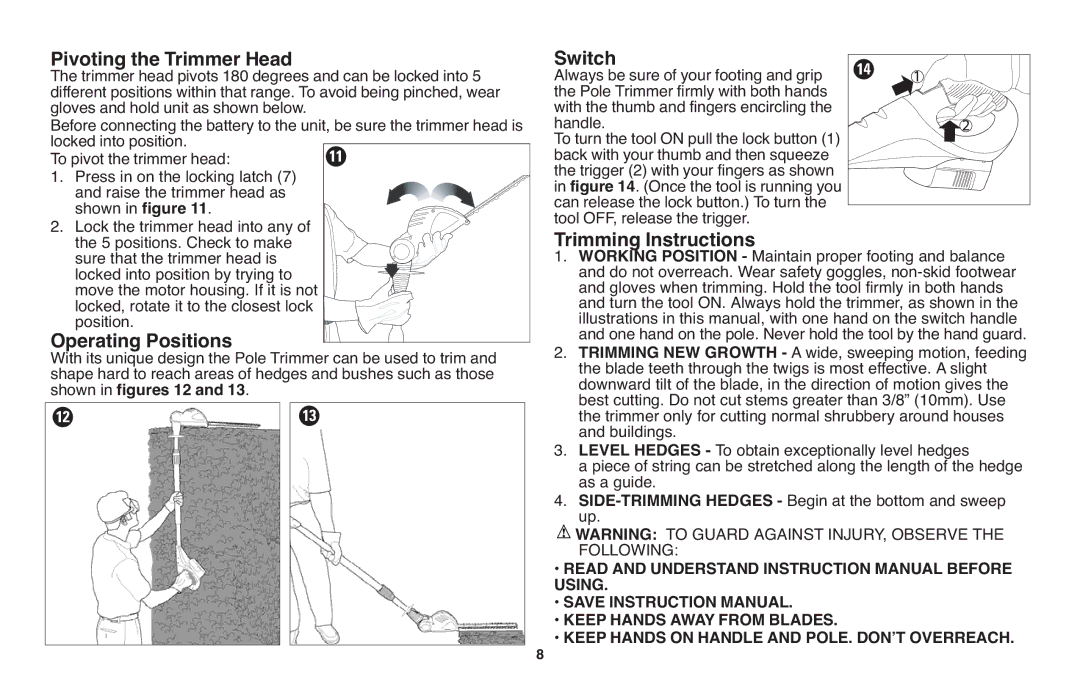
Operating Positions |
|
With its unique design the Pole Trimmer can be used to trim and | |
shape hard to reach areas of hedges and bushes such as those | |
shown in figures 12 and 13. | 13 |
12 | |
Switch | 14 |
Always be sure of your footing and grip |
|
the Pole Trimmer firmly with both hands |
|
with the thumb and fingers encircling the |
|
handle. |
|
Toturn the tool ON pull the lock button (1) |
|
back with your thumb and then squeeze |
|
the trigger (2) with your fingers as shown |
|
in figure 14. (Once the tool is running you |
|
can release the lock button.) Toturn the |
|
tool OFF,release the trigger. |
|
Trimming Instructions |
|
1. WORKING POSITION - Maintain proper footing and balance | |
and do not overreach. Wear safety goggles, | |
and gloves when trimming. Hold the tool firmly in both hands | |
and turn the tool ON. Always hold the trimmer, as shown in the | |
illustrations in this manual, with one hand on the switch handle | |
and one hand on the pole. Never hold the tool by the hand guard. | |
2. TRIMMING NEW GROWTH - A wide, sweeping motion, feeding | |
the blade teeth through the twigs is most effective. A slight | |
downward tilt of the blade, in the direction of motion gives the | |
best cutting. Do not cut stems greater than 3/8” (10mm). Use | |
the trimmer only for cutting normal shrubbery around houses | |
and buildings. |
|
3. LEVEL HEDGES - To obtain exceptionally level hedges | |
a piece of string can be stretched along the length of the hedge | |
as a guide. |
|
4. | |
up. |
|
WARNING: TO GUARD AGAINST INJURY, OBSERVE THE | |
FOLLOWING: |
|
• READ AND UNDERSTANDINSTRUCTION MANUAL BEFORE | |
USING. |
|
• SAVE INSTRUCTION MANUAL. |
|
• KEEP HANDS AWAY FROM BLADES. |
|
8 • KEEP HANDS ON HANDLE AND POLE. DONʼT OVERREACH. | |