Before First Use and Tips
•The battery is not fully charged when packed in the carton. Charge the battery for at least 16 hours before first use. See “Charging the Battery”.
Charging the Battery: (Fig. B)
When disconnecting the Scrubber from the charger, be sure to unplug the charger from the outlet first, then disconnect the charger cord from the Scrubber. The tool can be left on charge for as long as you desire, a minimum charge of 16 hours is required to recharge a completely discharged tool.
1.Remove the Charging Port Plug (9) on the end of the handle. Plug in the Output Cord
(10)of the Battery Charger (5) into the socket in the back of the Scrubber.
2.Plug the Battery Charger into a wall plug. The red indicator light on the Battery Charger will come ON indicating that the battery is charging. This light will remain Red as long as the unit is connected to the charger. While charging, the Battery Charger may hum and feel warm to touch. This is normal.
3.If battery does not charge properly:
•check the current at the outlet by plugging in a lamp or other appliance there to see if it will work,
•see if the outlet is connected to a wall switch which controls the power,
•move the Battery Charger and battery to a surrounding air temperature of +40°F (5°C) to 105°F (40°C).
4.After charging replace the Charging Port Plug (9).
5.DO NOT CONTINUE TO USE THE Scrubber with a depleted battery.
The user should never attempt to remove the Scrubber Handle Cap except to recycle the Battery. The removal of the Scrubber Handle Cap will affect the operation of the unit.
INSTALLATION INSTRUCTIONS
Accessories: (Fig. C)
 WARNING: Do not install/remove accessory or extension handle while unit is running. To turn ON/ OFF the Scrubber push on and release Switch Button (9).
NOTE: Some accessories may not be included in your model. Refer to product packaging for contents. Additional accessories are available at local retailers or by calling, toll-free
1-800-544-6986.
Attaching Roller Brush (4) or Pad Holder (5) Accessories: (Fig. C)
Insert the Accessory (4 or 5) over the Scrubber Gearbox (10). While slightly pushing, rotate the Accessory (4 or 5) either direction until it engages with the Scrubber Gearbox (10). You will hear a “click” sound when the Accessory (4 or 5) will be fully engaged with the Scrubber Gearbox (10). To remove, pull the Accessory (4 or 5) off the Scrubber Gearbox (10).
Attaching Scrubber Pad (6): (Fig. A)
Attach Scrubber Pad (6) to the Pad Holder (5) by fixing one of the Scrubber Pad face to the Pad Holder Hook-and-Loop surface.
Attaching Scrubber to Extension Handle: (Fig. D & Fig. E)
To install the Scrubber (1) to the Extension Handle (2), insert the Scrubber
Handle into the Extension Handle Clamp (11) until you hear a “click” sound. To remove the Scrubber (1) from the Extension Handle (2) push down on the Extension Handle Lever (12) and at the same time pull the Scrubber (1) out of the Extension Handle Clamp (11).
OPERATING INSTRUCTIONS
How to Operate the Scrubber: (Fig. C)
To turn ON/ OFF the Scrubber push on and release Switch Button (9).
Always firmly hold the Scrubber by the handle when operating the unit.
IMPORTANT: The Scrubber has been designed for easy, powerful cleaning. If you are uncertain about its use on a surface, test an attachment on a small inconspicuous area before cleaning larger areas.
•Always follow manufacturer’s recommendations when using a chemical cleaner such as sprays, foams, rub-on gels, liquid detergents, or bleach solutions.
•Do not use with abrasive cleaners on any surface or in the unit.
•Always wear rubber gloves and protective eye wear (to avoid splatter) when using irritating cleaners.
To avoid splatter from a Brush or Pad, turn the Scrubber OFF while the attachment is still in contact with the surface.
Important:
If some water leaks into the unit, it will not affect performance. However, should the unit accidentally fall into water without the Charging Port Plug in place, shake out loose liquid and allow to air dry overnight.
Extension Handle
 WARNING: Always firmly hold the Extension Handle with your two hands when using the Extension Handle. Never spray towards your face or in the direction of another person.
Using Extension Handle as a Rinsing Tool: (Fig. F)
With the Extension Handle fully collapsed; submerge the Nozzle in a pail or bathtub
filled with water. Hold the Extension Handle Tube (13) with one hand and at the same time pull on the Extension Handle Grip (14) with the other hand to draw water into the Extension Handle. To expel the water out of the Extension Handle, hold the Extension Handle Tube
(13)with one hand and at the same time push on the Extension Handle Grip (14) with the other hand.
Using Extension Handle to Spray Cleaning Chemical: (Fig. G)
You should always fill and empty the Extension Handle over a sink or bathtub in case of spillage. Clean exterior of the unit and flush the Extension Handle with clear water before filling with a different cleaning solution. DO NOT MIX Cleaning Solutions. Read and follow manufacturer’s instructions on the cleaning product you use.
Cleaning and Storage
NOTE! For best performance, empty and thoroughly rinse the Extension Handle before storing. Do this by filling the Extension Handle with water and emptying as normal 1 or 2 times. Thoroughly clean the Brushes and/or Scrub Pads after each use.
1.Clean the Brushes and Scrub Pads in a mild detergent, rinse with water and air dry.
2.To clean the Scrubber and Extension Handle, wipe with a damp sponge and a mild soap.
3.Store the Scrubber and attachments/accessories indoors.
Cleaning the Extension Handle Nozzle: (Fig. I)
•Remove the Extension Handle Nozzle (20) by unscrewing it counter clockwise.
•Keep the valve (19) aside for its re-installation later on.
•Soak the Extension Handle Nozzle (20) in a mixture of 1 part vinegar with 3 parts water for 1/2 hour. Make sure the Extension Handle Nozzle holes are clear of deposits. If not, carefully clear the holes using a fine needle.
•Replace the Valve (19) into the hole in the end of the Extension Handle Clamp (11) with the male side of the Valve (19) facing the interior of the Extension Handle Clamp (11). Screw the Nozzle (20) in place and hand tighten.
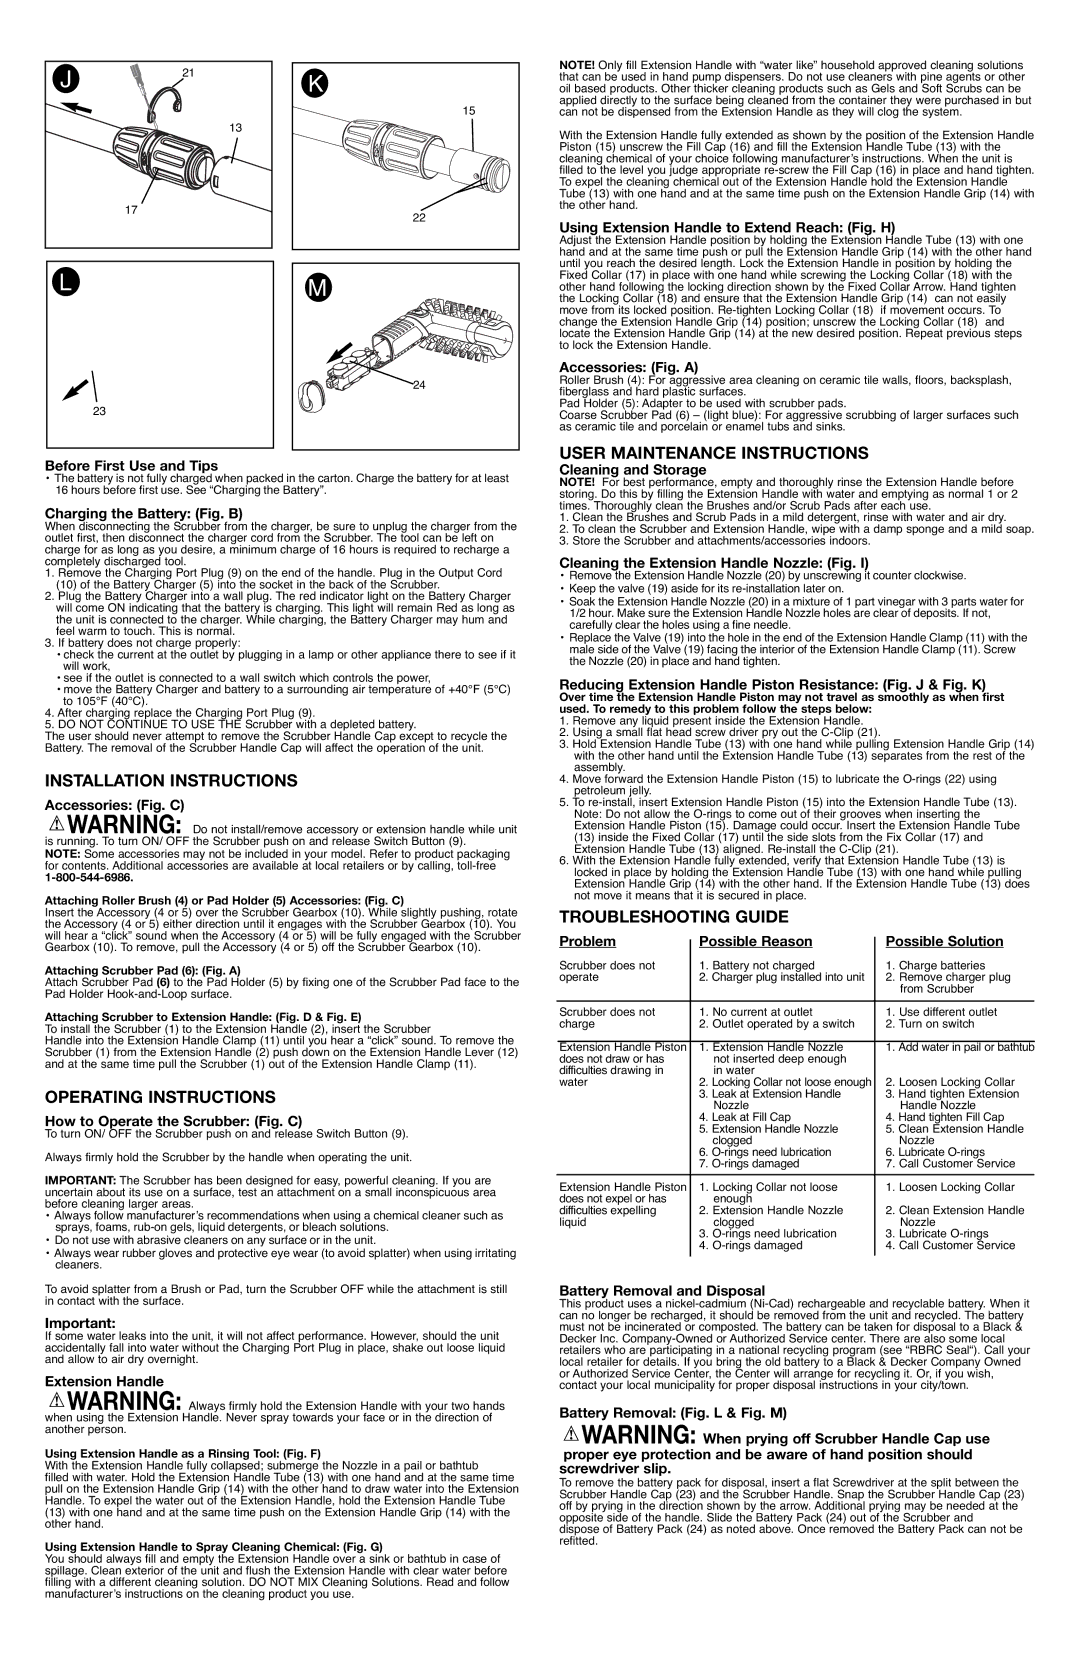
Reducing Extension Handle Piston Resistance: (Fig. J & Fig. K)
Over time the Extension Handle Piston may not travel as smoothly as when first used. To remedy to this problem follow the steps below:
1.Remove any liquid present inside the Extension Handle.
2.Using a small flat head screw driver pry out the C-Clip (21).
3.Hold Extension Handle Tube (13) with one hand while pulling Extension Handle Grip (14) with the other hand until the Extension Handle Tube (13) separates from the rest of the assembly.
4.Move forward the Extension Handle Piston (15) to lubricate the O-rings (22) using petroleum jelly.
5.To re-install, insert Extension Handle Piston (15) into the Extension Handle Tube (13). Note: Do not allow the O-rings to come out of their grooves when inserting the Extension Handle Piston (15). Damage could occur. Insert the Extension Handle Tube (13) inside the Fixed Collar (17) until the side slots from the Fix Collar (17) and Extension Handle Tube (13) aligned. Re-install the C-Clip (21).
6.With the Extension Handle fully extended, verify that Extension Handle Tube (13) is locked in place by holding the Extension Handle Tube (13) with one hand while pulling Extension Handle Grip (14) with the other hand. If the Extension Handle Tube (13) does not move it means that it is secured in place.
TROUBLESHOOTING GUIDE
Problem | Possible Reason | Possible Solution |
Scrubber does not | 1. | Battery not charged | 1. | Charge batteries |
operate | 2. | Charger plug installed into unit | 2. | Remove charger plug |
| | | | from Scrubber |
| | | | | |
Scrubber does not | 1. | No current at outlet | 1. | Use different outlet |
charge | 2. | Outlet operated by a switch | 2. Turn on switch |
| | | | | |
Extension Handle Piston | 1. | Extension Handle Nozzle | 1. | Add water in pail or bathtub |
does not draw or has | | not inserted deep enough | | | |
difficulties drawing in | | in water | | | |
water | 2. Locking Collar not loose enough | 2. | Loosen Locking Collar |
| 3. | Leak at Extension Handle | 3. | Hand tighten Extension |
| | Nozzle | | Handle Nozzle |
| 4. | Leak at Fill Cap | 4. | Hand tighten Fill Cap |
| 5. | Extension Handle Nozzle | 5. | Clean Extension Handle |
| | clogged | | Nozzle |
| 6. | O-rings need lubrication | 6. | Lubricate O-rings |
| 7. | O-rings damaged | 7. | Call Customer Service |
| | | | | |
Extension Handle Piston | 1. | Locking Collar not loose | 1. | Loosen Locking Collar |
does not expel or has | | enough | | | |
difficulties expelling | 2. | Extension Handle Nozzle | 2. | Clean Extension Handle |
liquid | | clogged | | Nozzle |
| 3. | O-rings need lubrication | 3. | Lubricate O-rings |
| 4. | O-rings damaged | 4. | Call Customer Service |
Battery Removal and Disposal
This product uses a nickel-cadmium (Ni-Cad) rechargeable and recyclable battery. When it can no longer be recharged, it should be removed from the unit and recycled. The battery must not be incinerated or composted. The battery can be taken for disposal to a Black & Decker Inc. Company-Owned or Authorized Service center. There are also some local retailers who are participating in a national recycling program (see “RBRC Seal“). Call your local retailer for details. If you bring the old battery to a Black & Decker Company Owned or Authorized Service Center, the Center will arrange for recycling it. Or, if you wish, contact your local municipality for proper disposal instructions in your city/town.
Battery Removal: (Fig. L & Fig. M)
 WARNING: When prying off Scrubber Handle Cap use proper eye protection and be aware of hand position should screwdriver slip.
To remove the battery pack for disposal, insert a flat Screwdriver at the split between the Scrubber Handle Cap (23) and the Scrubber Handle. Snap the Scrubber Handle Cap (23) off by prying in the direction shown by the arrow. Additional prying may be needed at the opposite side of the handle. Slide the Battery Pack (24) out of the Scrubber and dispose of Battery Pack (24) as noted above. Once removed the Battery Pack can not be refitted.