90539493 TLD100 manual.qxd 9/8/08 7:42 AM Page 4

ASSEMBLY/SET-UP

Changing the Temperature Display and Installing the Battery

Note: The Thermal Leak Detector requires one 9V alkaline battery, not included.

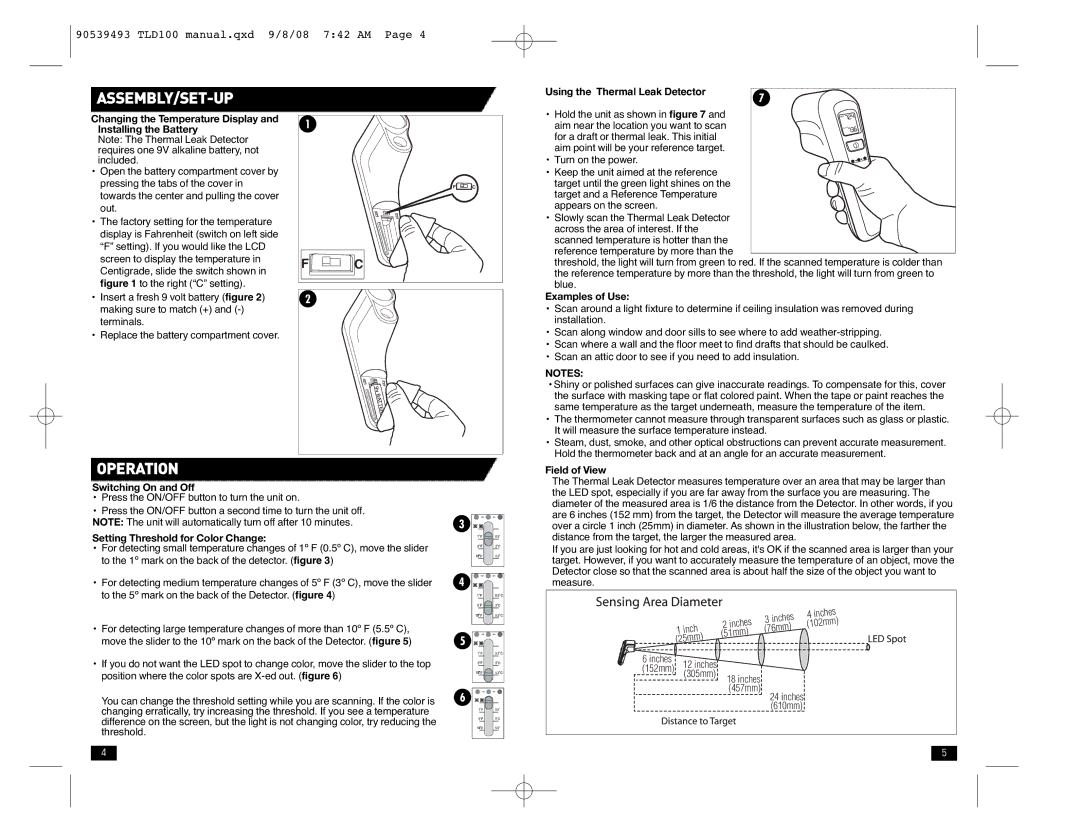
Open the battery compartment cover by pressing the tabs of the cover in towards the center and pulling the cover out.

The factory setting for the temperature display is Fahrenheit (switch on left side “F” setting). If you would like the LCD screen to display the temperature in Centigrade, slide the switch shown in figure 1 to the right (“C” setting).

Insert a fresh 9 volt battery (figure 2) making sure to match (+) and (-) terminals.

Replace the battery compartment cover.

1


F

C

F

C


2


Using the Thermal Leak Detector

7


• Hold the unit as shown in figure 7 and

REP

aim near the location you want to scan

SCAN

for a draft or thermal leak. This initial


aim point will be your reference target.


• Turn on the power.

• Keep the unit aimed at the reference target until the green light shines on the target and a Reference Temperature appears on the screen.

• Slowly scan the Thermal Leak Detector across the area of interest. If the scanned temperature is hotter than the reference temperature by more than the

threshold, the light will turn from green to red. If the scanned temperature is colder than the reference temperature by more than the threshold, the light will turn from green to blue.

Examples of Use:

Scan around a light fixture to determine if ceiling insulation was removed during installation.

Scan along window and door sills to see where to add weather-stripping.

Scan where a wall and the floor meet to find drafts that should be caulked.

Scan an attic door to see if you need to add insulation.

NOTES:

Shiny or polished surfaces can give inaccurate readings. To compensate for this, cover the surface with masking tape or flat colored paint. When the tape or paint reaches the same temperature as the target underneath, measure the temperature of the item.

The thermometer cannot measure through transparent surfaces such as glass or plastic. It will measure the surface temperature instead.

Steam, dust, smoke, and other optical obstructions can prevent accurate measurement. Hold the thermometer back and at an angle for an accurate measurement.

OPERATION

Switching On and Off

Press the ON/OFF button to turn the unit on.

Press the ON/OFF button a second time to turn the unit off.

NOTE: The unit will automatically turn off after 10 minutes.

3

Setting Threshold for Color Change:

For detecting small temperature changes of 1º F (0.5º C), move the slider to the 1º mark on the back of the detector. (figure 3)

For detecting medium temperature changes of 5º F (3º C), move the slider

4


to the 5º mark on the back of the Detector. (figure 4)


For detecting large temperature changes of more than 10º F (5.5º C),

5


move the slider to the 10º mark on the back of the Detector. (figure 5)

If you do not want the LED spot to change color, move the slider to the top position where the color spots are X-ed out. (figure 6)

You can change the threshold setting while you are scanning. If the color is

6

changing erratically, try increasing the threshold. If you see a temperature difference on the screen, but the light is not changing color, try reducing the threshold.

4

Field of View

The Thermal Leak Detector measures temperature over an area that may be larger than the LED spot, especially if you are far away from the surface you are measuring. The diameter of the measured area is 1/6 the distance from the Detector. In other words, if you are 6 inches (152 mm) from the target, the Detector will measure the average temperature over a circle 1 inch (25mm) in diameter. As shown in the illustration below, the farther the distance from the target, the larger the measured area.

If you are just looking for hot and cold areas, it's OK if the scanned area is larger than your target. However, if you want to accurately measure the temperature of an object, move the Detector close so that the scanned area is about half the size of the object you want to measure.


s


3 inches

4 inche


2 inches

mm)

1 inch

(76mm)

(102

(51mm)


(25mm)


6 inches

(152mm) 12 inches (305mm) 18 inches

(457mm)

24 inches (610mm)

5

Page 3
Image 3
Black & Decker TLD100 instruction manual Assembly/Set-Up, Operation, Using the Thermal Leak Detector

TLD100 specifications

The Black & Decker TLD100 is a versatile and reliable tool designed for various tasks around the home and job site. This laser level is specifically engineered to ensure precision and ease-of-use, making it an ideal choice for both DIY enthusiasts and professional contractors.

One of the standout features of the TLD100 is its self-leveling mechanism. This technology allows the tool to automatically adjust to uneven surfaces, providing accurate horizontal and vertical lines without the need for manual adjustments. Whether you are hanging shelves, installing tiles, or aligning cabinets, the self-leveling feature saves time and increases accuracy.

The TLD100 also boasts a range of laser visibility options. Its bright, clear laser beam can be seen up to 100 feet away, making it suitable for both indoor and outdoor projects. This visibility ensures that users can easily see the laser line, even in well-lit environments. Furthermore, the adjustable laser head allows for greater versatility in directing the laser line exactly where it is needed.

Durability is another significant characteristic of the Black & Decker TLD100. Constructed with a robust housing, this laser level is built to withstand the rigors of any job site. Its compact size and lightweight design make it easy to transport and operate, allowing users to carry it effortlessly from one project to another.

Another notable feature of the TLD100 is its magnetic base. This innovative design allows the laser level to attach securely to metal surfaces, providing hands-free operation while users complete their tasks. Additionally, it includes a tripod mount, enabling users to set up the tool at various heights and angles for added convenience.

In terms of power, the TLD100 is powered by a standard 9V battery, ensuring long-lasting performance. The battery compartment is easily accessible, allowing for quick and hassle-free replacement when needed.

Overall, the Black & Decker TLD100 is an excellent choice for those seeking a reliable, accurate, and easy-to-use laser level. With its self-leveling feature, impressive range, durable construction, and practical design, it is poised to meet the demands of various applications. Whether you are a seasoned professional or a casual DIYer, the TLD100 is a tool that promises to enhance your accuracy and efficiency on any project.