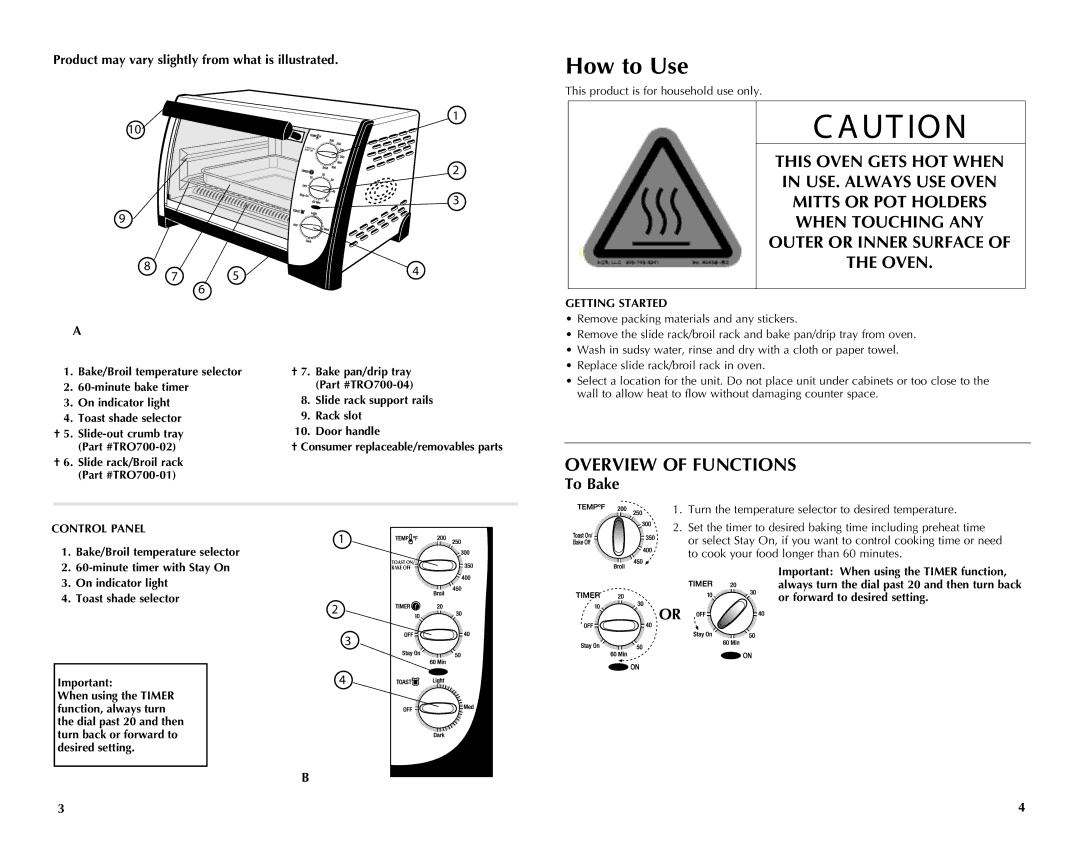
Product may vary slightly from what is illustrated.
![]() 1 10
1 10![]()
![]()
![]()
TOAST ON/
BAKE OFF![]()
2
![]()
![]()
![]()
![]()
![]()
![]()
![]()
![]()
![]() 3 9
3 9 ![]()
![]()
![]()
![]()
![]()
![]()
![]()
| 8 | 7 | 5 |
| 4 |
|
|
| |||
|
|
|
| ||
|
|
| 6 |
|
|
A |
|
|
|
| |
1. | Bake/Broil temperature selector | † 7. | Bake pan/drip tray | ||
2. |
|
| (Part | ||
3. | On indicator light |
|
| 8. | Slide rack support rails |
4. | Toast shade selector |
| 9. | Rack slot | |
† 5. |
| 10. | Door handle | ||
| (Part |
| † Consumer replaceable/removables parts | ||
†6. Slide rack/Broil rack (Part
How to Use
This product is for household use only.
$ "65*0/
THIS OVEN GETS HOT WHEN
THIUSEOVENALWAYSGET HOT. OVENWH
IN . USE
IN USE, ALWAYS USE OVEN
MITTS OR POT HOLDERS
MITTS OR POT HOLDERS
WHEN TOUCHING ANY
WHEN TOUCHING ANY OUTER
OUTER OR INNER SURFACE OF
OR INNER SURFACE OF THE
THE .
OOVEN
GETTING STARTED
•Remove packing materials and any stickers.
•Remove the slide rack/broil rack and bake pan/drip tray from oven.
•Wash in sudsy water, rinse and dry with a cloth or paper towel.
•Replace slide rack/broil rack in oven.
•Select a location for the unit. Do not place unit under cabinets or too close to the wall to allow heat to flow without damaging counter space.
OVERVIEW OF FUNCTIONS
To Bake
1. Turn the temperature selector to desired temperature.
CONTROL PANEL
1.Bake/Broil temperature selector
2.
3.On indicator light
4.Toast shade selector
Important:
When using the TIMER function, always turn the dial past 20 and then turn back or forward to desired setting.
B
3
1
2
3
4
TOAST ON/ |
BAKE OFF |
2. Set the timer to desired baking time including preheat time or select Stay On, if you want to control cooking time or need to cook your food longer than 60 minutes.
Important: When using the TIMER function, always turn the dial past 20 and then turn back or forward to desired setting.
OR
4
