-10- -8-

-6-


-4-


-2-


B

C


12:30


D

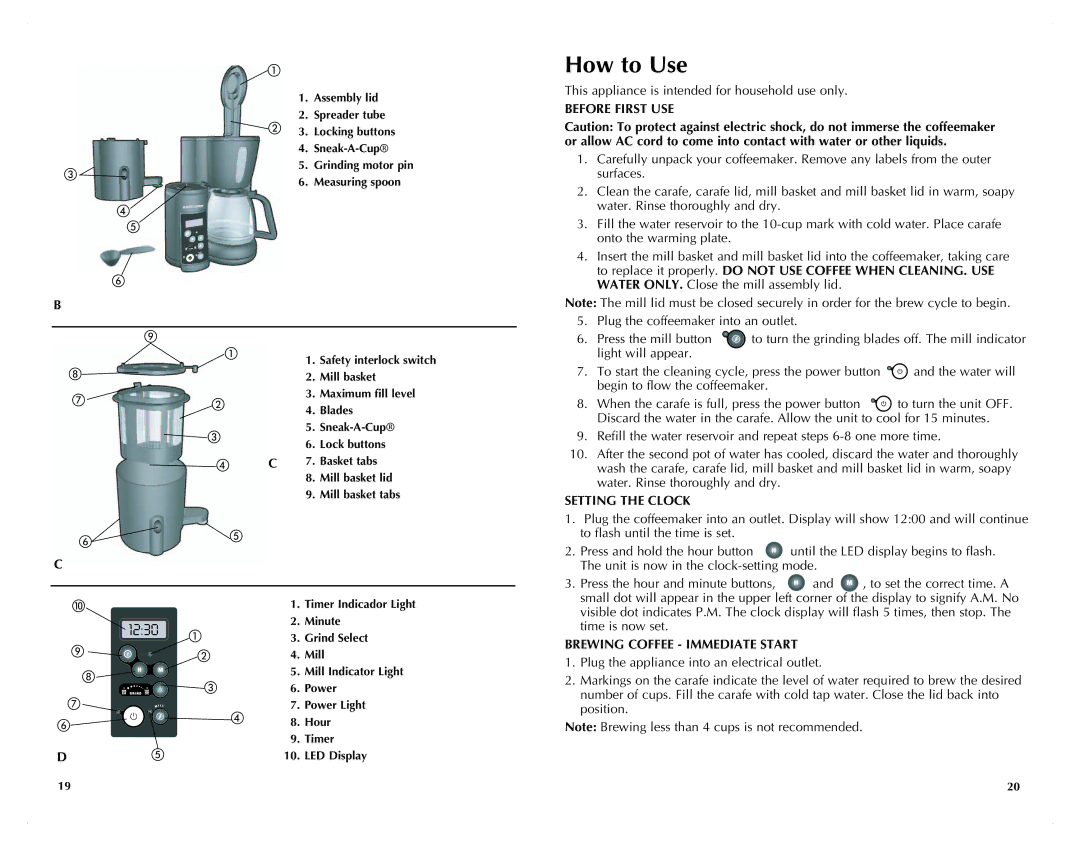
1.Assembly lid

2.Spreader tube

3. Locking buttons

4.Sneak-A-Cup®

5.Grinding motor pin

6.Measuring spoon

1.Safety interlock switch

2.Mill basket

3.Maximum fill level

4.Blades

5.Sneak-A-Cup®

6.Lock buttons

C7. Basket tabs

8.Mill basket lid

9.Mill basket tabs

1.Timer Indicador Light

2.Minute

3.Grind Select

4.Mill

5.Mill Indicator Light

6.Power

7.Power Light

8.Hour

9.Timer

10.LED Display

How to Use

This appliance is intended for household use only.

Before First Use

Caution: To protect against electric shock, do not immerse the coffeemaker or allow AC cord to come into contact with water or other liquids.

1.Carefully unpack your coffeemaker. Remove any labels from the outer surfaces.

2.Clean the carafe, carafe lid, mill basket and mill basket lid in warm, soapy water. Rinse thoroughly and dry.

3.Fill the water reservoir to the 10-cup mark with cold water. Place carafe onto the warming plate.

4.Insert the mill basket and mill basket lid into the coffeemaker, taking care to replace it properly. DO NOT USE COFFEE WHEN CLEANING. USE WATER ONLY. Close the mill assembly lid.

Note: The mill lid must be closed securely in order for the brew cycle to begin.

5.Plug the coffeemaker into an outlet.

6.Press the mill button to turn the grinding blades off. The mill indicator light will appear.

7.To start the cleaning cycle, press the power button and the water will begin to flow the coffeemaker.

8. When the carafe is full, press the power button to turn the unit OFF. Discard the water in the carafe. Allow the unit to cool for 15 minutes.

9.Refill the water reservoir and repeat steps 6-8 one more time.

10.After the second pot of water has cooled, discard the water and thoroughly wash the carafe, carafe lid, mill basket and mill basket lid in warm, soapy water. Rinse thoroughly and dry.

Setting the Clock

1.Plug the coffeemaker into an outlet. Display will show 12:00 and will continue to flash until the time is set.

2.

Press and hold the hour button


until the LED display begins to flash.


The unit is now in the clock-setting

mode.


3.

Press the hour and minute buttons,

and

, to set the correct time. A

small dot will appear in the upper left corner of the display to signify A.M. No visible dot indicates P.M. The clock display will flash 5 times, then stop. The time is now set.

Brewing Coffee - Immediate Start

1.Plug the appliance into an electrical outlet.

2.Markings on the carafe indicate the level of water required to brew the desired number of cups. Fill the carafe with cold tap water. Close the lid back into position.

Note: Brewing less than 4 cups is not recommended.

19

20

Page 11
Image 11
Black & Decker UCM200WG manual Before First Use, Setting the Clock, Brewing Coffee Immediate Start

UCM200WG specifications

The Black & Decker UCM200WG is an innovative outdoor tool that seamlessly combines power and efficiency for meticulous lawn care. Designed for homeowners seeking a reliable and user-friendly machine, this electric cordless lawn mower stands out with its robust features and cutting-edge technology.

One of the main attractions of the UCM200WG is its powerful 40V lithium-ion battery, providing ample runtime on a single charge. This battery not only offers the freedom of cordless operation but also translates into increased mobility, allowing users to navigate through their yards without being tethered to a power outlet. The battery's quick charge capability ensures minimal downtime, making it ideal for small to medium-sized lawns.

The mower is equipped with a 20-inch cutting deck, which strikes an optimal balance between width and maneuverability. This size allows for efficient cutting paths while also enabling access to tight corners and narrow spaces with ease. Additionally, the UCM200WG features a dual-blade system that enhances cutting performance, delivering a clean and precise cut for healthy grass growth.

One of the standout features of the UCM200WG is its adjustable cutting height settings, offering a range from 1 to 3 inches. This flexibility allows users to customize their mowing experience based on their preferences and lawn conditions. The mower also has a 13-gallon grass collection bag, facilitating easy disposal of clippings and reducing the frequency of emptying during use.

In terms of design, the ergonomic handle provides comfort during operation, significantly reducing user fatigue. The mower's lightweight construction, at just around 40 pounds, ensures easy maneuverability, making it suitable for users of all ages and abilities.

The UCM200WG also employs advanced technologies such as the Smart Cut technology, which automatically adjusts the power based on the density of grass. This ensures optimal cutting performance and improved battery efficiency. Additionally, the inclusion of the safety key prevents accidental start-ups, adding an extra layer of security while the mower is not in operation.

In conclusion, the Black & Decker UCM200WG is a versatile, efficient, and easy-to-use lawn mower that delivers impressive performance and convenience. With its powerful battery, adjustable height settings, and thoughtful design features, it meets the needs of modern homeowners looking to maintain a pristine lawn with minimal effort.